Insulated Dog House Ideas for Hot Summers and Cold Winters
Extreme heat, freezing winters, and sudden rainstorms can all be tough on a dog that spends time outdoors. That’s why finding the right insulated dog house ideas matters so much for pet owners who want their furry friend to stay safe and comfortable no matter the season. A good insulated dog house isn’t just a wooden box — it’s a small shelter built with the right materials, layout, and features to trap warmth in winter and keep heat out in summer.
In this article, we’re breaking down 9 real insulated dog house builds, from simple DIY wood cabins to fully climate-controlled luxury villas. Each idea shows a different way to insulate, whether that’s foam panels, layered wood walls, heavy vinyl door flaps, or built-in AC units. Whether you’re planning an insulated dog house diy project this weekend or just want inspiration for your next build, there’s an idea here for every budget and climate.
Let’s jump straight into the ideas.
1. Nordic Flat-Roof Insulated Dog House on Wheels
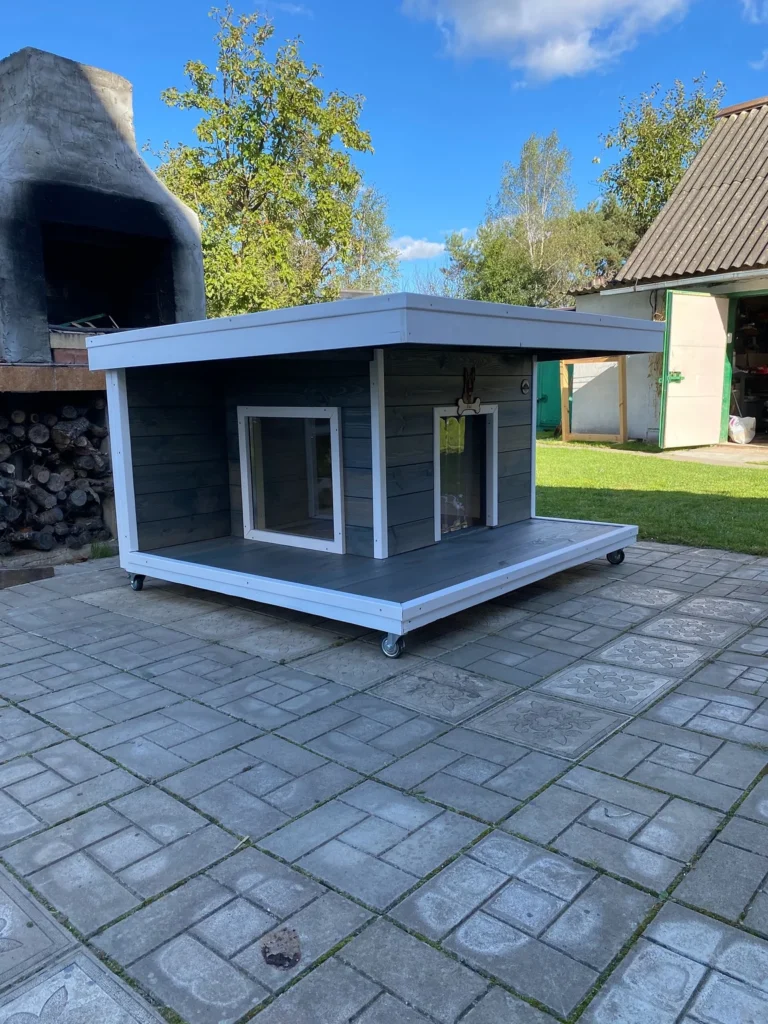
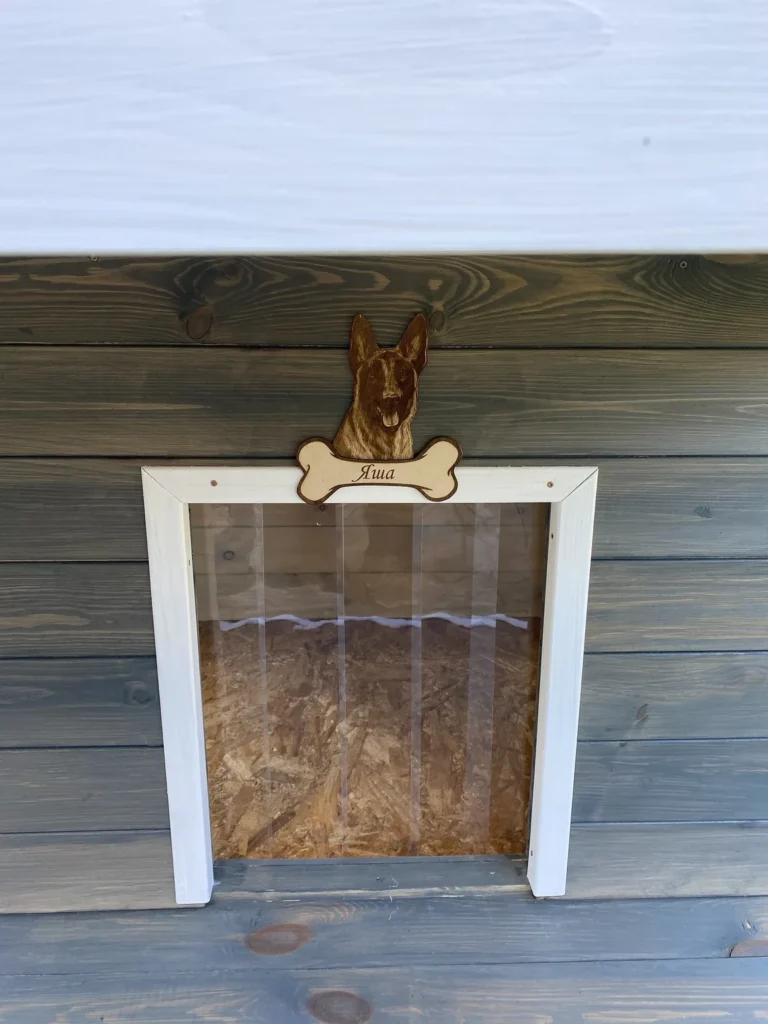
This gray-blue shiplap house takes design cues from modern Nordic cabins. It has a wide, overhanging flat roof that shields the walls and porch from rain and direct sun, which helps keep the internal temperature more stable throughout the day. The whole structure sits on caster wheels, so it can be rolled into shade in summer or tucked closer to the house in winter — a smart trick for climate control without adding extra insulation materials.
The covered porch area also acts as a buffer zone. Instead of stepping straight from the yard into the sleeping area, the dog has a semi-sheltered space first, which cuts down on wind and rain getting into the main insulated compartment. The wide roof overhang does double duty here, too — it keeps direct sunlight off the walls during the hottest part of the day, which lowers how much heat the insulation actually has to fight against in the first place.
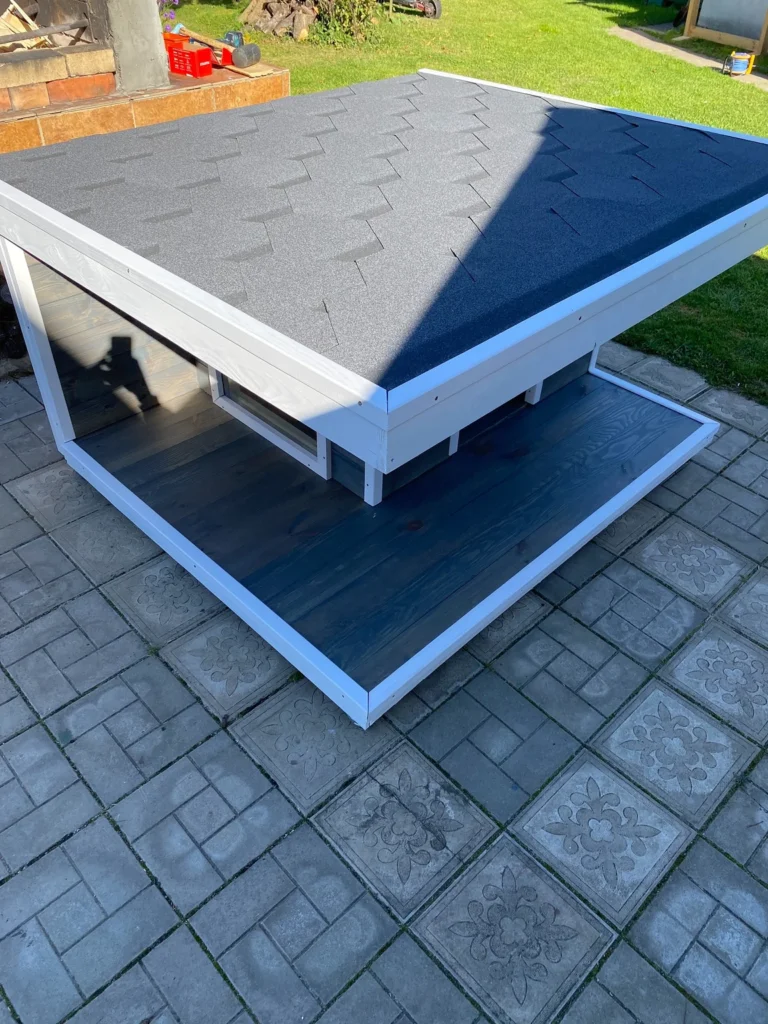
Another detail worth copying is the layered roofing. The mid-construction photos of this build show asphalt shingles being laid in overlapping rows, which is a much stronger moisture barrier than a single sheet of plywood or metal. That layering technique keeps rainwater from pooling and seeping down into the insulated ceiling cavity, something that’s easy to overlook on a first DIY build.
DIY tip: If you’re building something similar, use asphalt shingles (like the ones shown mid-installation on this build) instead of a bare plywood roof. Shingles add a water-resistant layer that protects the insulation underneath from getting damp over time. Adding caster wheels, even cheap locking ones from a hardware store, also makes seasonal repositioning far easier than trying to drag a heavy insulated house across the yard by hand.
📸 Photo credit: Instagram @wood_dachaa
2. Insulated Wall Panel Dog House (Classic DIY Build)
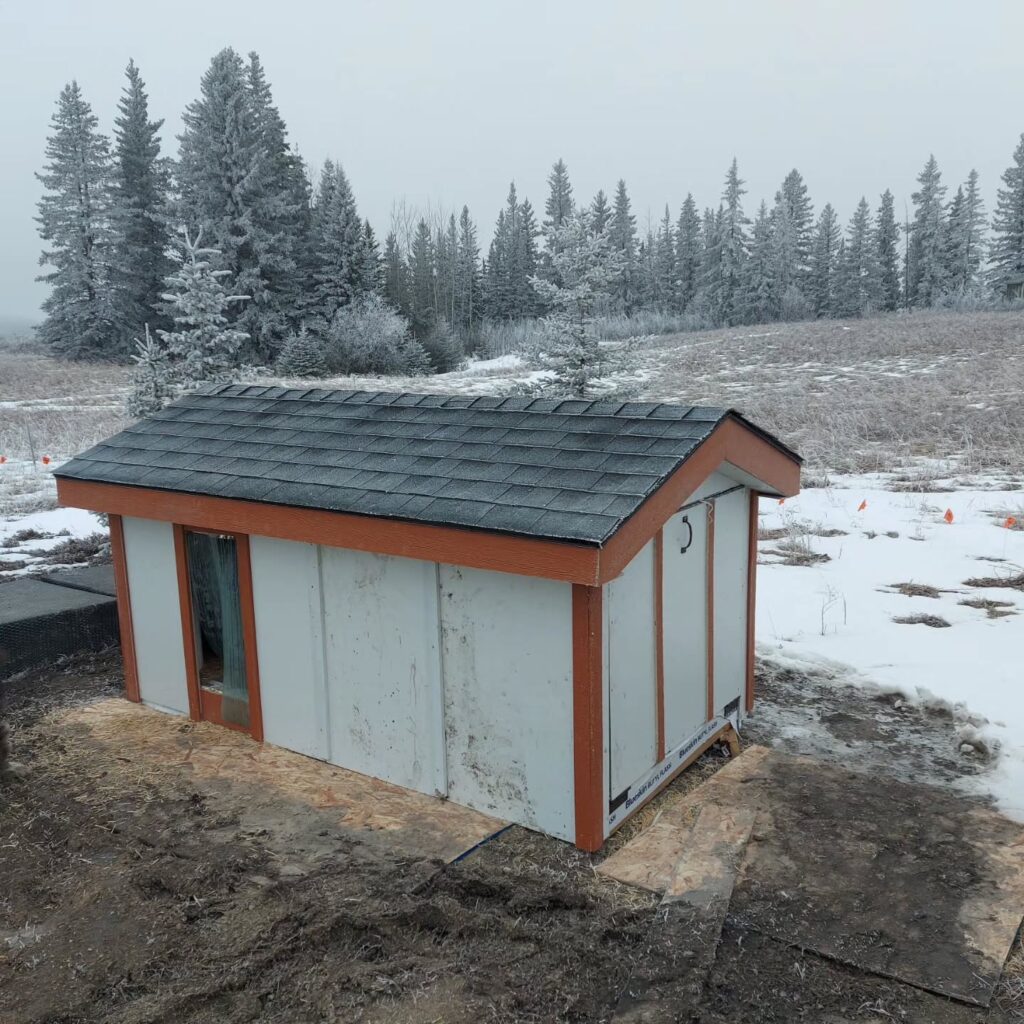
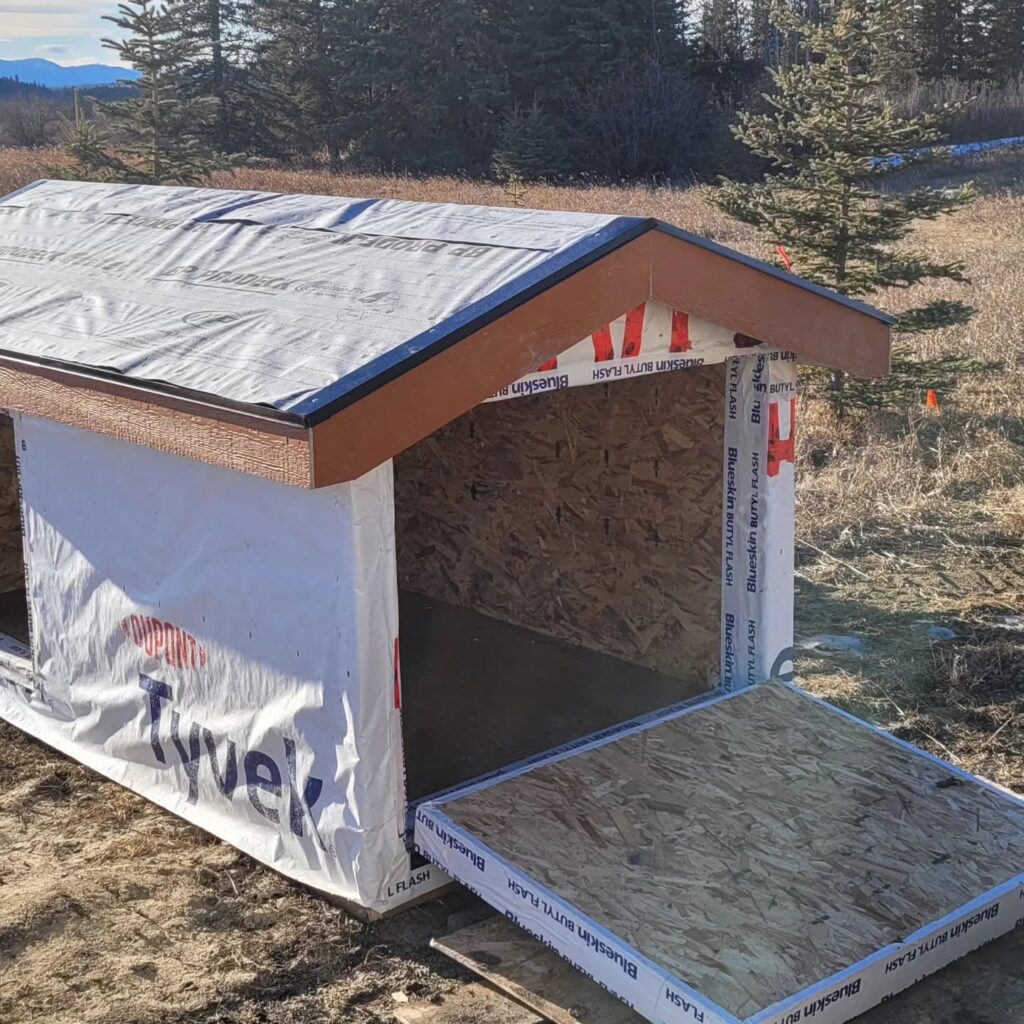
This is one of the clearest examples of what “insulated” actually looks like during construction. Before the final wood siding goes on, you can see a layer of Tyvek house wrap and OSB board — the same materials used in real home construction. This wrap acts as a moisture barrier, stopping outside dampness from soaking into the wall insulation, while the OSB adds structural strength and gives the insulation something solid to sit against.
The finished version has painted wood siding, white trim, and a shingled roof, all built over those insulated wall panels and an insulated ceiling. This is a great reference point if you’re searching for insulated dog house diy ideas because it shows the “invisible” layers that actually do the insulating work — not just the pretty exterior that most people focus on first.
What makes this build especially useful as a teaching example is that you can literally see the construction order: framing, then house wrap, then insulation board, then interior sheathing, then exterior siding. Following that same sequence in your own project helps avoid gaps where cold air or moisture can sneak in, which is one of the most common reasons DIY insulated builds underperform compared to their store-bought counterparts.
DIY tip: Always add a moisture barrier before your insulation layer. Skipping this step is one of the most common mistakes in DIY builds, and it can lead to soggy insulation and mold over time. Seal every seam in the house wrap with proper tape, not just staples, since staple holes alone can let moisture through. If you’re also working on kennel flooring, check out this guide on dog kennel flooring ideas for materials that pair well with insulated walls.
📸 Photo credit: Instagram @no_hablo_espanol_
3. Cozy Indoor Nook Dog House with Feeding Station
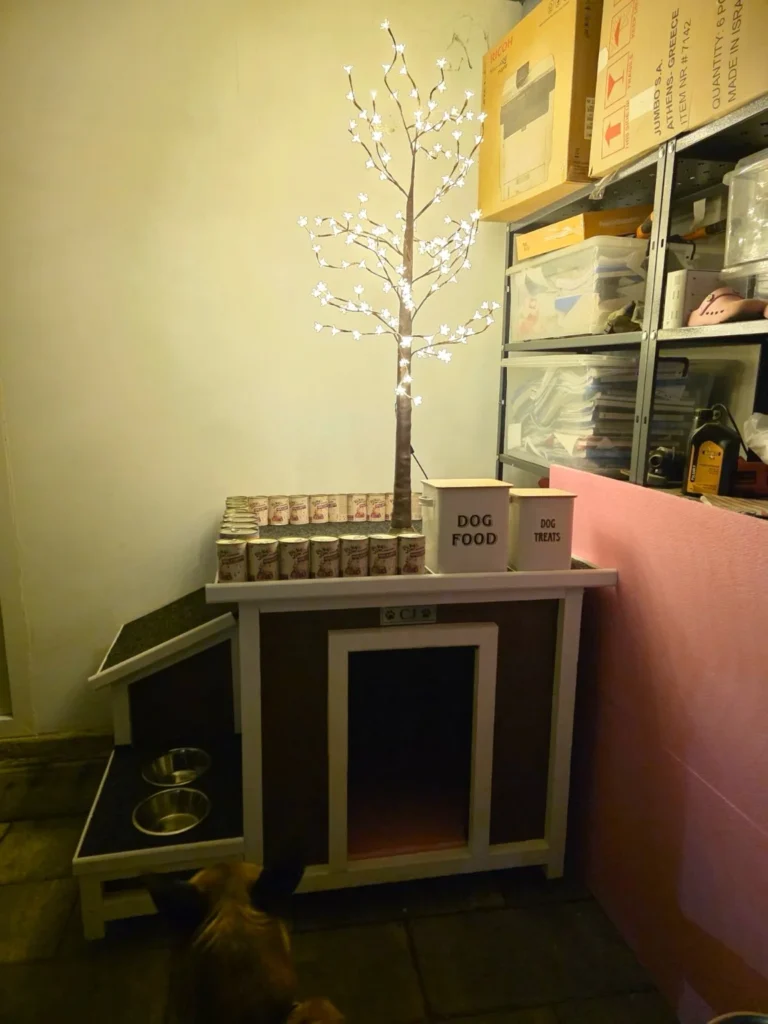
Not every insulated dog house has to live outside. This small brown house is placed indoors, tucked into a utility room corner, which means it benefits from the insulation of the house itself. On top sits a feeding and treat station, with stacked cans, labeled canisters, and a set of external steps leading to a raised bowl area below.
This idea works well for people who want the coziness of a dedicated dog space without building a fully weatherproof structure. Since it’s indoors, insulation needs are lower, but the layout still borrows ideas from outdoor builds — like a raised platform and separate feeding zone. The raised steps leading up to the bowls also keep food and water off the cold floor, which matters more than people think in unheated garages, laundry rooms, or basements during colder months.
Because this setup lives inside a climate-controlled home, the “insulation” here is really about smart placement rather than thick walls. Choosing a corner away from drafty doors or windows, and away from direct heating or cooling vents, does most of the work that outdoor insulation would otherwise need to handle.
DIY tip: If you’re placing a dog house indoors, focus your insulation budget on the door flap or curtain instead of the walls. This keeps drafts out during colder months without needing thick wall insulation. A simple fabric curtain or short vinyl flap over the entrance can noticeably raise the temperature inside without any real construction work.
If you like the feeding setup shown here, this article on dog feeding station ideas has more layout inspiration.
📸 Photo credit: Instagram @doghouse_ks
4. Gable-Roof Dog House with Attached Feeding Porch
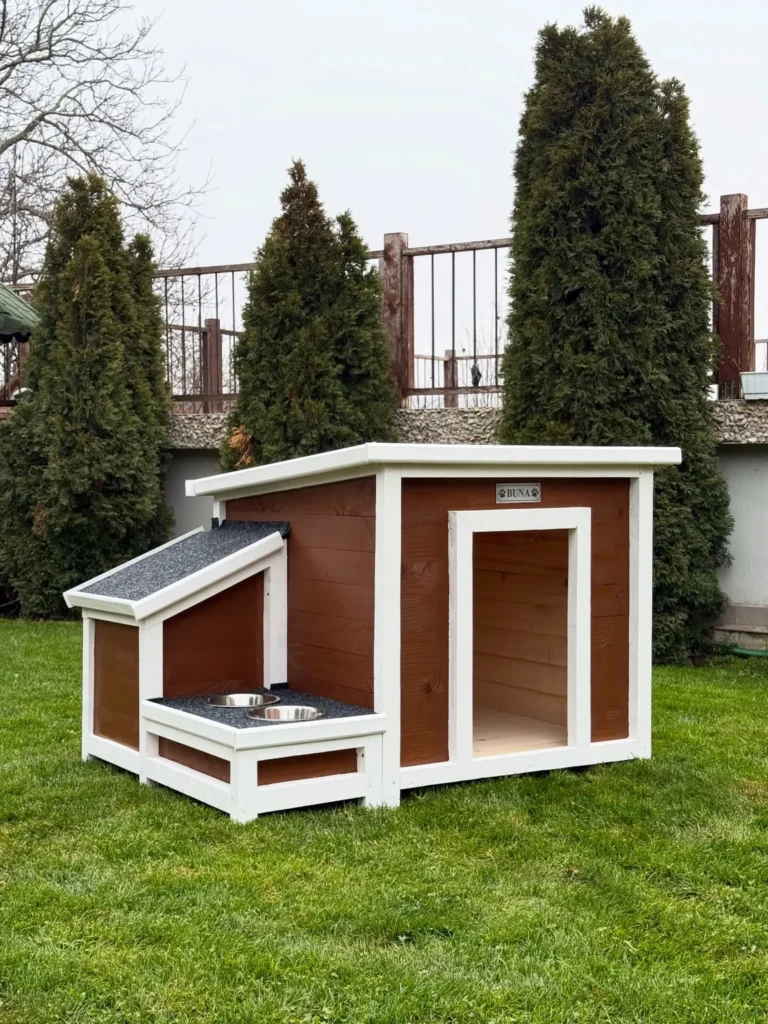
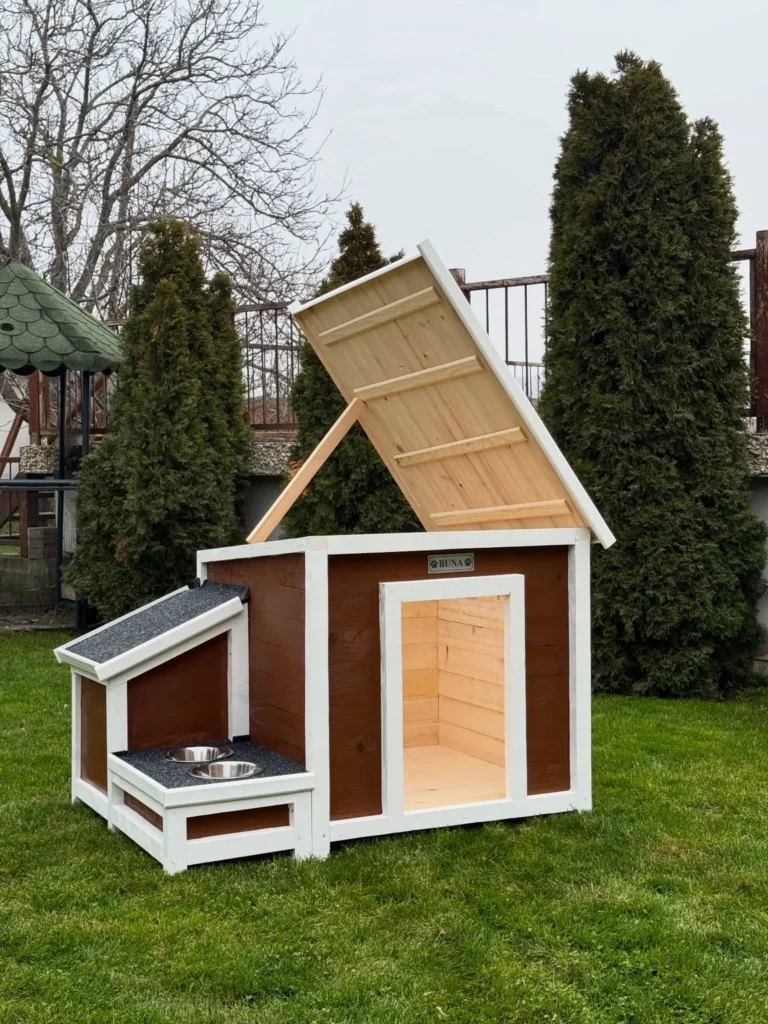
This reddish-brown gable house pairs a traditional peaked roof with a smaller attached feeding porch, each with its own separate roof line. The feeding area has two steel bowls set into a non-slip surface, keeping food and water away from the insulated sleeping compartment so moisture doesn’t get tracked inside. Separating the feeding zone from the sleeping zone like this is a small design choice that makes a big difference in keeping the insulated area dry.
One especially useful feature here is the lift-up roof panel. It swings open on a hinge, giving full access to the interior for cleaning or for checking on the insulation layer underneath. This is a smart design choice that a lot of insulated builds skip, and it makes long-term maintenance much easier, since you don’t have to remove siding or pry off nailed-down roofing just to inspect the walls.
The peaked gable shape itself also plays a role in insulation performance. Unlike a flat roof, a gable roof naturally sheds snow and rain faster, which means less standing moisture sitting on top of the insulated ceiling cavity for long periods. That’s a small structural choice that pays off over years of outdoor use.
DIY tip: Building a hinged roof section takes a bit more carpentry work, but it pays off. It lets you inspect insulation for dampness or pests without tearing the whole roof apart. Use sturdy exterior hinges rated for outdoor use, and add a simple hook-and-eye latch to keep the panel from swinging open in strong wind.
📸 Photo credit: Instagram @doghouse_ks
5. Vinyl-Sided Insulated Dog House Built for Iowa Winters
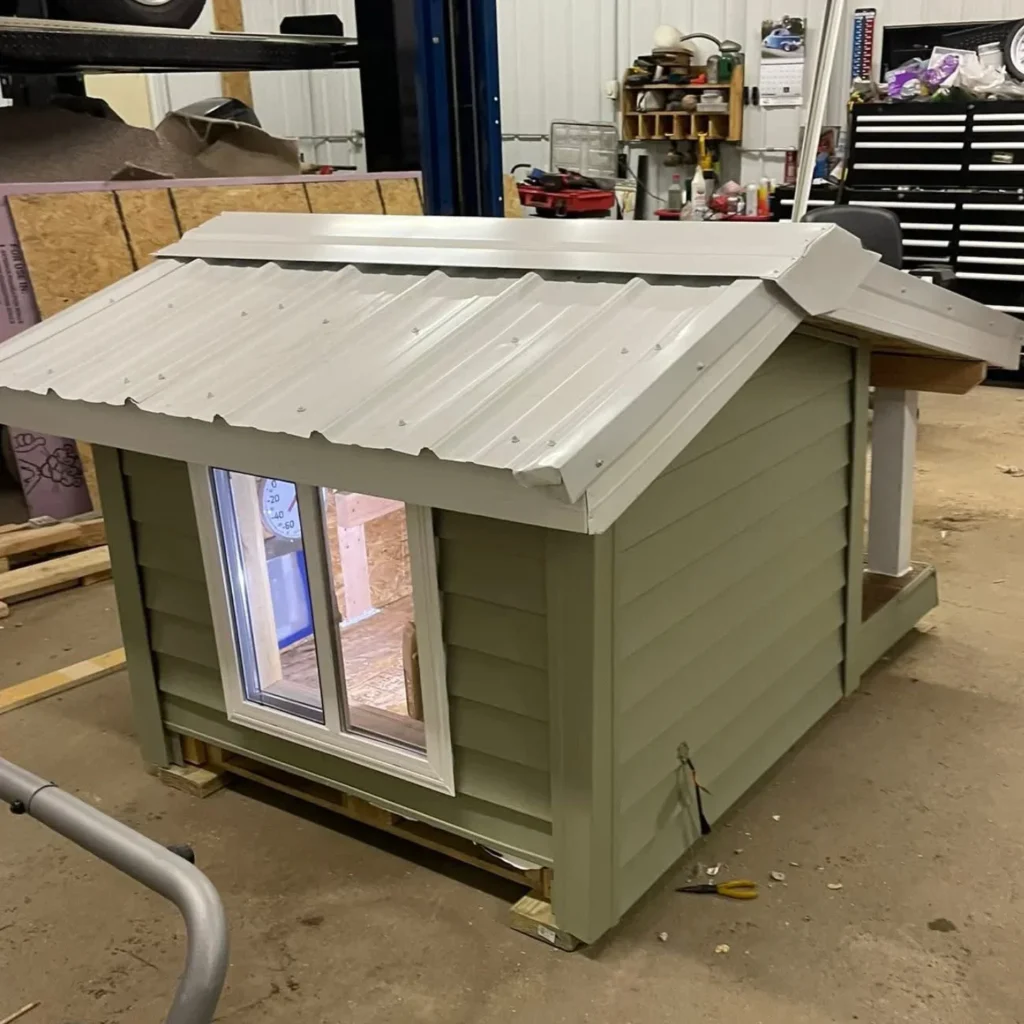
This build was specifically made and insulated for harsh Midwest winters, and it shows. The house uses green vinyl siding, a corrugated metal roof, and even a glass-paned window — construction choices that usually show up on human sheds, not dog houses. Vinyl siding adds an extra weatherproof layer over the insulation, helping block wind-driven snow and rain from ever reaching the insulated wall cavity underneath.
Because this house was also heated, not just insulated, it’s a strong example for anyone dealing with extreme cold. Heating combined with insulation means the warmth generated actually stays inside instead of leaking out through thin walls. Without insulation, a heat source has to work constantly just to keep up with heat loss, which wastes energy and can still leave cold spots near the floor and corners.
The glass window is another small but meaningful detail. It lets in natural light and lets the owner check on the dog without opening the door and letting warm air escape, which is a simple way to preserve heat retention during the coldest months.
DIY tip: If you’re working on an insulated dog house diy winter project, consider pairing your insulation with a small pet-safe heating pad or heated mat. Insulation alone slows heat loss, but in very cold climates, a heat source keeps the inside temperature from dropping too low overnight. Always choose chew-resistant, low-wattage pet heating products designed specifically for outdoor use.
📸 Photo credit: Instagram @vivivandevenne
6. Modern Kennel System with Sandwich-Panel Insulation
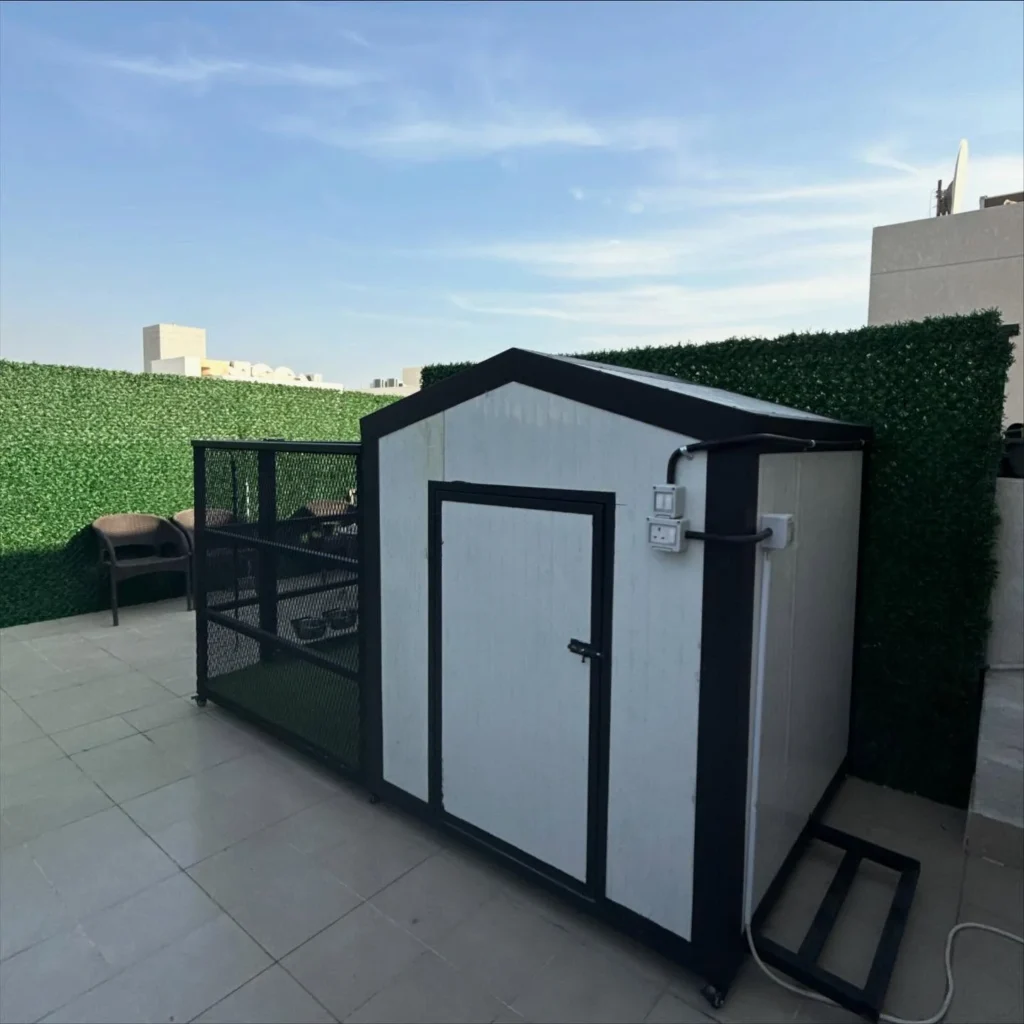
This olive-green kennel takes insulation to a more technical level. Instead of standard wood-frame walls, it’s built using sandwich panels — rigid foam sandwiched between two solid outer layers. According to the builder, this method delivers up to 90% thermal insulation efficiency, along with strong water resistance and even some soundproofing, which is rare to see mentioned in a backyard dog house build.
The kennel also includes an attached wire-mesh run, giving the dog outdoor access without leaving the insulated, covered structure entirely. This setup is ideal for hot, sunny climates where shade and thermal insulation both matter, since the room stays significantly cooler than an uninsulated structure of the same size. The mesh run also allows airflow around the insulated room, which helps prevent heat from building up against the exterior walls during peak sun hours.
Sandwich panels are also lightweight compared to solid wood or brick, which makes this style of build easier to move or reposition later if needed, despite offering better insulation performance than most wood-frame alternatives.
DIY tip: Sandwich panels are more expensive and harder to source than wood, but they’re worth considering if you live somewhere with intense heat or heavy rain. Precut panel kits are available online and can be assembled with basic tools, no advanced carpentry needed, which makes this option more beginner-friendly than it first appears.
For more layout ideas that combine a kennel with a run like this one, take a look at this roundup of outdoor dog kennel ideas.
📸 Photo credit: Instagram @dardoggo
7. Insulated Dog House with Heavy-Duty Draft-Blocking Door
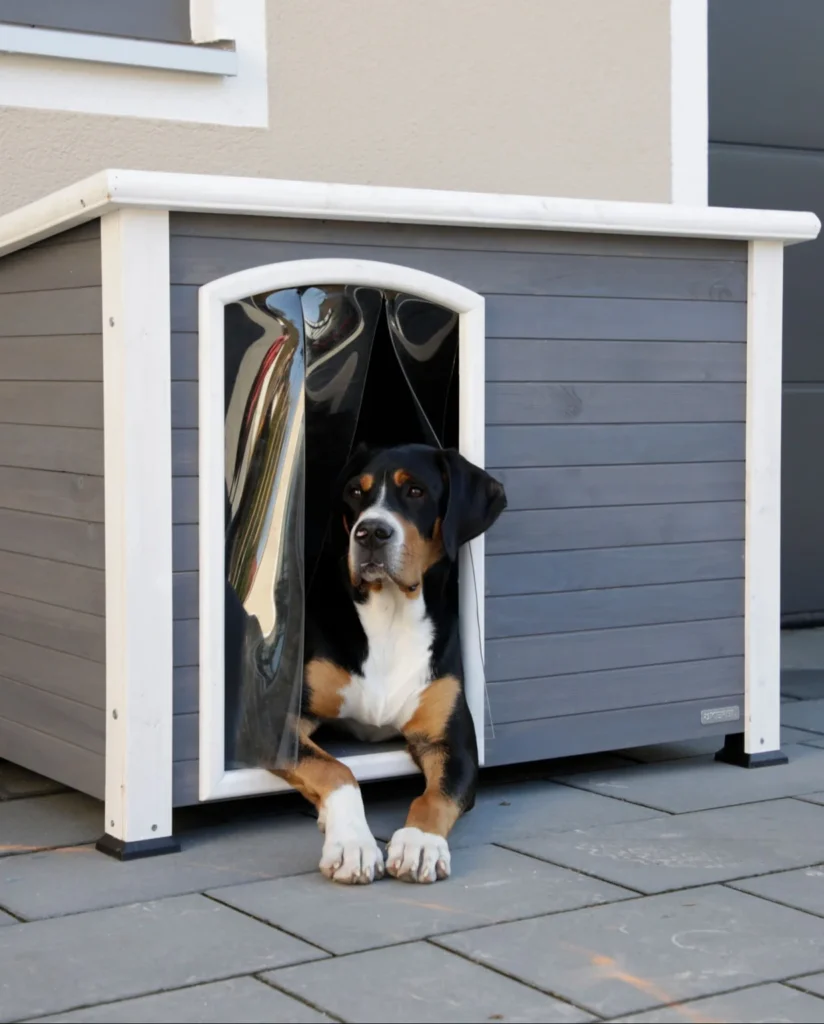
Walls and roofs get most of the attention in insulation talk, but the door is just as important — and this gray house nails it. Instead of a simple opening, it has a rounded, arched doorway fitted with a heavy, clear PVC strip flap, similar to what you’d see on a walk-in freezer. This kind of flap blocks wind and rain from blowing straight into the sleeping area while still letting the dog move in and out freely.
Without a door flap like this, even a fully insulated dog house loses a lot of its effectiveness, since warm air can escape and cold drafts can rush right in through an open entrance. In fact, an open, unprotected doorway is often the single biggest source of heat loss in an otherwise well-insulated structure, even more than thin walls or a poorly insulated roof.
The arched shape of the doorway is a nice touch too, since it removes sharp corners where drafts tend to gather and leak through gaps more easily than a rounded frame.
DIY tip: You can add a similar flap to almost any existing dog house using cut strips of heavy-duty clear vinyl, available at most hardware stores. It’s one of the cheapest upgrades you can make to an already-built structure, often costing less than a single afternoon’s work and a few dollars in materials.
If you’re planning a full interior setup to match, this guide on smart dog room ideas has more inspiration.
📸 Photo credit: Instagram @kerbl.uk
8. Rooftop Deck Dog House with Shaded Canopy
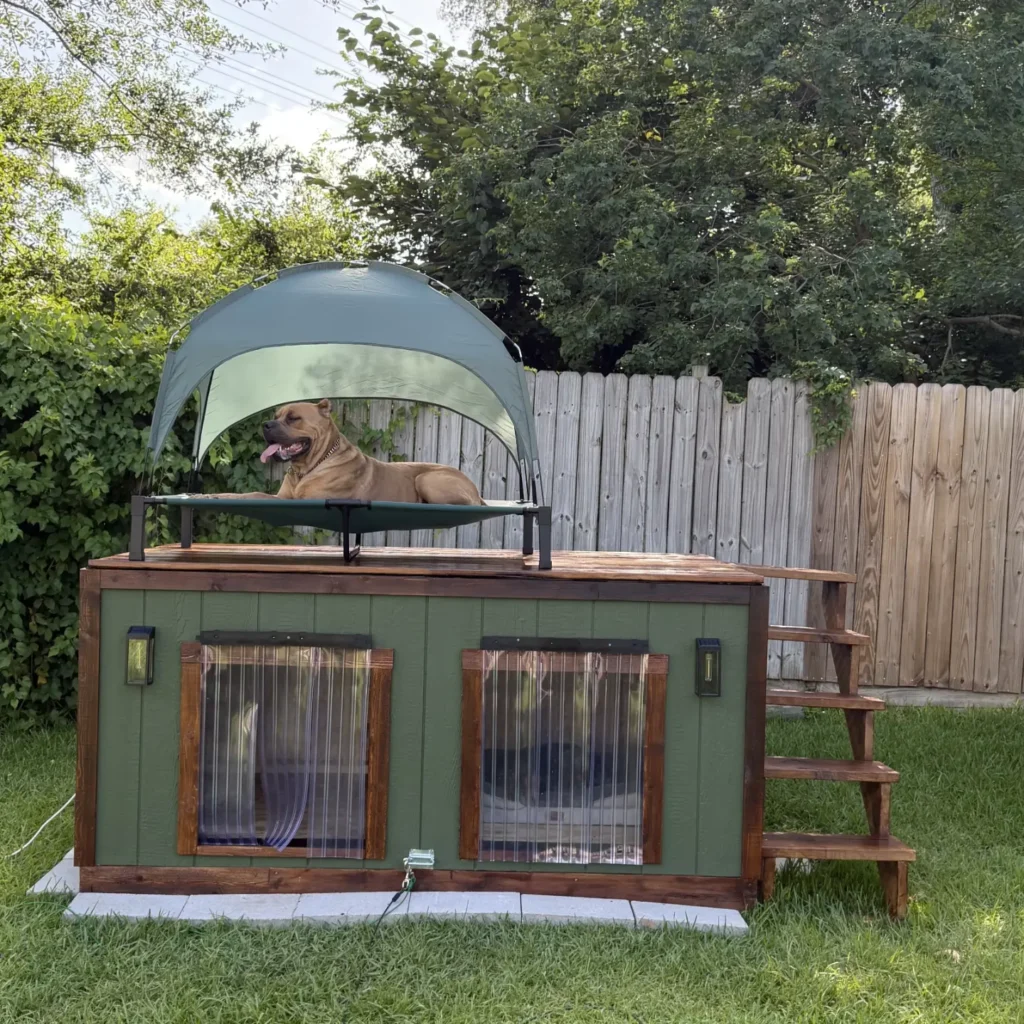
This green, insulated house does double duty — it’s a sleeping shelter down below and a lounging deck up top. Wooden stairs lead up to a raised platform with a dog bed and a pop-up canopy tent, giving the dog a shaded outdoor lookout spot separate from the enclosed insulated room underneath. It’s a fun way to give a dog both a cozy, insulated retreat and an open-air spot to relax without leaving the safety of home base.
The lower level has two separate entrances with clear vinyl door flaps, similar to the draft-blocking idea above, and solar-powered lights mounted on the sides. This build is a great example of combining insulation with lifestyle features, rather than treating the dog house as just a bare shelter. Having two entrances also makes sense for multi-dog households, since it reduces crowding at a single doorway and keeps warm air from escaping every time one dog wants to head outside.
The solar lights are a small but practical addition, giving enough visibility around the structure at night without needing to run electrical wiring outdoors.
DIY tip: If you want to try a rooftop deck like this, make sure your base structure is insulated and fully weatherproofed first. Adding a deck on top means more foot traffic and weight, so a sturdy, well-sealed roof is essential before building upward. Reinforce the roof framing with extra support beams if you’re planning to add a platform or canopy later.
For more high-end layout inspiration like this dual-purpose build, check out these luxury dog kennel ideas.
📸 Photo credit: Instagram @moes_wood
9. Climate-Controlled Luxury Villa Dog House
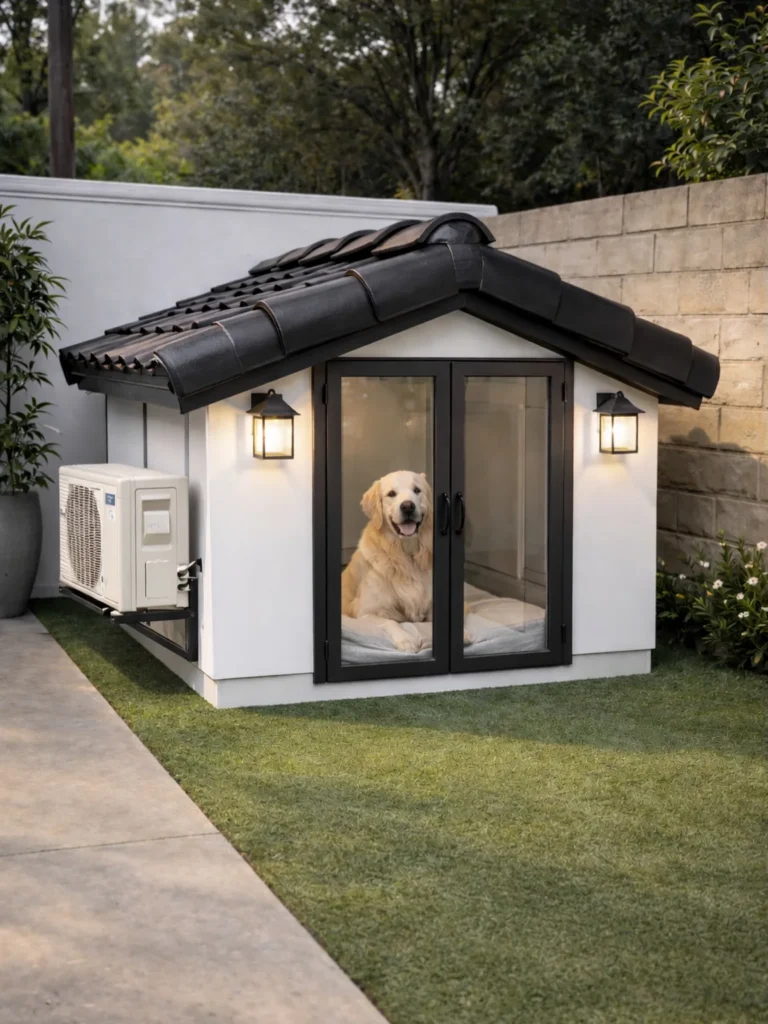
At the top end of insulated dog house ideas sits this white stucco villa, built with a fibre composite material that’s fully waterproof both inside and out, with zero water absorption. It was specifically designed for extreme climate swings — think intense heat, high humidity, and heavy rain all in the same region. That combination of challenges makes this one of the most demanding environments for any insulated structure to perform well in.
Glass French doors, wall sconces, a black tiled roof, and a mini-split AC unit round out the build, making it look more like a small guest house than a dog shelter. While this is a professionally built, high-budget project, it shows what’s possible when insulation, waterproofing, and active cooling are all combined in one structure. The zero water absorption claim is especially notable, since even fully insulated wood builds can slowly absorb moisture over years of exposure, eventually weakening their insulation performance.
The mini-split AC unit also means this house doesn’t rely on insulation alone. Active cooling paired with strong insulation keeps the interior temperature stable even when outside conditions swing wildly between extremes within the same day.
DIY tip: You don’t need fibre composite materials or a full AC unit to borrow the core idea here — even a small portable fan or a shaded, insulated design can mimic some of the cooling benefit for a fraction of the cost. Positioning any insulated dog house in natural shade, away from direct afternoon sun, goes a long way toward the same result.
Why Your Dog Needs an Insulated Dog House
Now that you’ve seen nine different builds, let’s talk about why insulation actually matters in the first place.
Dogs left outside without proper shelter are exposed to whatever the weather throws at them — freezing wind, blazing sun, heavy rain, or humidity. An uninsulated wooden box might block rain, but it does very little to regulate temperature. In summer, a thin-walled house can trap heat like an oven. In winter, that same house offers almost no protection from cold air seeping through the walls.
Here’s what proper insulation actually does:
- Keeps body heat in during winter — insulated walls slow down heat loss, so a dog’s own body warmth helps keep the space comfortable overnight.
- Blocks outside heat in summer — insulation works both ways, reflecting and slowing down heat transfer so the interior doesn’t overheat.
- Reduces moisture problems — as seen in a few of the builds above, moisture barriers like Tyvek wrap keep dampness from soaking into wall insulation, which prevents mold and rot.
- Improves overall comfort and health — dogs exposed to extreme temperatures for long periods can develop health issues, from dehydration in heat to joint stiffness in cold. A properly insulated house reduces that risk. For more on keeping dogs healthy year-round, this article on puppy veterinary needs covers useful basics.
Insulation isn’t just a “nice to have” feature — it’s the difference between a dog house that looks good and one that actually protects your dog.
DIY Tips for Building Your Own Insulated Dog House
If you’re inspired by these builds and want to try an insulated dog house diy project yourself, here are some practical tips pulled from the ideas above.
Choose the right insulation material
Wood-frame walls with foam board insulation are the most beginner-friendly option. Sandwich panels, like the ones used in idea #6, offer better performance but cost more and require more precise cutting.
Always add a moisture barrier
As shown in idea #2, a layer of house wrap between your framing and insulation stops outside moisture from ruining your insulation over time. This single step can add years to the life of your build.
Don’t ignore the door
A well-insulated box with an open doorway is only half-finished. Adding a heavy vinyl flap, like the one in idea #7, keeps drafts out and traps warm air inside.
Elevate the floor
Raising the house off the ground, even by a few inches, stops cold or heat from transferring directly through the floor. Several of the builds above use a raised platform or wheeled base for exactly this reason.
Plan for your specific climate
If you’re working on an insulated dog house diy winter build, focus on thicker wall insulation and consider adding a heat source, as seen in idea #5. If you’re building for a hot climate, prioritize shade, ventilation, and lighter-colored exteriors that reflect heat instead of absorbing it.
Use proper insulated dog house plans
Before cutting any wood, sketch out your insulated dog house plans with measurements for your dog’s size, plus a few extra inches of clearance for insulation thickness on all sides. Skipping this step often leads to a cramped interior once insulation is added.
If you want more layout inspiration before finalizing your design, this list of DIY dog kennel ideas is a good next stop.
Final Thoughts
There’s no single “best” insulated dog house — it really depends on your climate, your budget, and how much of the build you want to do yourself. A simple wood-frame house with foam insulation and a vinyl door flap can work wonders in most backyards, while a sandwich-panel kennel or fibre-built villa makes more sense for extreme weather or bigger budgets.
What all nine of these builds have in common is a focus on the details that actually matter: moisture barriers, draft-blocking doors, raised floors, and materials chosen for the local climate. Whether you’re browsing for insulated dog house ideas to buy, or planning to build one from scratch this weekend, use these examples as a starting point and adjust the size, material, and features to fit your dog’s needs.

Izzy is an experienced ranch worker who has a passion for exploring nature and getting up close to wildlife. With her connections to various animal organizations, Izzy is well-versed in animal care and rehabilitation.