How to Make a Slinky Dog Costume DIY at Home
If you’ve ever watched Toy Story and instantly thought “I need to dress my dachshund up as Slinky Dog,” you’re not alone. A Slinky Dog costume DIY is one of the most fun, budget-friendly, and photo-worthy costume projects you can take on — whether it’s for your pet, your kids, or even you and your partner.
The best part about a Slinky Dog costume DIY is how flexible it is. You don’t need to be a professional seamstress or spend a fortune on a store-bought outfit. With a few basic materials — some soft fabric, a metal coil, and a little patience — you can build a costume that looks just like it walked straight out of Andy’s toy box.
In this guide, we’re breaking down 5 unique Slinky Dog costume DIY ideas, each based on real examples people have actually made and worn. From pet-friendly hoods to matching twin costumes, there’s an idea here for everyone. Let’s dig right in.
Idea 1: Classic Googly-Eye Hood Pet Costume
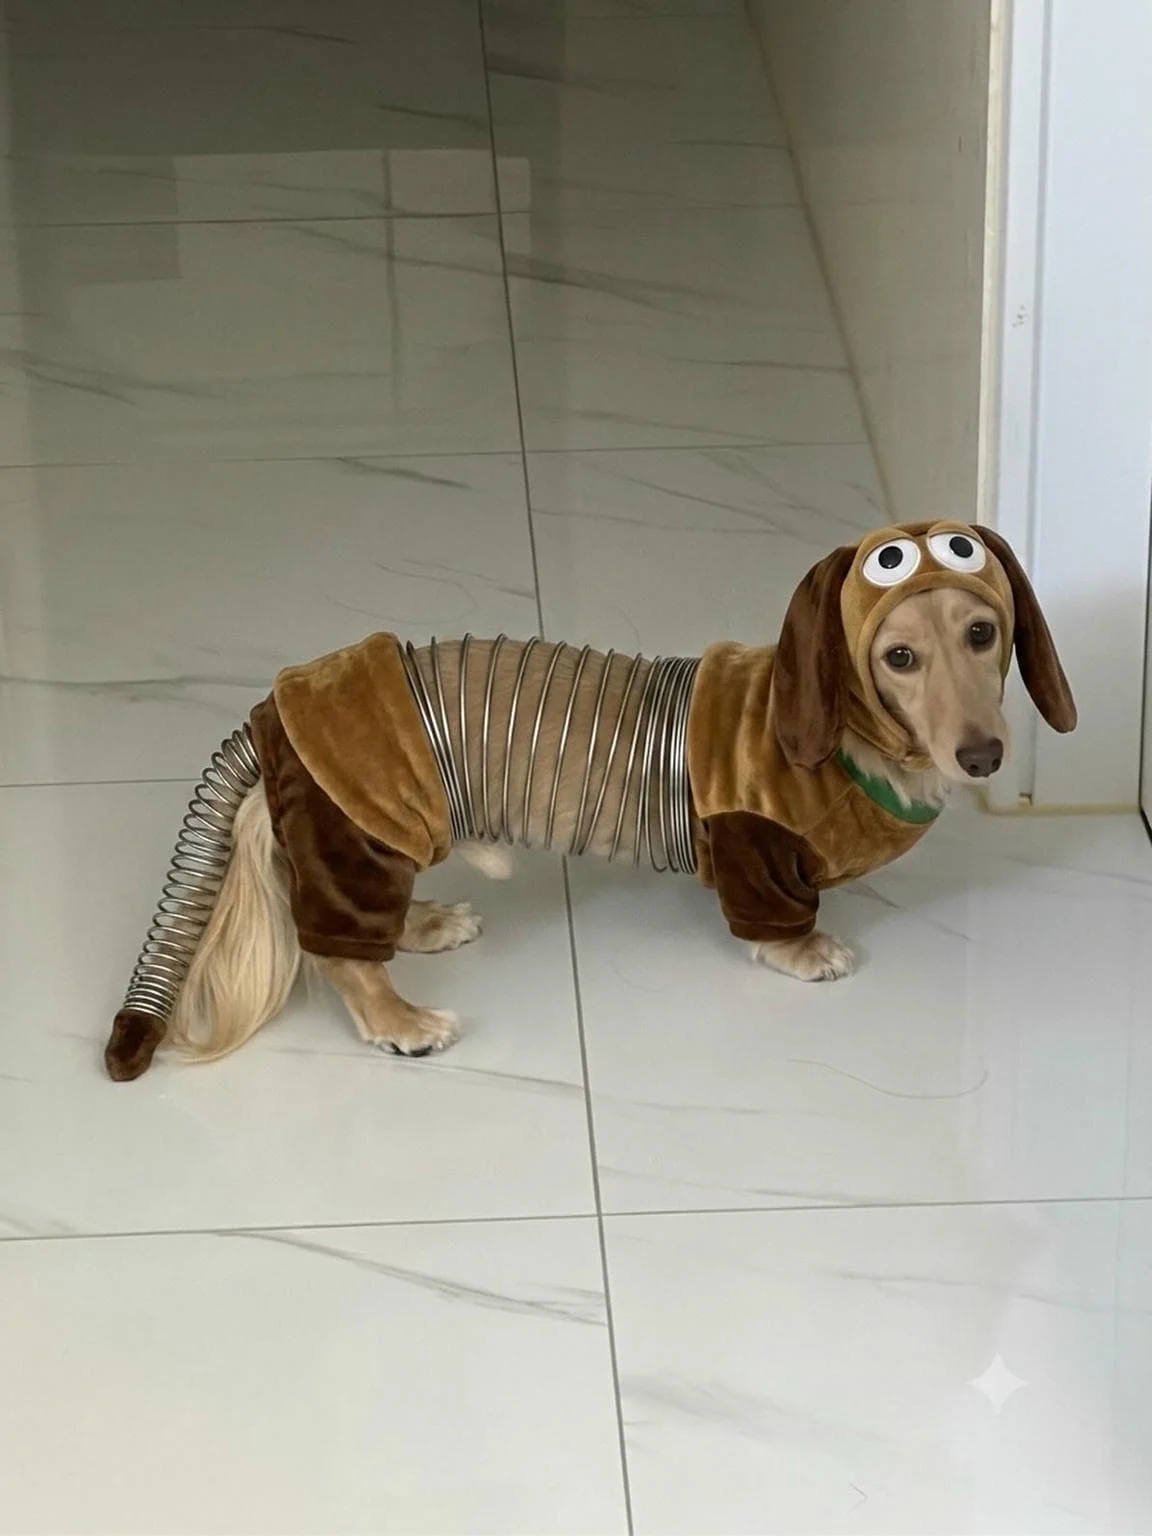
This is the most iconic version of the Slinky Dog costume DIY, and it’s the one most people picture when they hear “Slinky Dog.” It works especially well on dachshunds because their long bodies naturally match Slinky’s stretched-out shape.
What Makes This Idea Special
The standout feature of this costume is the soft fabric hood with oversized googly eyes stitched or glued right on top, sitting just above the dog’s real eyes. Long floppy ear extensions are attached to the sides of the hood, giving your dog that classic droopy-eared Slinky look. The body is wrapped in a brown velvet or fleece jacket, and a real metal accordion-style coil connects the front half to the back half, mimicking Slinky’s actual spring body.
Materials You’ll Need
- Soft velvet or fleece fabric (brown and tan shades)
- A small metal slinky toy or a flexible wire coil
- Googly eye fabric patches or felt cutouts
- Velcro or elastic straps for a secure, comfortable fit
- A sewing machine or fabric glue gun
Step-by-Step DIY Instructions
- Measure your dog from the base of the neck to the base of the tail, and around the belly, to know how much fabric and coil length you’ll need.
- Cut two fabric pieces — one for the front section (chest and front legs) and one for the back section (hips and back legs) — leaving a gap in the middle for the coil.
- Attach the metal coil between the two fabric halves by sewing small fabric loops on each end of the coil and stitching them to the jacket pieces.
- Sew or glue the ear extensions onto a simple hood base, then attach the googly eyes just above where your dog’s real eyes would be.
- Add straps or velcro closures underneath the belly so the costume stays snug but doesn’t restrict movement.
- Do a trial fitting before the big day to make sure your dog can walk, sit, and turn comfortably.
Best Dogs for This Look
Naturally, dachshunds are the top choice because of their long, low bodies. If you’re curious about how this breed compares to other similar-looking animals, check out this piece on the dachshund vs badger comparison. That said, smaller breeds with flexible bodies can pull off this costume too, especially with some minor adjustments to the coil length.
📸 Photo credit: Instagram @borri.comm
Idea 2: Realistic Slinky-Face Hood (No Googly Eyes)
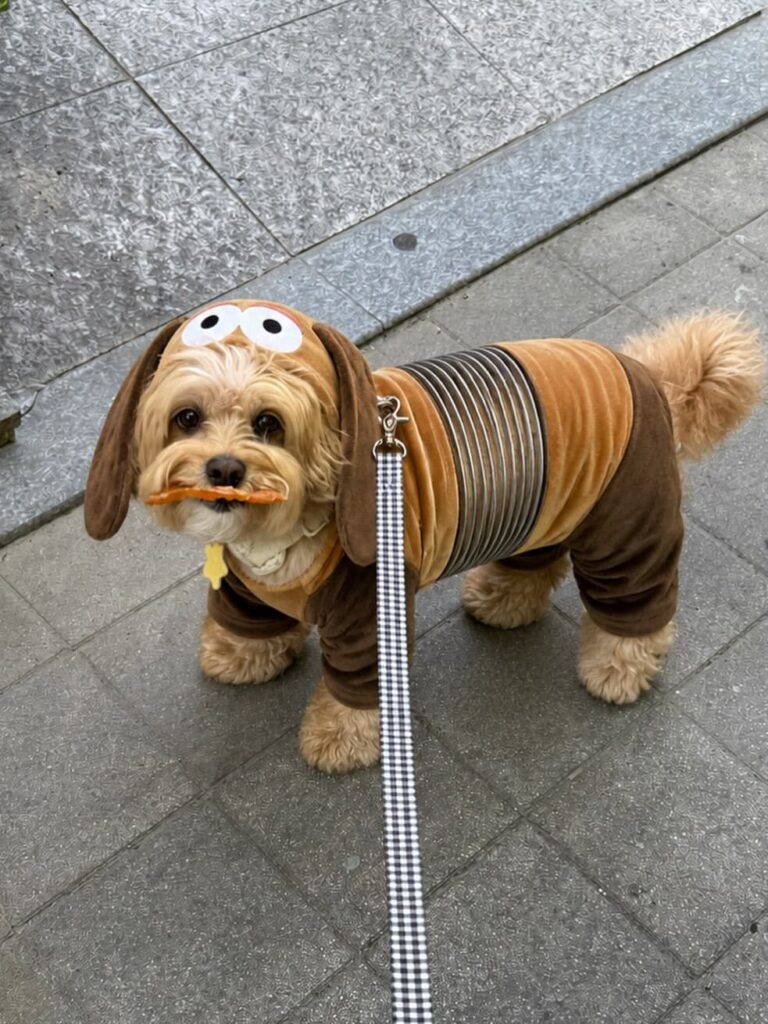
If the cartoon googly-eye version feels a little too playful for your taste, this second idea offers a more toned-down, realistic take on the same costume concept.
What Makes This Idea Special
Instead of a cartoonish overlay, this version uses a plain tan or brown hood shaped to look like Slinky’s actual dog face, without any googly eyes stuck on top. It relies on the natural shape of the ears and the fabric coloring to sell the look. A nice added touch here is a small name tag charm hanging from the collar, similar to the kind a real pet would wear — it’s a subtle detail that makes the costume feel more personalized. The tail also gets special attention in this version, ending in a rounded bead tip instead of a plain metal end.
Materials You’ll Need
- Tan and brown felt or fleece fabric
- A simple hood pattern (no eye cutouts needed)
- A metal coil or slinky toy for the tail and body
- A small round wooden or plastic bead for the tail tip
- A charm or tag (optional, for the personalized touch)
Step-by-Step DIY Instructions
- Shape the hood so it hugs your dog’s head naturally, leaving the real face fully visible through the front opening.
- Attach long ear pieces on either side, using a slightly darker shade of brown for contrast.
- Wrap the coil section around the dog’s midsection just like in Idea 1, but keep the color scheme more muted and consistent.
- Glue or sew the bead onto the end of the tail coil to complete the “spring tip” detail.
- Attach a small name charm to the collar for that extra bit of realism.
Why This Version Works So Well
This style is a great pick if you want something that still reads clearly as “Slinky Dog” but feels a little more refined and less costume-y. It’s also a good option for dogs who might find fabric eye patches uncomfortable or distracting near their face. If you’re working on other dogs accessories for your pet alongside this costume, this is a good moment to think about matching collars or leashes too.
📸 Photo credit: Instagram @my__benji
Idea 3: Toy Story-Themed Photoshoot Styling
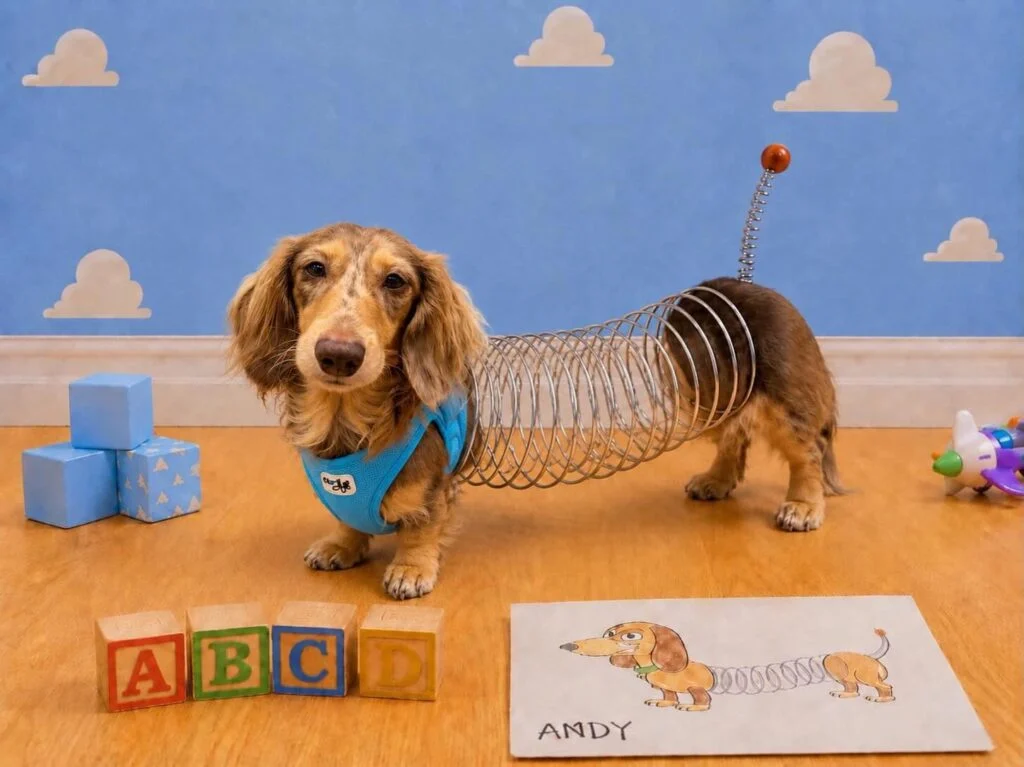
This idea isn’t just about the costume itself — it’s about how you present it. If you really want your Slinky Dog costume DIY to stand out on social media, staging a themed photoshoot can take it to the next level.
What Makes This Idea Special
This concept takes the same basic coil-harness costume from Idea 1 and places it inside a full Toy Story-inspired setting. Think a sky-blue backdrop with painted clouds, wooden ABC blocks scattered on the floor, and a hand-drawn “Andy” name card placed near the dog, just like the drawing on Andy’s boot in the movie. It turns a simple costume photo into a full scene that tells a story.
How to Build a Simple Backdrop
- Use a plain blue bedsheet or poster board as your base.
- Cut out cloud shapes from white paper or felt and stick them onto the backdrop.
- Add a wooden floor prop or a light-colored rug for the ground.
Props to Include
- Colorful alphabet blocks (A, B, C, D work great as a nod to Andy’s room)
- A hand-drawn or printed name card
- Small toy props like a toy airplane or wooden block tower
Photography Tips for Pet Costumes
- Shoot at your dog’s eye level rather than from above, so the costume details show clearly.
- Use natural light near a window instead of a flash, which can wash out the fabric colors.
- Keep a treat nearby to hold your dog’s attention and get that classic “looking at camera” shot.
- Take several shots quickly, since pets rarely hold still for long.
This idea works particularly well if you’re also updating your dog room ideas or planning a fun themed space at home — you could even reuse some of the same props.
📸 Photo credit: Instagram @binzodachshund
Idea 4: Human Couple Slinky Dog Costume
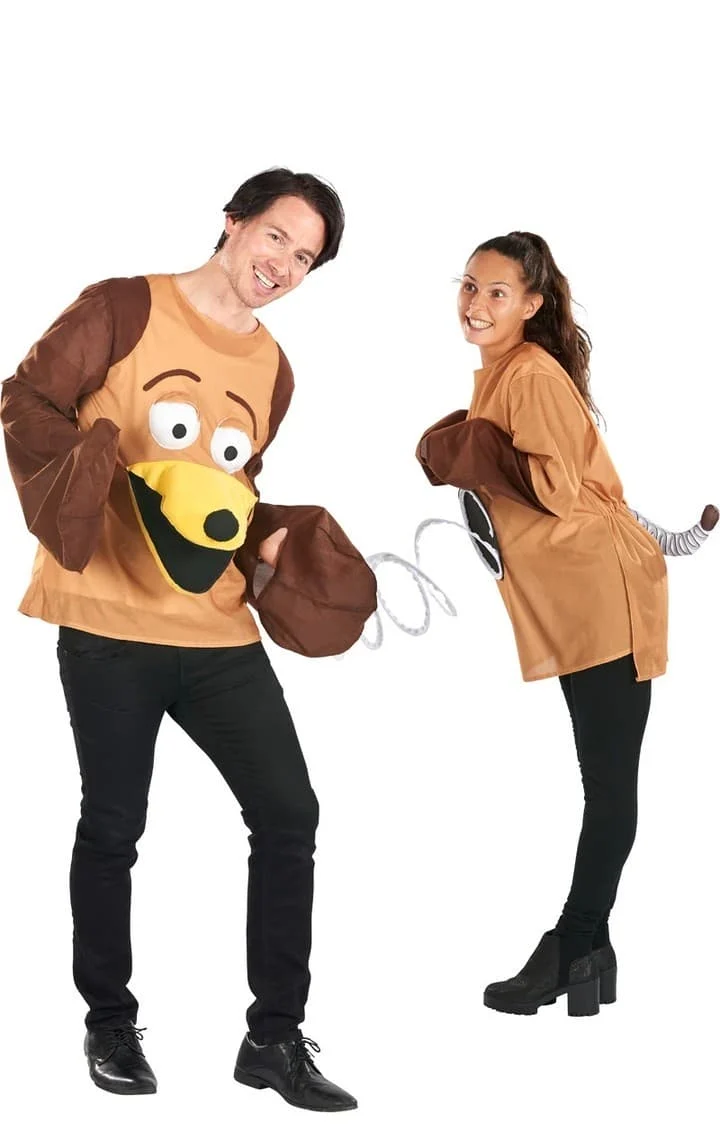
Not everyone has a dachshund at home, and that’s completely fine — the Slinky Dog costume DIY concept translates surprisingly well into a two-person human costume too.
What Makes This Idea Special
This version splits the character into two halves worn by two different people. One person wears the “front half,” which includes an oversized head piece with big cartoon eyes and a floppy nose, plus arm sleeves shaped like Slinky’s front legs. The second person wears the “back half,” a simpler tan tunic with a small tail attached at the back. When the two people stand or walk close together, a coil design (either a real prop coil or a printed/stitched design) visually connects them, completing the illusion of one long dog.
Materials You’ll Need
- Two oversized tunics or loose t-shirts (tan/brown)
- Foam or stuffed fabric for the front head piece
- Felt cutouts for eyes and nose
- A short fabric or foam coil prop to link both costumes
- Dark pants and shoes to keep the focus on the costume itself
How the Two-Person Design Works
- Build the front head piece first, since it’s the most detailed part — stuff it with fabric batting so it holds its cartoon shape.
- Attach arm sleeves shaped like short stubby legs to the front costume.
- Keep the back half simple — a plain tunic with a small tail sewn on works fine.
- Connect both costumes with a coil prop that either person can hold, or attach a printed coil pattern to both tunics for a lighter, easier-to-wear option.
- Practice walking together so the “connected” illusion looks natural in photos and while moving through a party.
Where to Wear It
This costume idea is perfect for Halloween parties, couples’ costume contests, or even matching costumes with a friend or sibling. It’s also a fun option if you’re looking for trendy costume or gift ideas to try out together during the holiday season.
📸 Photo credit: Instagram @fancydresscom
Idea 5: Twin or Sibling Toddler Slinky Dog Costume
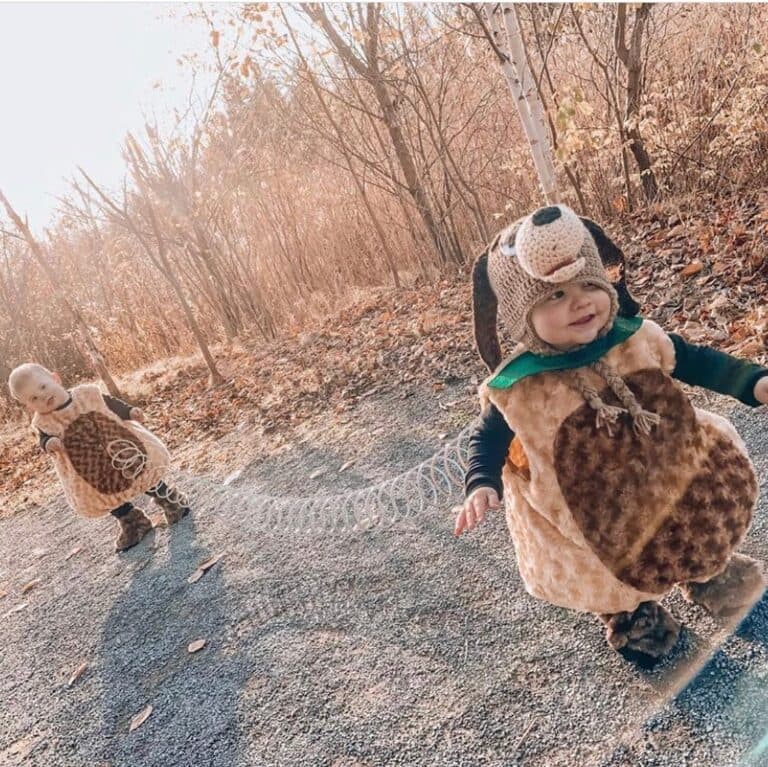
This might be the most heart-melting version of the Slinky Dog costume DIY on this list. It’s designed specifically for two young children — twins, siblings, or even close friends — who want to dress up together as one connected character.
What Makes This Idea Special
Just like the human couple version, this costume splits Slinky Dog into two halves, but scaled down for toddlers. One child wears the front half, complete with a soft hood shaped like Slinky’s head, floppy ears, and a fuzzy tan or brown body suit. The other child wears the back half, usually a simpler body suit with a small tail. A real coiled spring — lightweight and child-safe — connects the two costumes, so when the kids walk side by side, they form one long Slinky Dog together.
Materials You’ll Need
- Two soft toddler-sized body suits or tunics (tan/brown, fuzzy fabric works best)
- A hood piece with ears for the “head” child
- A small tail piece for the “back” child
- A lightweight, child-safe coil (avoid sharp metal edges)
- Fabric boot covers to complete the paw-like look
Step-by-Step DIY Instructions
- Choose soft, stretchy fabric so the toddlers can move, sit, and play comfortably in the costume.
- Shape the hood with two long ear pieces and simple felt eye and nose details.
- Sew a small tail onto the back half costume, keeping it short enough that it won’t drag or trip anyone up.
- Attach the coil loosely between both costumes using fabric loops, making sure it’s flexible enough for both kids to move independently.
- Add boot covers in a matching brown tone to complete the paw look at the bottom.
Safety Considerations for Toddlers
Since this costume involves two children physically linked by a coil, safety should always come first.
- Keep the coil short and lightweight so neither child feels pulled or restricted.
- Avoid costumes with small detachable parts that could become choking hazards.
- Supervise closely during walking or trick-or-treating, especially near stairs or uneven ground.
- Take short breaks to make sure both kids stay comfortable, especially in warm weather.
If you’re planning other family or pet activities around the same time, it’s also worth reviewing some essential puppy training tips if you happen to have a new dog joining the household during costume season too.
📸 Photo credit: Instagram @minimioche
What You Need Before Starting Your Slinky Dog Costume DIY
Now that you’ve seen all five ideas, here’s a quick rundown of the core supplies that show up across almost every version of this costume.
Basic Materials
- Brown, tan, and cream fabric (velvet, fleece, or felt all work)
- A metal or fabric-wrapped coil for the signature “spring” body
- Felt or fabric scraps for eyes, ears, and nose details
- Velcro, elastic, or snap closures for easy on-and-off wear
Tools and Sewing Basics
- A sewing machine (or needle and thread if you prefer hand-sewing)
- Fabric scissors and pins
- A hot glue gun for quick attachments
- Fabric measuring tape
Safety Tips for Pet Costumes
Before you get started, keep in mind that not every dog will love wearing a costume right away. Introduce the costume gradually, let your dog sniff and explore it first, and reward calm behavior with treats. If your dog is a puppy, it’s worth checking on general puppy veterinary needs to make sure they’re healthy and comfortable enough for a longer costume-wearing session.
Tips to Make Your Slinky Dog Costume Stand Out
- Add a name tag that says “Slinky” for an extra authentic touch.
- Match the collar color to the green collar Slinky wears in the movie.
- Take photos in natural settings like a park with autumn leaves, which pairs beautifully with the brown and tan color palette.
- Coordinate with family costumes, like dressing kids as other Toy Story characters alongside your Slinky Dog.
Common Mistakes to Avoid When Making a DIY Slinky Dog Costume
- Using a coil that’s too heavy — this can cause discomfort for pets or toddlers wearing the costume.
- Skipping the trial fitting — always test the costume before the actual event to catch any sizing issues early.
- Choosing scratchy fabric — soft, breathable materials matter more than exact color accuracy.
- Forgetting mobility — make sure whoever is wearing the costume, pet or person, can still walk, sit, and move naturally.
- Overcomplicating the first attempt — start with a simpler version like Idea 2 if you’re new to costume-making, then work your way up to more detailed designs.
Conclusion
A Slinky Dog costume DIY is one of those rare projects that’s genuinely fun for the whole family to work on together, whether you’re making it for your dachshund, your toddlers, or even yourself and a partner. From the classic googly-eye hood to a full themed photoshoot setup, there’s no single “right” way to bring this beloved Toy Story character to life.
Start with whichever idea matches your skill level and materials on hand, and don’t be afraid to mix and match details from different versions to make the costume truly your own. However you choose to build it, one thing’s for sure — a Slinky Dog costume DIY is guaranteed to turn heads and steal hearts wherever it goes.

Izzy is an experienced ranch worker who has a passion for exploring nature and getting up close to wildlife. With her connections to various animal organizations, Izzy is well-versed in animal care and rehabilitation.