5 Blueberry Peanut Butter Dog Chews Your Dog Will Absolutely Adore
If your dog goes crazy for peanut butter and can’t resist a fresh blueberry rolling across the kitchen floor, you’ve probably already guessed where this is going. Blueberry Peanut Butter Dog Chews combine two of the most dog-approved flavors into one healthy, homemade treat that’s easy on your wallet and even easier on your dog’s stomach.
Store-bought chews often come loaded with fillers, artificial flavors, and preservatives that don’t do your pup any favors. The good news? You don’t need a culinary degree or a long list of fancy ingredients to make something better at home.
In this guide, you’ll find five different recipes for Blueberry PB Dog Chews, ranging from oven-baked sticks to no-bake frozen bites. Whether your dog is a power chewer, a senior with sensitive teeth, or a picky eater who needs grain-free options, there’s a recipe here that fits.
Let’s get into it.
Contents
- What Makes Blueberry Peanut Butter Dog Chews So Healthy
- Important Safety Tips Before You Start
- Recipe 1: Classic Baked Blueberry Peanut Butter Chew Sticks
- Recipe 2: No-Bake Frozen Blueberry PB Yogurt Chews
- Recipe 3: Sweet Potato, Blueberry, and Peanut Butter Chews
- Recipe 4: Grain-Free Blueberry Peanut Butter Chews
- Recipe 5: 3-Ingredient Quick Blueberry PB Bites
- How to Choose the Right Recipe for Your Dog
- Portion Guidelines: How Many Chews Is Too Many?
- Storage Tips That Apply to All Recipes
- Final Thoughts
What Makes Blueberry Peanut Butter Dog Chews So Healthy
Before jumping into the recipes, it helps to know why this flavor combo isn’t just tasty—it’s actually good for your dog.
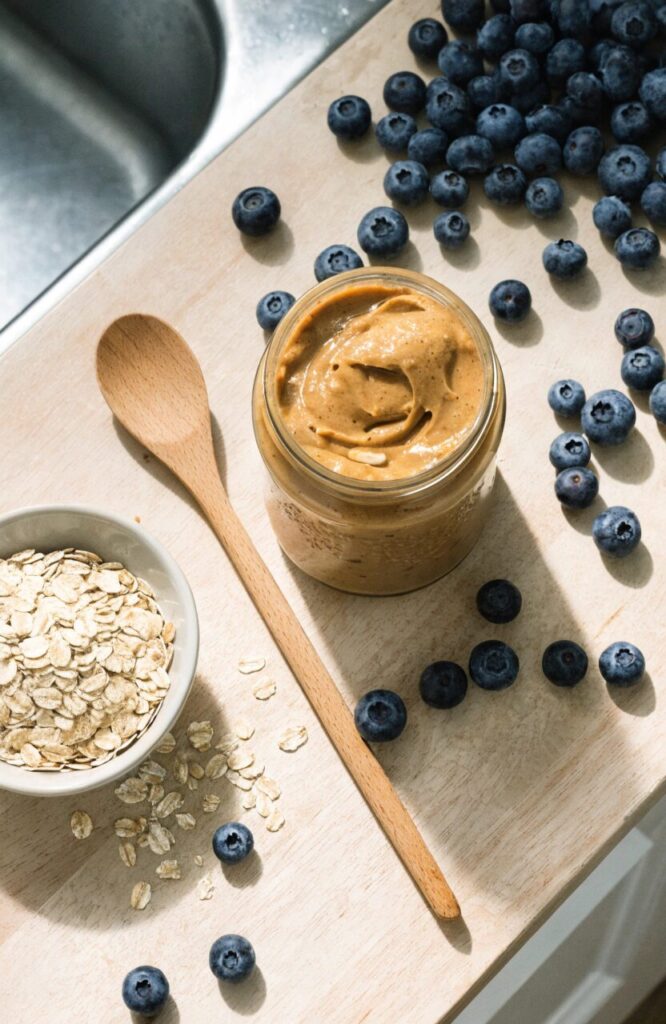
Blueberries: Nature’s Antioxidant Boost
Blueberries are tiny but mighty. They’re packed with antioxidants, vitamin C, and fiber, all while being low in calories. For dogs, this means:
- Support for the immune system
- Help fighting cell damage from aging
- A natural source of fiber for healthy digestion
Because blueberries are soft and naturally sweet, dogs tend to love them without needing any added sugar.
Peanut Butter: A Safe Way to Add Flavor and Protein
Peanut butter is the secret weapon of dog treat recipes. It’s creamy, smells amazing, and helps bind ingredients together.
When chosen correctly, peanut butter offers:
- Healthy fats for skin and coat
- Protein to support muscles
- A flavor dogs simply can’t resist
The catch? Not all peanut butter is dog-safe. We’ll cover that next.
Important Safety Tips Before You Start

A few quick rules to keep in mind before you preheat that oven:
- Always check for xylitol. This sweetener is highly toxic to dogs, even in small amounts. Read every peanut butter label, every time.
- Use plain, unsalted peanut butter. Skip flavored or “natural” varieties with added sugar or salt.
- Wash blueberries first, whether fresh or frozen.
- Cool treats completely before serving—warm dough can upset a dog’s stomach.
- Introduce new treats slowly, especially if your dog hasn’t had blueberries or peanut butter before.
If you’re also curious about other everyday foods and whether they’re safe, check out this guide on can dogs eat cheerios for more human-food safety tips.
Now, let’s get baking (and freezing).
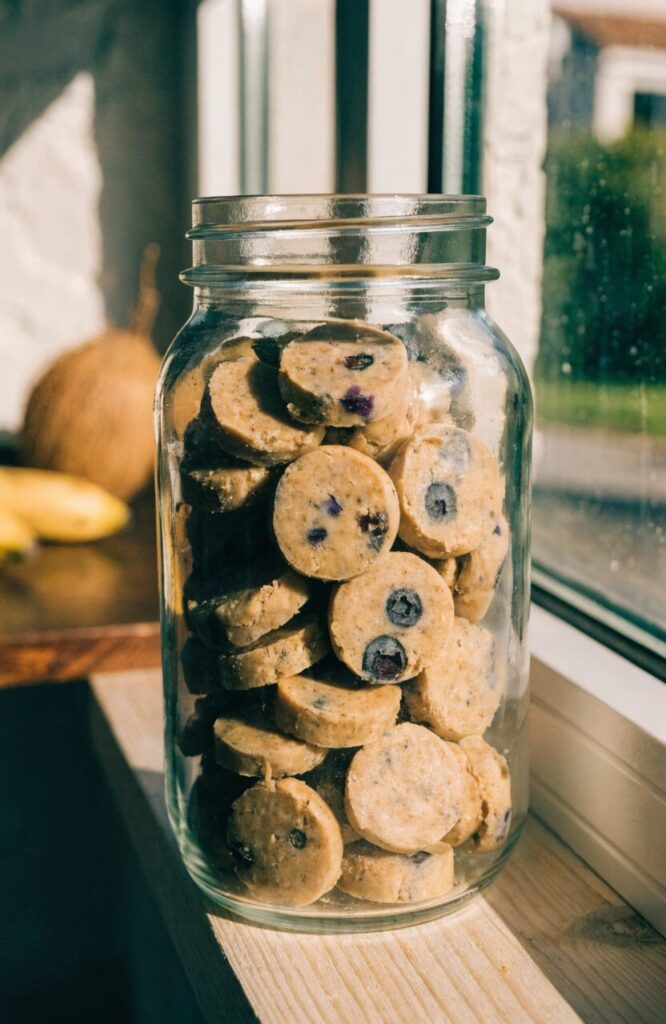
Recipe 1: Classic Baked Blueberry Peanut Butter Chew Sticks
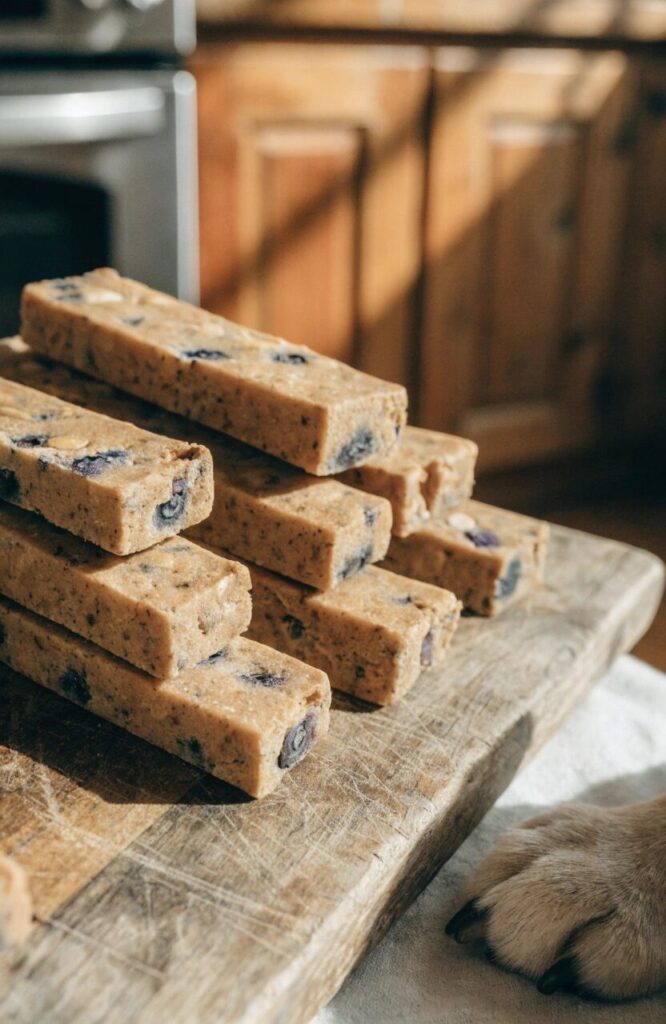
This is the recipe most dog owners search for first—and for good reason. It’s simple, the texture holds up well, and it makes a generous batch.
Why This Recipe Works
This version uses oat flour as a base, which gives the chews a firm, slightly crunchy texture that’s perfect for dogs who like to really work on a treat. The egg helps bind everything together, while the blueberries add little pockets of natural sweetness throughout.
Ingredients
- 1 cup oat flour (blend rolled oats if you don’t have oat flour)
- ½ cup natural peanut butter (xylitol-free)
- ½ cup fresh or frozen blueberries, lightly mashed
- 1 large egg
- 2–4 tablespoons water (as needed)
Instructions
- Step 1: Preheat and Prep Preheat your oven to 350°F (175°C). Line a baking sheet with parchment paper so nothing sticks.
- Step 2: Mash the Blueberries In a small bowl, gently mash the blueberries with a fork. Don’t go too smooth—small chunks add texture and flavor pockets.
- Step 3: Mix the Wet Ingredients In a large bowl, combine the peanut butter, mashed blueberries, and egg. Stir until you get a glossy, thick mixture.
- Step 4: Add the Oat Flour Slowly mix in the oat flour. The dough will look messy and shaggy at first—that’s completely normal. Add water, one tablespoon at a time, until the dough comes together and doesn’t stick to your hands.
- Step 5: Shape the Chews Turn the dough onto a lightly floured surface. Roll it into a rectangle about ½ inch thick, then slice it into stick shapes using a knife or pizza cutter.
- Step 6: Bake Place the sticks on your prepared baking sheet. Bake for 20–25 minutes, flipping halfway through for even cooking.
- Step 7: Cool Completely Let the chews cool fully on a wire rack before giving them to your dog. This step matters—warm chews are softer and can be messy, plus cooling helps them firm up properly.
Texture Tip
Want a chewier stick instead of a crunchy one? Lower the oven to 300°F after the initial bake and leave the chews in for an extra 10–15 minutes with the door slightly open. This slowly dries them out without making them rock-hard.
How to Store
- Room temperature: Airtight container for up to 5 days
- Refrigerator: Up to 10 days
- Freezer: Up to 2 months
If your dog tends to be a heavy chewer who goes through treats fast, you might want to pair these with some long-lasting dog bones treat options for variety.
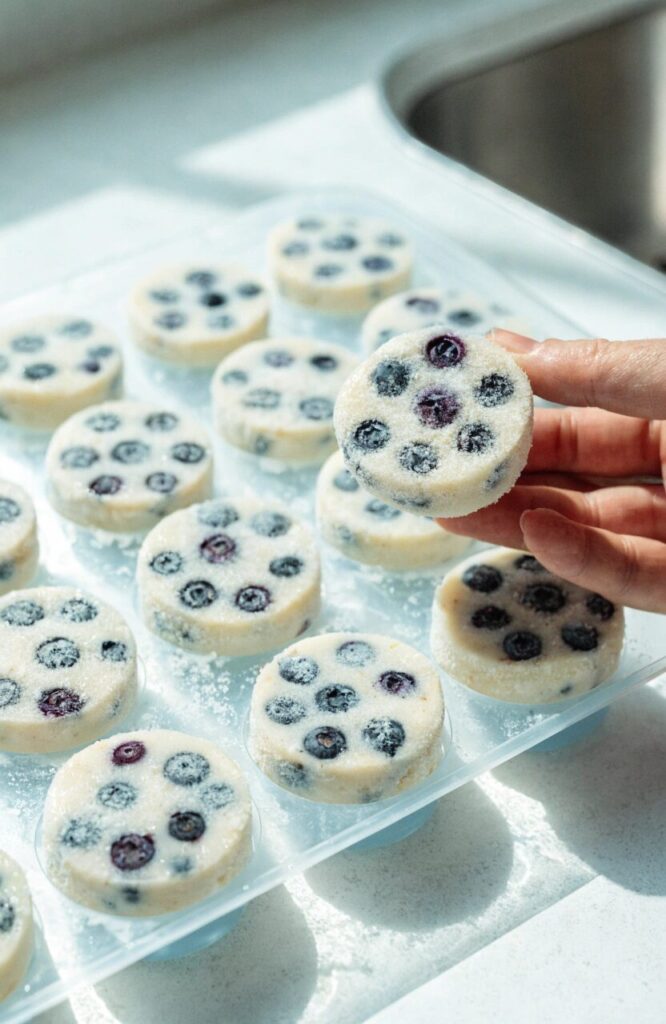
Recipe 2: No-Bake Frozen Blueberry PB Yogurt Chews
Perfect for hot days, lazy afternoons, or when you simply don’t want to turn the oven on.
Why This Recipe Works
This recipe skips baking entirely. Instead, plain yogurt and peanut butter create a creamy base that freezes into a firm, lickable chew. It’s especially great for dogs who enjoy licking treats slowly—it keeps them busy and cool at the same time.
Ingredients
- 2 cups plain unsweetened yogurt
- ½ cup natural peanut butter (xylitol-free)
- ¾ cup blueberries, mashed
- ¼ cup rolled oats (optional, for a firmer texture)
Instructions
- Step 1: Mix the Base In a mixing bowl, combine the yogurt and peanut butter until smooth and well blended.
- Step 2: Add the Blueberries Stir in the mashed blueberries until they’re evenly distributed throughout the mixture.
- Step 3: Add Oats (Optional) If you want a firmer chew that holds its shape better, mix in the rolled oats now.
- Step 4: Portion the Mixture Spoon the mixture into silicone molds, or simply shape small portions onto a parchment-lined tray using a spoon.
- Step 5: Freeze Place in the freezer for at least 4 hours, or until completely firm.
- Step 6: Pop and Serve Once frozen, pop the chews out of their molds and serve immediately, or store them frozen until needed.
Why Dogs Love This Texture
These chews are semi-firm straight from the freezer and soften slightly as your dog works through them. This slow-melt texture encourages licking and gentle gnawing—great for slowing down treat time and adding a bit of mental stimulation.
How to Store
Keep these in the freezer in an airtight container for up to 2 months. Discard any that develop freezer burn or an off smell.
Recipe 3: Sweet Potato, Blueberry, and Peanut Butter Chews
This recipe is ideal if your dog has a sensitive stomach or you simply want to add more fiber and vitamins to their treat rotation.
Why This Recipe Works
Sweet potato adds natural sweetness and a smooth, dense texture, while a touch of peanut butter ties everything together with that flavor dogs go crazy for. The cinnamon (yes, it’s dog-safe in small amounts) adds warmth without any spice.
Ingredients
- ½ cup mashed sweet potato (cooked and cooled)
- 1 cup rolled oats
- ¼ teaspoon cinnamon
- ¼ cup blueberries (fresh or frozen)
- 2 tablespoons natural peanut butter (xylitol-free)
Instructions
- Step 1: Combine the Base Ingredients In a large bowl, mix the mashed sweet potato, oats, cinnamon, and peanut butter until thoroughly combined.
- Step 2: Fold in Blueberries Gently fold in the blueberries, making sure they’re spread evenly throughout the mixture.
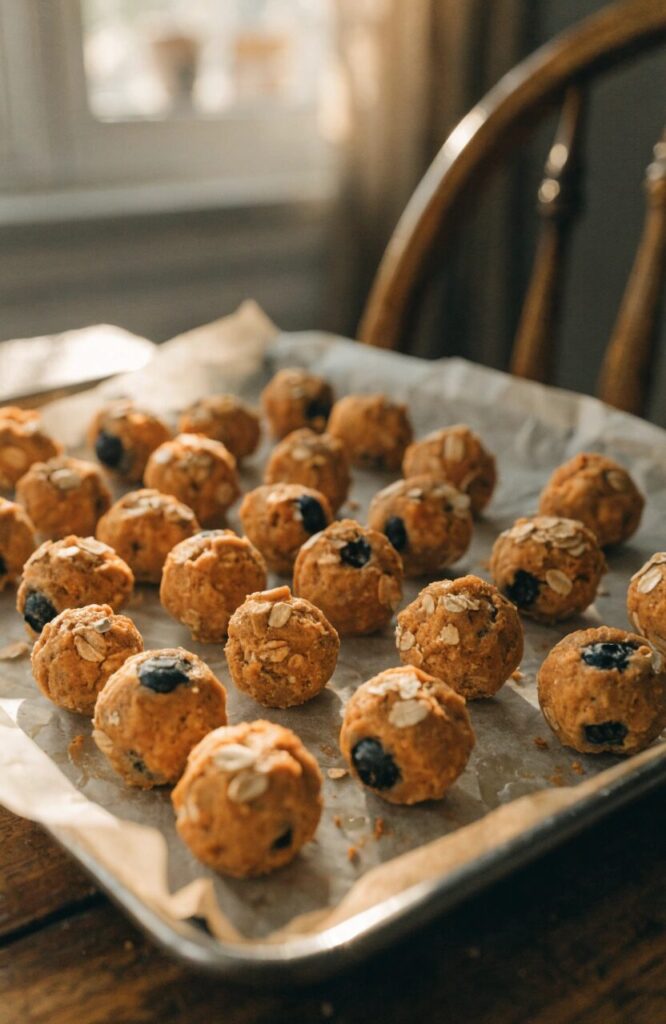
- Step 3: Shape the Chews Using your hands, roll the mixture into small balls or shape into chew-sized portions, depending on your dog’s size.
- Step 4: Place and Freeze Arrange the chews on a parchment-lined baking sheet, spacing them apart. Freeze for 1–2 hours until firm.
- Step 5: Transfer to Storage Once firm, transfer the chews to an airtight container.
Pro Tip for Best Texture
If the mixture feels too dry to hold together, add a small splash of water or a bit more mashed sweet potato until it reaches a moldable consistency.
How to Store
- Refrigerator: Mixture holds for up to 2 days before freezing
- Freezer: Up to 2 weeks in an airtight container
- Thawing: Let 2–3 chews sit at room temperature for about 15 minutes before serving
Recipe 4: Grain-Free Blueberry Peanut Butter Chews
If your dog has a grain sensitivity—or you simply prefer to skip oats and flour altogether—this recipe swaps in pantry staples that are naturally grain-free.
Why This Recipe Works
Instead of oat flour, this version uses a mix of mashed banana and a small amount of coconut flour (or almond flour, if your dog tolerates nuts well) to bind everything together. The result is a softer, more cake-like chew that’s gentle on sensitive digestive systems.
Ingredients
- ½ cup natural peanut butter (xylitol-free)
- ½ cup mashed ripe banana
- ½ cup blueberries, mashed
- 1 cup coconut flour
- 1 large egg
Instructions
- Step 1: Preheat the Oven Set your oven to 350°F (175°C) and line a baking sheet with parchment paper.
- Step 2: Mix Wet Ingredients In a bowl, combine the peanut butter, mashed banana, mashed blueberries, and egg. Stir until smooth.
- Step 3: Add Coconut Flour Gradually mix in the coconut flour. Coconut flour absorbs more moisture than oat flour, so the dough will thicken quickly—stop adding once it forms a soft, workable dough.
- Step 4: Shape the Chews Roll the dough into small balls or flatten into chew-sized rounds, about ½ inch thick.
- Step 5: Bake Place on the baking sheet and bake for 18–20 minutes, or until lightly golden and firm to the touch.
- Step 6: Cool Before Serving Allow to cool completely on a wire rack. These chews will firm up more as they cool.
A Note on Allergies
If your dog has never had coconut flour or banana before, introduce these chews slowly and watch for any signs of an upset stomach. Every dog’s digestive system reacts a little differently to new ingredients.
How to Store
- Refrigerator: Up to 7 days in an airtight container
- Freezer: Up to 2 months
Recipe 5: 3-Ingredient Quick Blueberry PB Bites

Short on time? This recipe is for the days when you want to whip something up fast without measuring a dozen ingredients.
Why This Recipe Works
With just three ingredients, this is the easiest recipe on the list—perfect for beginners or for keeping the kids involved in a quick kitchen project with the dog watching nearby.
Ingredients
- 1 cup natural peanut butter (xylitol-free)
- 1½ cups rolled oats
- ½ cup blueberries, mashed
Instructions
Step 1: Mix Everything Together In a large bowl, combine the peanut butter, oats, and mashed blueberries. Stir until a thick, sticky dough forms.
Step 2: Shape the Bites Roll the mixture into small, bite-sized balls using your hands. If the dough feels too sticky, lightly wet your hands first.
Step 3: Flatten (Optional) For a chewier texture, gently flatten each ball into a small disc shape.
Step 4: Chill or Bake
- No-bake option: Place the bites on a tray and refrigerate for at least 1 hour until firm.
- Baked option: Bake at 325°F (165°C) for 12–15 minutes for a firmer, drier bite.
Step 5: Cool and Serve If baked, let cool completely before serving.
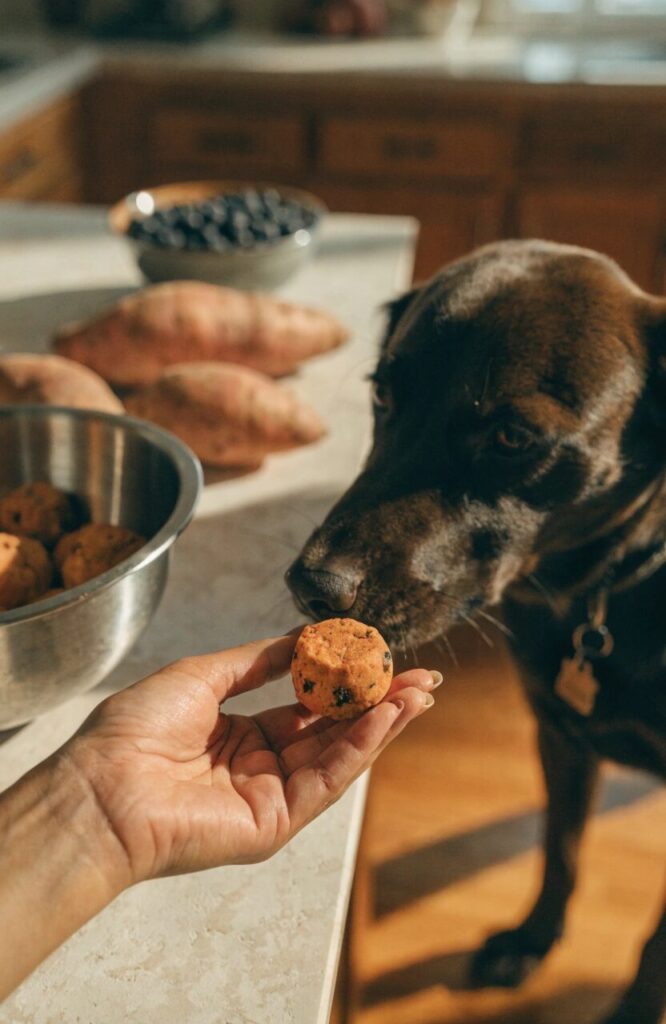
Why This One’s Great for Training
Because these bites are small and soft, they’re perfect for training sessions where you need quick, bite-sized rewards. If you’re working on commands, pair these treats with some essential puppy training tips for better results.
How to Store
- Refrigerator: Up to 1 week
- Freezer: Up to 1 month
How to Choose the Right Recipe for Your Dog
With five recipes to choose from, here’s a quick way to decide which one fits your dog best.
By Texture Preference
- Loves a crunchy, long-lasting chew: Recipe 1 (Baked Chew Sticks)
- Prefers something soft and cool: Recipe 2 (No-Bake Frozen Yogurt Chews)
- Wants a dense, chewy bite: Recipe 3 (Sweet Potato Chews)
- Enjoys soft, cake-like treats: Recipe 4 (Grain-Free Chews)
- Needs small training rewards: Recipe 5 (3-Ingredient Bites)
By Dietary Needs
- Sensitive stomach: Recipe 3 (Sweet Potato)
- Grain allergy: Recipe 4 (Grain-Free)
- Egg allergy: Recipe 2 or Recipe 5 (both egg-free)
- Quick and simple: Recipe 5
If your dog has ongoing digestive issues or you’re unsure which ingredients to introduce, it’s worth reviewing your puppy veterinary needs checklist or chatting with your vet before trying new treats.
Portion Guidelines: How Many Chews Is Too Many?
No matter which recipe you choose, treats should never make up more than 10% of your dog’s daily food intake. As a general guide:
| Dog Size | Daily Treat Limit |
|---|---|
| Small dogs (under 20 lbs) | 1–2 chews |
| Medium dogs (20–50 lbs) | 2–3 chews |
| Large dogs (over 50 lbs) | 3–4 chews |
These are rough guidelines—always adjust based on your dog’s activity level, weight, and any vet recommendations.
Storage Tips That Apply to All Recipes
A few general rules to keep your homemade chews fresh and safe:
- Cool completely before storing—warm treats trap moisture and spoil faster.
- Use airtight containers for both fridge and freezer storage.
- Label and date your containers, especially if you’re making multiple batches.
- Thaw frozen chews at room temperature for 10–15 minutes before serving.
- Discard anything that smells off, looks discolored, or feels slimy.
Final Thoughts
Making Blueberry Peanut Butter Dog Chews at home doesn’t have to be complicated—and as you’ve seen, there’s no single “right” recipe. Whether you bake, freeze, or skip the oven entirely, each version offers a healthy, additive-free way to treat your dog.
Start with whichever recipe matches your dog’s chewing style and dietary needs, then experiment from there. Once you find the right fit, don’t be surprised if your dog starts waiting by the kitchen every time you reach for the peanut butter jar.
And if treat time turns into a fun bonding ritual, why not make it part of a bigger routine? Setting up a dedicated dog treat station ideas at home can make storing and serving these homemade chews even easier.
Happy baking—and enjoy watching your dog enjoy every bite.

Izzy is an experienced ranch worker who has a passion for exploring nature and getting up close to wildlife. With her connections to various animal organizations, Izzy is well-versed in animal care and rehabilitation.