12 DIY Dog Collars Ideas Using Paracord, Fabric, Leather & More
Does your dog deserve something more special than a plain store-bought collar? Of course they do! DIY dog collars are one of the most fun and rewarding craft projects a dog owner can take on. You get to pick the colors, add your dog’s name, choose the style, and create something totally one-of-a-kind.
The best part? You don’t need to be a professional crafter to get started. Whether you’re working with paracord, leather, yarn, fabric, or beads, there’s a DIY dog collar idea out there that matches your skill level and your dog’s personality.
In this guide, we’ve gathered 12 real DIY dog collar ideas inspired by actual handmade collars from talented makers. From beginner-friendly bead collars to jaw-dropping paracord flower designs, every idea here is something you can realistically make at home.
Before you dive in, make sure you’re picking the right approach for your dog’s size and needs. It also helps to already know a little about safe collar choices for dogs so you understand what materials work best next to your pup’s skin.
Contents
- 1. Stamped Leather Name Collar
- 2. Simple Paracord Cobra Stitch Collar
- 3. Colorful Letter Charm Paracord Collar
- 4. Pastel Paracord Collar with Butterfly Charms
- 5. Paracord Flower Collar
- 6. Crocheted Collar with Tulip Appliqués
- 7. Daisy Bead Collar
- 8. Multi-Strand Braided Paracord Collar
- 9. Printed Ribbon Over Nylon Webbing Collar
- 10. Silicone Collar with Snap-On Name Plate
- 11. Printed Fabric Sewn Collar
- 12. Macramé Cotton Rope Collar with Flower Charm Pendant
- What Materials Do You Need to Get Started?
- Safety Tips for Every DIY Dog Collar
- Final Thoughts
1. Stamped Leather Name Collar
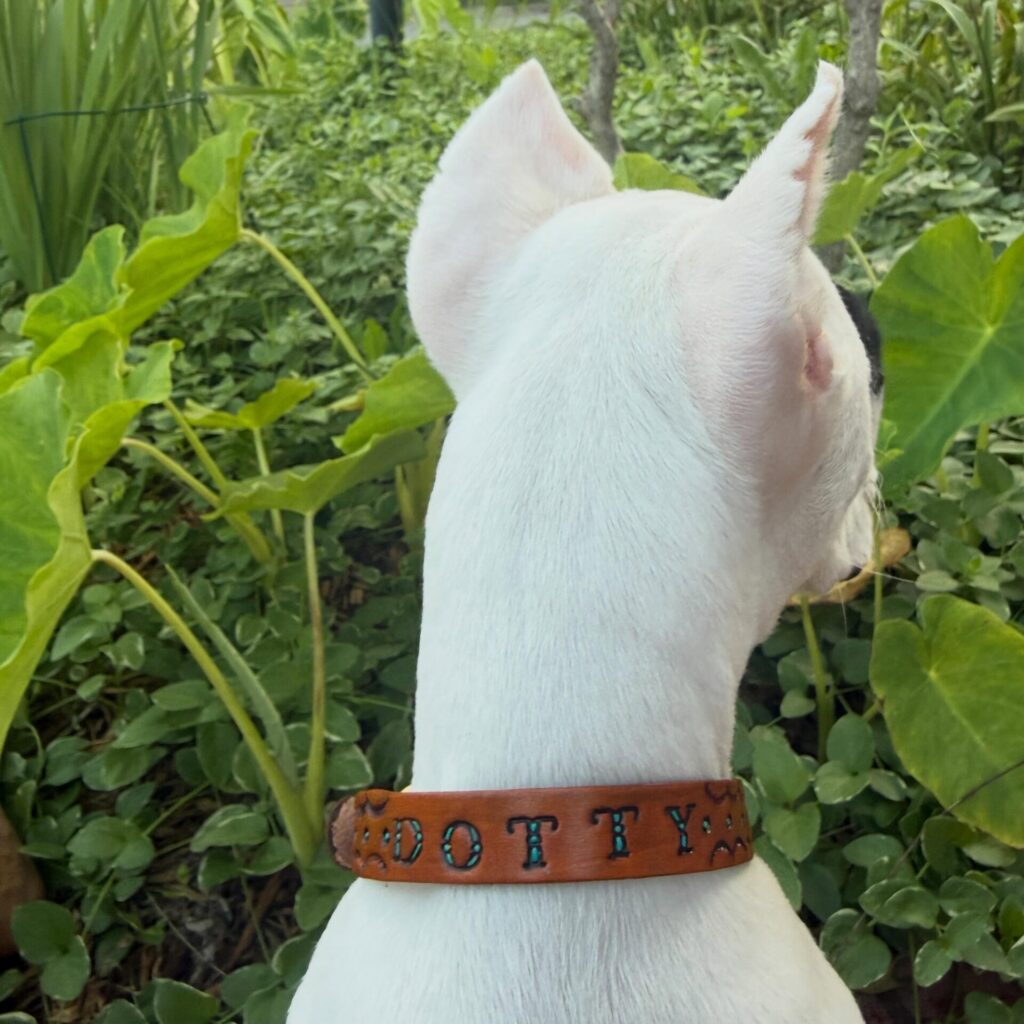
Skill Level: Intermediate | Best For: Medium to Large Dogs
There’s something timeless about a leather collar — and when it has your dog’s name stamped right into it, it becomes a true keepsake.
This idea is inspired by a gorgeous brown leather collar with the name “DOTTY” carved in bold letters and painted with teal/turquoise ink. The result looks incredibly professional and has a Western artisan feel to it.
What You’ll Need:
- Vegetable-tanned leather strip (1–1.5 inches wide)
- Alphabet leather stamps
- A rubber mallet
- Leather dye or acrylic paint (for the letters)
- Leather hole punch
- A buckle or snap fastener
- Leather finish/sealant
How It Works:
Cut your leather to the right length for your dog’s neck, leaving extra room for the buckle holes. Use your alphabet stamps and mallet to press each letter firmly into the leather. Once you’re happy with the stamping, paint the letters with your chosen color — teal looks stunning on tan leather. Let it dry fully, then apply a sealant to protect the surface.
This is one of those DIY dog collar ideas that looks like it came straight from a boutique shop. It’s also extremely durable and can last for years with proper care.
The name stamped on the collar also serves as a basic identification feature, which is always a safety bonus when you’re out on walks.
📸 Photo credit: Instagram @lanora_lane
2. Simple Paracord Cobra Stitch Collar
Skill Level: Beginner | Best For: All Dog Sizes
If you’ve never made a DIY dog collar before, this is exactly where you should start.
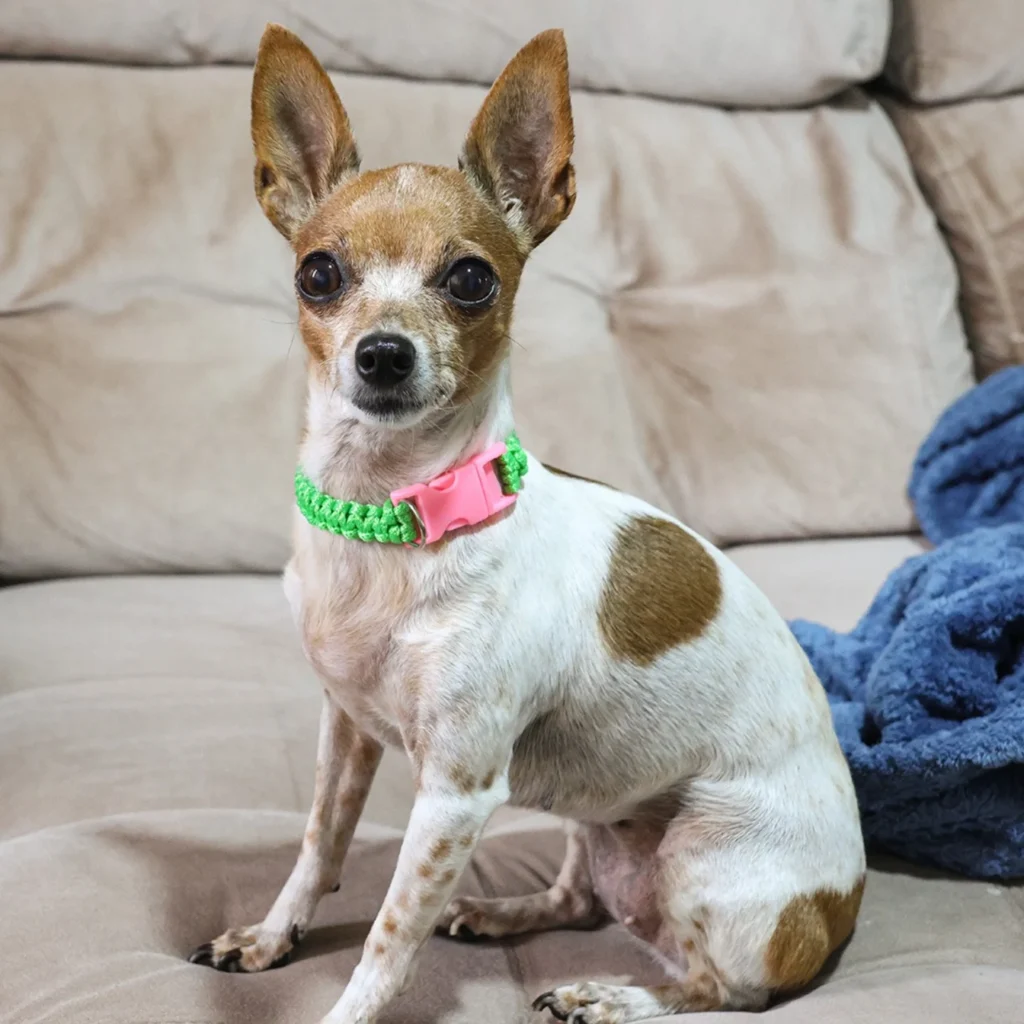
The cobra stitch (also called the square knot) is the most basic paracord technique, and it produces a clean, sturdy collar with very little practice. The inspiration here is a bright green paracord collar with a contrasting pink plastic side-release buckle — simple, colorful, and totally functional.
What You’ll Need:
- 550 paracord (about 8–10 feet for a small/medium dog)
- A plastic side-release buckle
- A D-ring for the leash attachment
- Scissors
- A lighter (to seal cord ends)
How It Works:
Thread your paracord through the buckle and D-ring, then work cobra stitches across the entire length. The knots alternate left-right and create a flat, woven surface. When you reach the end, trim the extra cord and melt the tips with a lighter to prevent fraying.
You can mix two colors of paracord for a two-tone look, or keep it single-colored for something clean and bold.
This is a great starter project, and once you’ve mastered the cobra stitch, you’ll naturally want to try more advanced patterns. The whole collar can be made in under two hours.
📸 Photo credit: Instagram @barkbarkbelmontshore
3. Colorful Letter Charm Paracord Collar
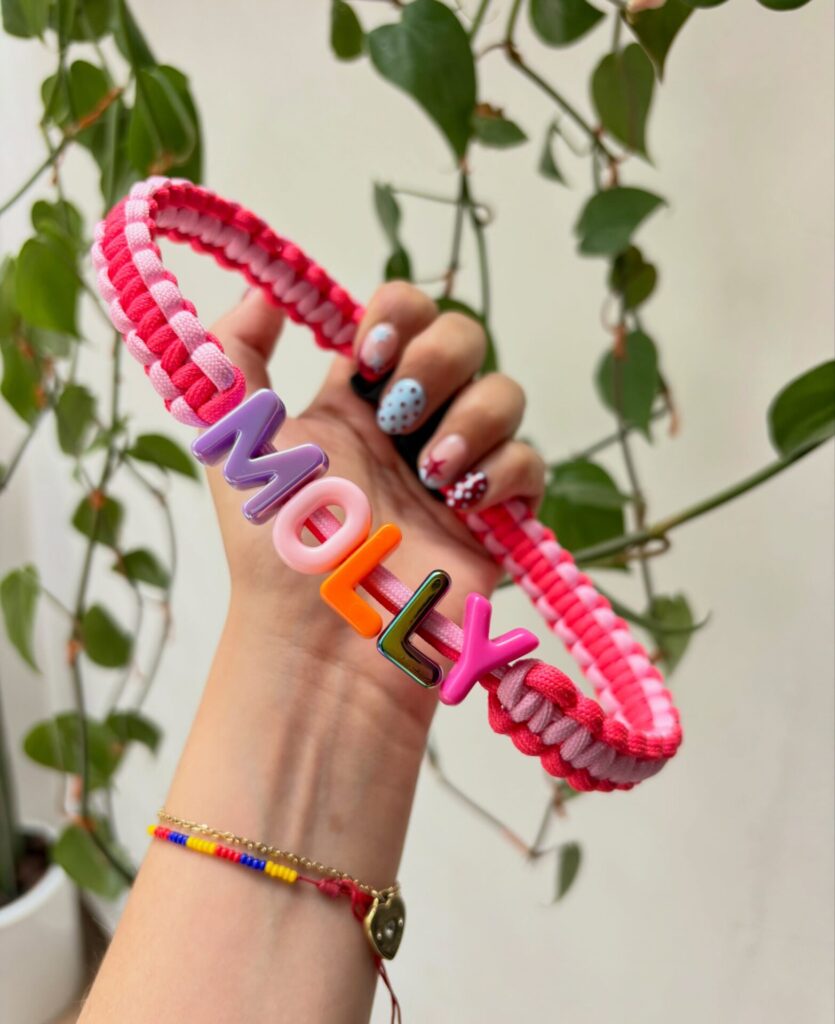
Skill Level: Beginner–Intermediate | Best For: Small to Medium Dogs
This idea takes personalization to a whole new level. Inspired by a hot pink and light pink paracord collar featuring large 3D bubble letter charms spelling “MOLLY” in mixed colors — purple, pink, orange, and metallic — this collar is pure fun.
The bubble letter charms are the real star of the show here. Each letter is a different color, giving the collar a playful, toy-like energy that’s perfect for social media photos.
What You’ll Need:
- Paracord in two shades of pink (or any two colors)
- Large acrylic or resin bubble letter charms
- Small jump rings or thin wire to secure letters
- A buckle and D-ring
- Scissors and a lighter
How It Works:
Make your base collar using a standard cobra or box stitch pattern. Once the collar is complete, thread your letter charms onto the flat surface of the collar using jump rings or by weaving them through the knotwork itself.
Space the letters evenly across the front-facing part of the collar where they’ll be visible.
This kind of DIY dog collar idea works especially well for dogs with short names — four to five letters sit perfectly on a standard collar width. It makes a wonderful personalized gift too. If you’re still deciding on a name for a new pup, check out these girl dog names or boy dog names for inspiration.
📸 Photo credit: Instagram @__lulule
4. Pastel Paracord Collar with Butterfly Charms
Skill Level: Beginner–Intermediate | Best For: Small Dogs
This design takes the charm-collar idea in a softer, dreamier direction. The inspiration is an all-pink paracord collar with pastel letter charms spelling “MINI,” small silver bead accents between the letters, and delicate translucent butterfly charms hanging from both ends.
It has a cottagecore-meets-Y2K aesthetic that’s incredibly popular right now on pet Instagram accounts.
What You’ll Need:
- Pink paracord (two shades work beautifully)
- Pastel acrylic letter beads
- Small silver or iridescent round beads
- Butterfly charm pendants (acrylic or resin)
- Jump rings
- Buckle or D-ring hardware
How It Works:
Braid or knot your paracord base as usual. Thread the letter beads and spacer beads onto a thin wire or elastic cord that runs through the center of the collar, then secure at both ends. Attach butterfly charms at the collar ends using jump rings.
The translucent butterfly charms catch light beautifully in outdoor photos, making this one of the most photogenic DIY dog collar ideas in this entire list.
This style suits smaller breeds perfectly — think Chihuahuas, Maltese, Shih Tzus, or toy breeds. Speaking of small dogs, here’s a helpful guide on best small dog breeds if you’re still exploring which furry friend is right for you.
📸 Photo credit: Instagram @khaotokpet_collar25
5. Paracord Flower Collar
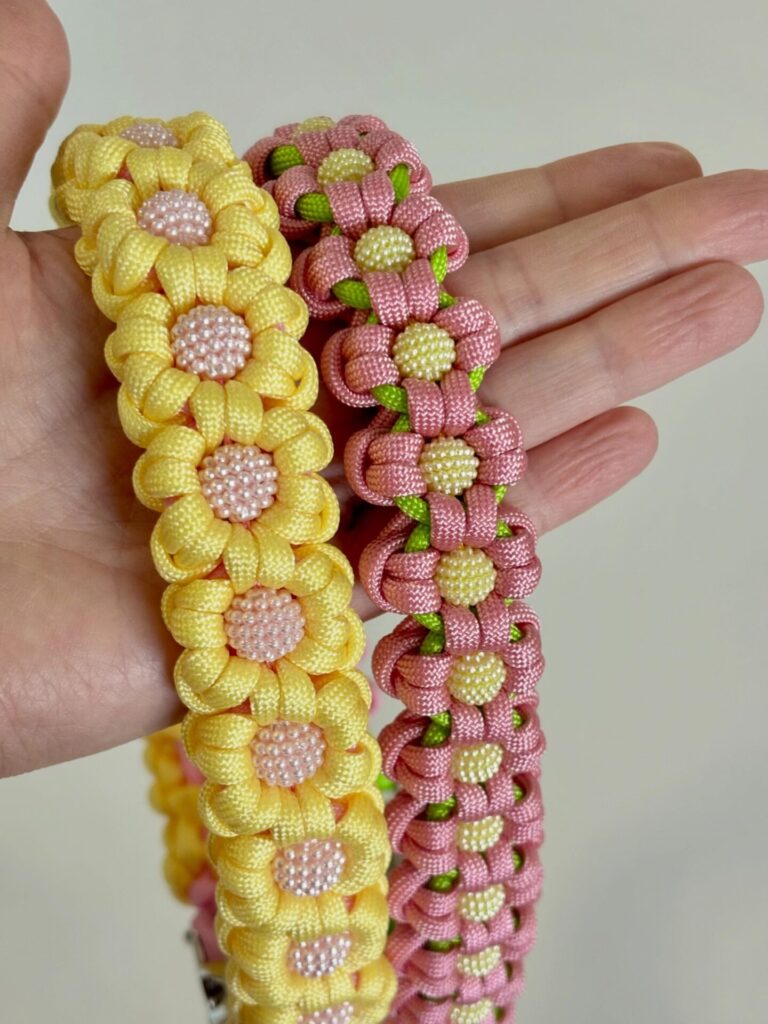
Skill Level: Advanced | Best For: Medium to Large Dogs
This is where DIY dog collars become genuine works of art.
The inspiration here is two stunning collars — one in yellow with pearl bead centers resembling sunflowers, and one in dusty pink with green leaf accents and cream bead centers resembling garden flowers. Every single flower is knotted entirely from paracord. There is no glue, no appliqué, no shortcut — just pure knotwork.
What You’ll Need:
- Paracord in your main flower color
- A contrasting paracord color for leaves (green works perfectly)
- Small pearl or seed beads for flower centers
- A needle and thread or thin wire to secure the beads
- Buckle hardware
How It Works:
Each flower is made using a petal knot technique — you’ll form a series of loops around a central point, then cinch them to create a raised, rounded petal shape. Five to eight petals per flower is typical. The flowers are then connected in a chain with small leaf knots between each one.
Yes, this takes time. Each collar can take four to six hours to complete. But the end result is unlike anything you can buy in a store, and it photographs beautifully.
This design suits golden retrievers, doodles, and other fluffy large breeds especially well — the flowers pop against a thick, light-colored coat.
📸 Photo credit: Instagram @whatt_hefloof
6. Crocheted Collar with Tulip Appliqués
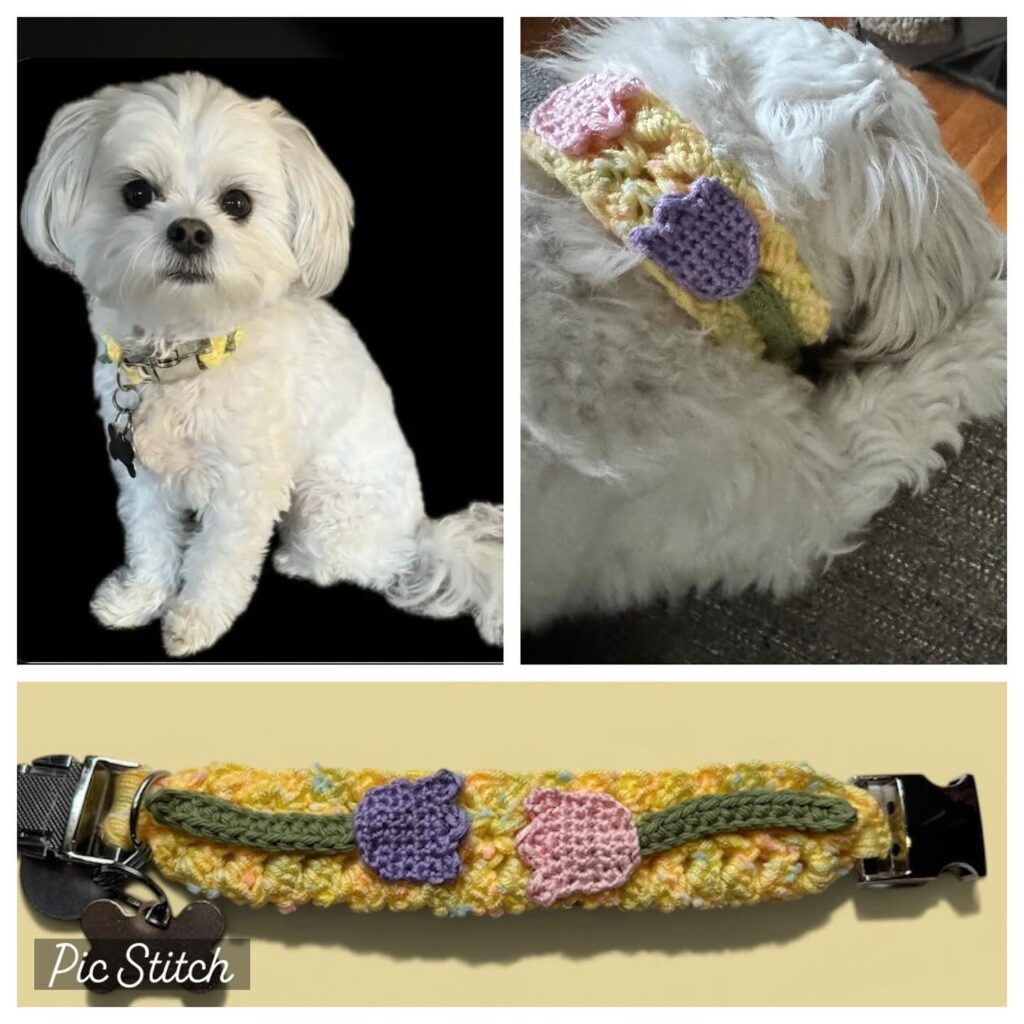
Skill Level: Intermediate | Best For: Small Dogs
For dog owners who already know how to crochet, this idea is pure joy. Inspired by a yellow variegated yarn collar worn by a white Maltese, this collar features hand-crocheted tulip flowers in purple and pink stitched directly onto the base.
The color combination — yellow base with purple and pink tulips against a green stem — is springtime perfection.
What You’ll Need:
- Variegated or solid yarn in your base color (cotton yarn is skin-friendly)
- Small amounts of yarn in 2–3 accent colors for the flowers
- A crochet hook (size B or C works for thin yarn)
- A small metal buckle or D-ring
- Yarn needle for weaving in ends
How It Works:
Crochet a flat rectangular strip long enough to fit your dog’s neck with some overlap for the buckle. Single crochet works perfectly for a dense, sturdy base. Crochet your tulip flowers separately (they’re just three-petal motifs with a chain stem), then sew them onto the collar surface.
You can also crochet directly into the base for a more integrated look.
This is one of the softest DIY dog collar ideas on this list, making it ideal for dogs with sensitive skin. Since it’s yarn-based, always make sure the collar stays dry — wet yarn can cause skin irritation over time. You can learn more about dog skin and health concerns to know what warning signs to watch for.
📸 Photo credit: Instagram @hip_2_be_stitched
7. Daisy Bead Collar
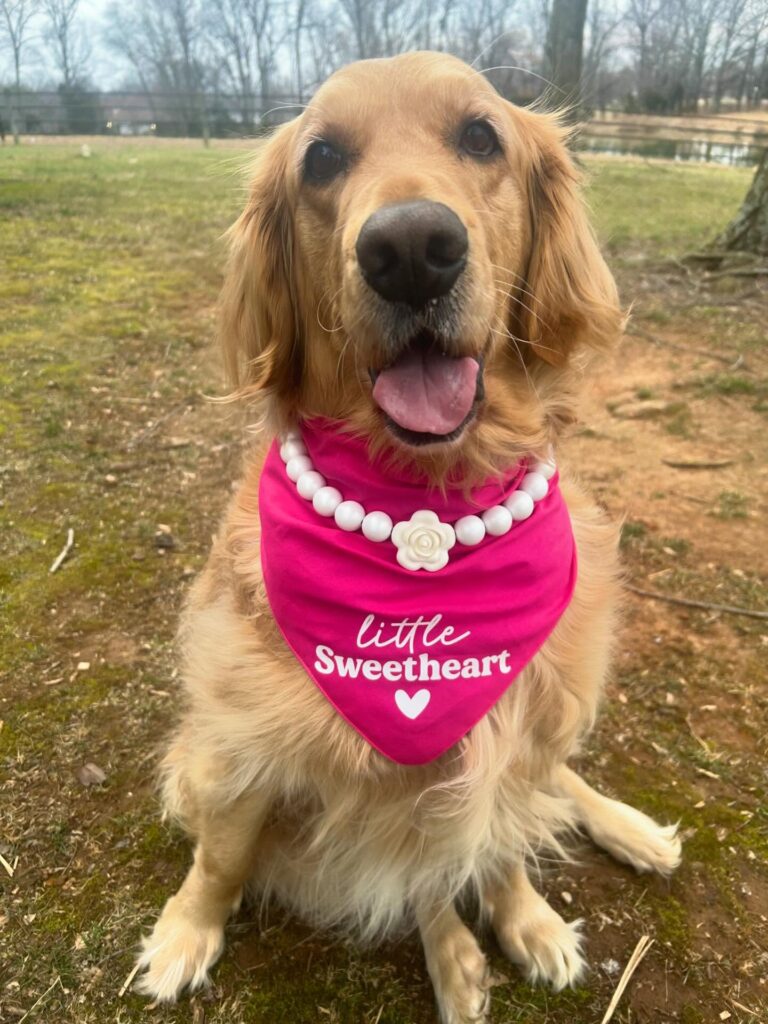
Skill Level: Beginner | Best For: Medium to Large Dogs
If you want something beautiful without a huge time commitment, a bead collar is your answer.
The inspiration here is a lavender daisy bead collar worn by a golden retriever — each “daisy” is formed by several small flower-shaped beads arranged around a white center bead, alternating with round purple beads in between. The effect is cheerful, springy, and absolutely charming.
What You’ll Need:
- Daisy/flower-shaped beads (acrylic, about 12–15mm)
- Round spacer beads in a matching color
- Stretchy beading elastic or beading wire with a crimp clasp
- Scissors or wire cutters
How It Works:
Measure your dog’s neck and cut your elastic or wire about two inches longer than that measurement. Thread your beads in a repeating pattern — one daisy, one round bead, one daisy, one round bead — until you’ve covered the full length. Tie off the elastic or crimp your wire ends securely.
If you’re using elastic, double-knot and add a tiny drop of jewelry glue to the knot for extra security.
This is one of the easiest DIY dog collar ideas you can make in an afternoon. Kids can even help with the beading process, making it a great family craft activity. It’s especially striking on golden retrievers, where the lavender pops beautifully against their golden coat.
📸 Photo credit: Instagram @farm_life_with_court
8. Multi-Strand Braided Paracord Collar
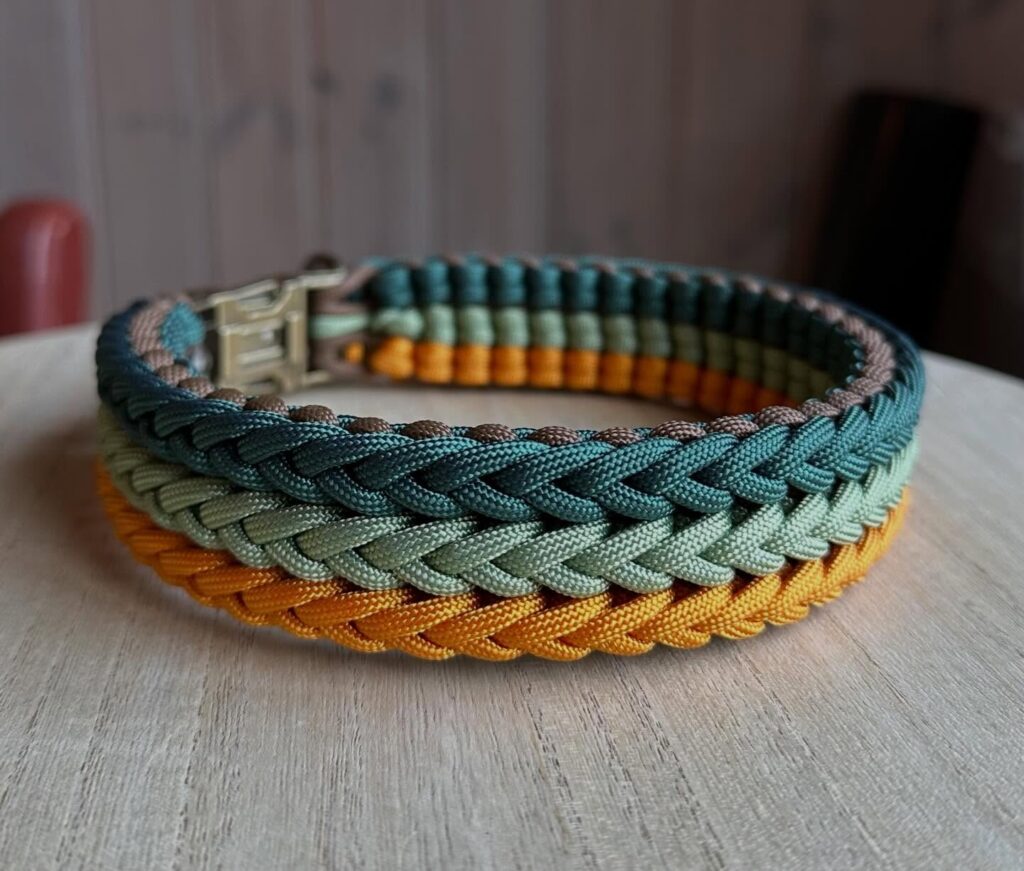
Skill Level: Advanced | Best For: Large Dogs
The inspiration here is a wide, structured collar featuring multiple parallel braided strands in teal, forest green, sage, orange, and brown — this collar looks like wearable architecture. The herringbone or fishtail braid pattern creates a layered, directional texture that’s completely unlike any other collar style.
What You’ll Need:
- 5–6 colors of 550 paracord (roughly 10–15 feet per strand)
- A wide metal side-release buckle (1.5 inch width)
- A wide D-ring
- Cord clamps or a vise to hold your work
- Scissors and a lighter
How It Works:
This collar uses multiple parallel braids that run side by side, creating a wide, flat surface. You braid each strand individually across the full collar length, then connect them into the buckle hardware at both ends. The colors are arranged in gradient order — dark to light or contrasting — to create that striped, layered effect.
Because it uses so much paracord, this collar is extremely strong and durable, making it excellent for large, active dogs. It sits flat against the neck without rolling, which is another major advantage for bigger breeds.
📸 Photo credit: Instagram @colourpop_design
9. Printed Ribbon Over Nylon Webbing Collar
Skill Level: Beginner | Best For: All Dog Sizes
This is one of the smartest and most accessible DIY dog collar ideas on this list. The concept is simple: take a plain nylon webbing collar as your base and cover it with a decorative printed ribbon. The result is a collar that looks completely custom but takes less than 30 minutes to make.
The inspiration is a pink leopard-print ribbon collar with colorful spots, a matching pink plastic buckle, and a tiny enamel daisy charm hanging from the D-ring — fun, feminine, and full of personality.
What You’ll Need:
- A plain nylon webbing collar (pre-made or DIY base)
- Decorative grosgrain or satin ribbon in your chosen print (leopard, floral, plaid — whatever you love)
- Fabric glue or a sewing machine
- A small enamel charm (optional but adorable)
- Jump ring to attach the charm
How It Works:
Cut your ribbon to match the length of the collar webbing exactly. Apply fabric glue along the back of the ribbon and press it firmly onto the collar surface. Alternatively, use a sewing machine to stitch along both edges for a more permanent finish.
Once dry, attach your enamel charm to the D-ring using a jump ring.
The beauty of this method is that you can swap ribbon patterns for different seasons — leopard print for everyday, plaid for fall, floral for spring. One collar base, endless looks. This is also a fantastic way to upcycle an old plain collar into something totally new.
📸 Photo credit: Instagram @combina_dogs
10. Silicone Collar with Snap-On Name Plate

Skill Level: Beginner–Intermediate | Best For: All Dog Sizes
If your dog loves the water or gets dirty on every walk, this is the most practical DIY dog collar idea on this list. Inspired by a set of bold, colorful waterproof silicone collars — each featuring a raised embossed name plate in a contrasting color snapped directly onto the band — this design combines durability with personalization in the cleanest way possible.
The name plates shown spell out names like SOL, GREY, NINA, and KIKI in bold raised letters. Each plate is a different color from the collar base, creating a striking two-tone look.
What You’ll Need:
- BioThane or silicone webbing (available online in many colors)
- A metal buckle (stainless steel or brass works best with waterproof materials)
- A D-ring
- A silicone or rubber name plate (can be custom ordered or made with a silicone mold and food-grade silicone)
- Rivet snaps or Chicago screws to attach the plate
How It Works:
Cut your BioThane to the correct collar length and punch holes for the buckle. Attach your D-ring using a folded loop and rivet. For the name plate, either order a custom silicone plate with your dog’s name embossed, or create one yourself using a silicone mold and alphabet stamps pressed in before curing.
Snap or rivet the name plate onto the front-center of the collar band.
BioThane and silicone collars are completely waterproof, odor-resistant, and wipe clean in seconds — making them ideal for active dogs, beach dogs, and rainy climates. You can find more useful dog accessories tips to round out your pup’s gear.
📸 Photo credit: Instagram @furrytagslb
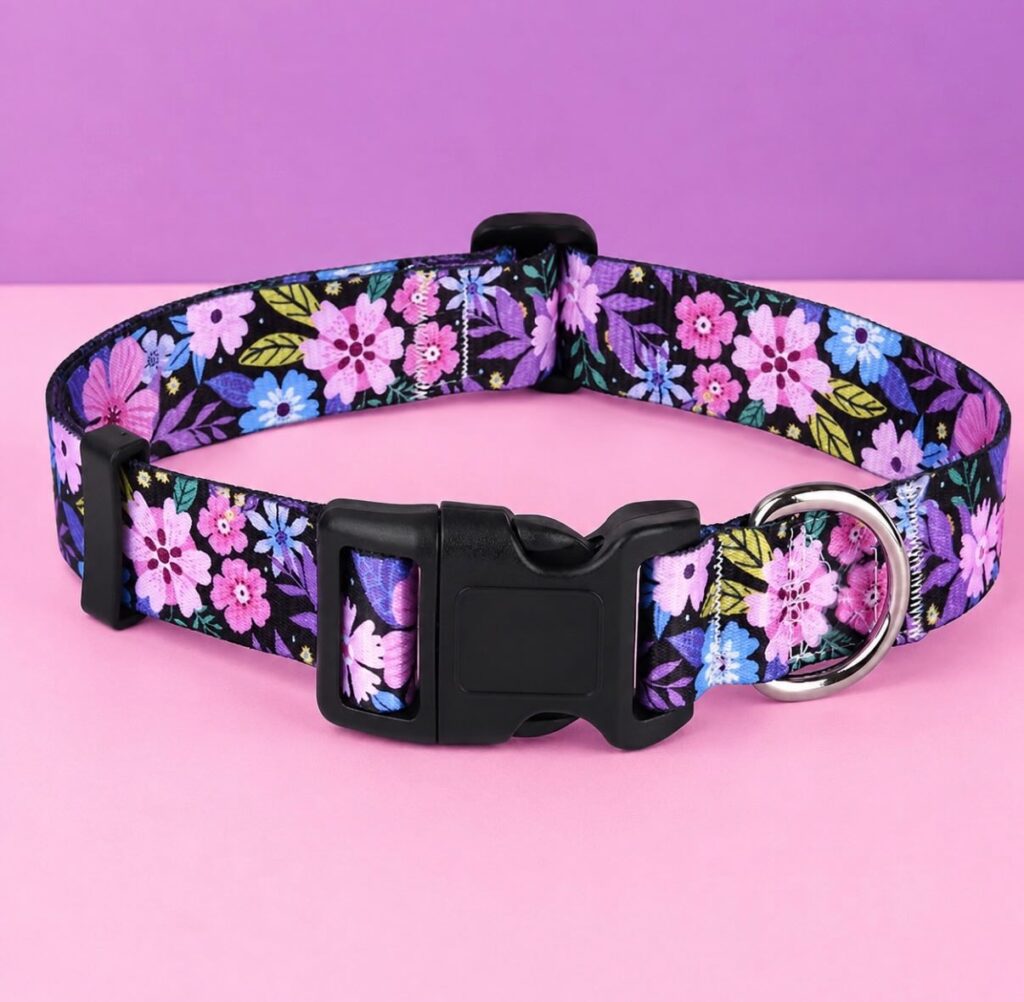
11. Printed Fabric Sewn Collar
Skill Level: Intermediate | Best For: All Dog Sizes
For anyone with basic sewing skills, making a fabric collar from scratch is a deeply satisfying project. This idea is inspired by a striking botanical floral collar — a rich black base fabric densely covered in pink, purple, and blue flowers with green and yellow leaves, finished with a black plastic buckle and silver D-ring.
The dark background makes the floral colors pop in a way that feels bold and sophisticated rather than sweet. It’s a collar that looks expensive and artistic.
What You’ll Need:
- Printed cotton or canvas fabric (your chosen pattern)
- Nylon webbing (same width as your fabric — ¾ inch or 1 inch)
- A side-release plastic buckle
- A D-ring
- Sewing machine and matching thread
- Iron and ironing board
- Scissors and pins
How It Works:
Cut your fabric into a strip that is twice the width of your webbing and the full length of the collar plus a few extra inches. Fold the fabric over the webbing lengthwise so it wraps around it completely, then pin in place. Sew along both long edges with a straight stitch.
Thread the fabric-covered webbing through your buckle and D-ring hardware, folding and stitching the ends to secure everything in place. Punch or hand-sew adjustment holes along the length.
The key to making this look professional is pressing your fabric folds with an iron before sewing — it keeps everything flat and aligned.
The pattern possibilities are truly endless. Floral, geometric, seasonal, character prints — if you can find the fabric, you can make the collar.
📸 Photo credit: Instagram @pawsandcoau
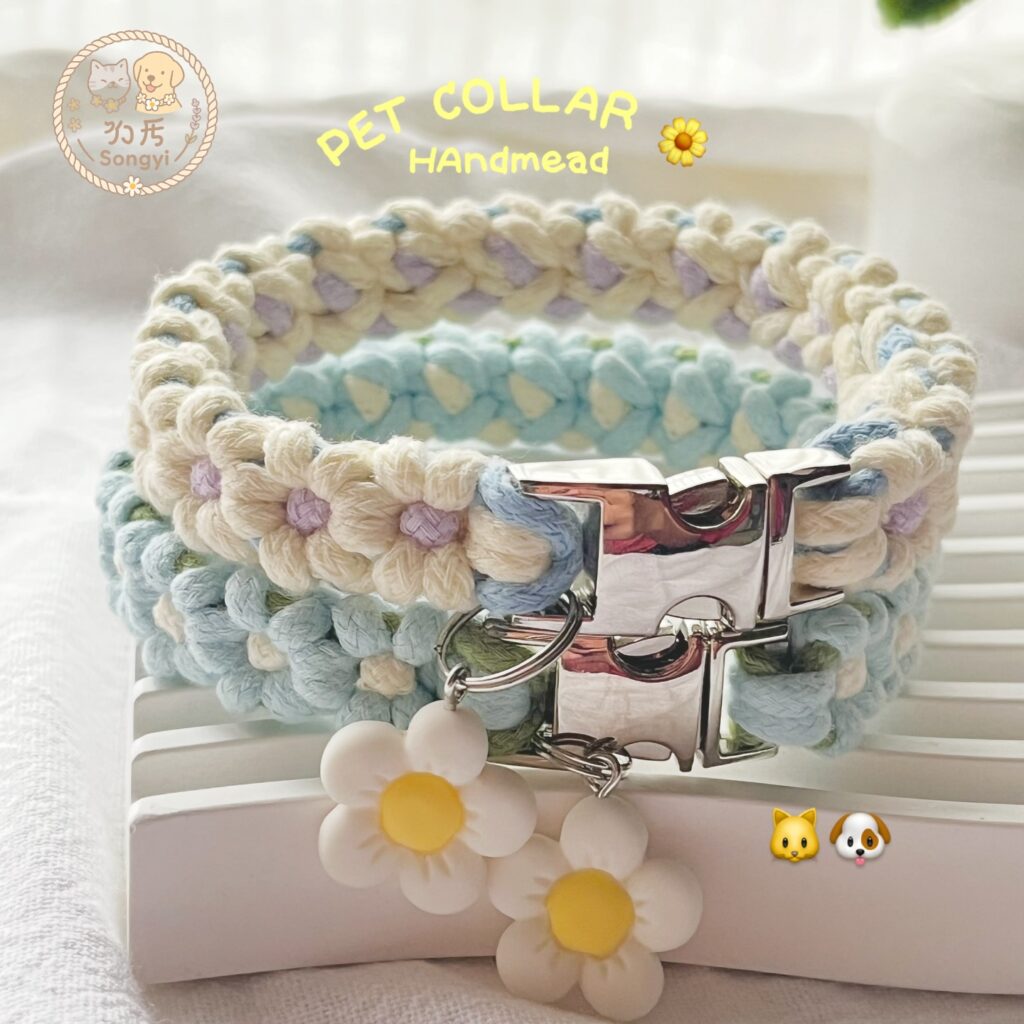
12. Macramé Cotton Rope Collar with Flower Charm Pendant
Skill Level: Intermediate | Best For: Small to Medium Dogs
This final idea brings together the softness of natural materials and the elegance of delicate detailing. Inspired by a handmade macramé-style collar in soft cream and blue tones with woven daisy flower motifs along the band and a white daisy charm pendant hanging from the buckle ring, this collar has an unmistakably handcrafted, cottagecore charm.
What You’ll Need:
- Natural cotton macramé cord (3mm works well)
- A metal or acrylic side-release buckle
- A D-ring
- Small daisy charm pendant
- A jump ring for the pendant
- Scissors and a tapestry needle
How It Works:
Work a flat square knot pattern across your cotton cord to create the collar body. As you progress, incorporate shorter looping knots at regular intervals to form small flower shapes embedded directly into the weave — this is done by creating a series of half-hitch knots in a circle pattern and pulling the center tight.
Finish by attaching your hardware and hanging your daisy charm from the D-ring using a jump ring.
Natural cotton macramé cord is wonderfully soft against a dog’s neck and gives this collar a textured, organic look that no factory-made product can replicate. Because it’s cotton-based, this collar is best suited for calmer, indoor-friendly dogs rather than rough outdoor adventurers.
📸 Photo credit: Instagram @macramedaniki
What Materials Do You Need to Get Started?
Before jumping into any of these projects, it helps to have a basic supply kit ready. Here’s what covers most of the ideas above:
- 550 Paracord in multiple colors — the foundation of most designs
- Plastic side-release buckles — lightweight and secure
- Metal D-rings — for leash attachment
- Leather strip and stamps — for the artisan name collar
- Acrylic beads, letter charms, butterfly charms — for decorative collars
- Cotton yarn and crochet hooks — for the crocheted style
- Printed ribbon or fabric — for the sewn and ribbon-wrap styles
- BioThane or silicone webbing — for the waterproof collar
- A lighter — for sealing paracord ends
- Scissors and a ruler — for precise cutting
Most of these supplies are available at craft stores or online for very reasonable prices. Many makers spend less than $10 per collar on materials.
Safety Tips for Every DIY Dog Collar
Making a collar yourself is rewarding, but safety always comes first. Here are a few rules to follow:
1. Always check the fit. You should be able to slip two fingers comfortably between the collar and your dog’s neck. Too tight restricts breathing; too loose can slip off.
2. Use pet-safe materials. Avoid any materials that could be toxic if chewed. Acrylic beads and paracord are generally safe, but always supervise dogs who like to chew their accessories.
3. Secure all hardware properly. A buckle that pops open unexpectedly is a safety hazard. Test every collar before putting it on your dog.
4. Decorative collars aren’t for walks. Collars with charms, beads, or delicate knotwork are best for photos and supervised indoor wear. Use a plain, sturdy collar for walks and outdoor time. Always remember proper puppy care basics include regularly checking that collars fit correctly as your dog grows.
5. Check for wear regularly. Handmade collars need more frequent inspections than commercial ones. Look for fraying paracord, loose beads, or weakening knots every few weeks.
Final Thoughts
DIY dog collars are one of the most creative ways to show your dog how much you care. Whether you go for a simple beaded daisy collar or spend a weekend crafting an intricate paracord flower design, the result is always something special — made with your own hands, for your best friend.
The DIY dog collar ideas in this guide cover every skill level and every material — leather, paracord, yarn, fabric, silicone, beads, and macramé. Start simple, practice your knots, and don’t be afraid to experiment with colors and textures.
Your dog doesn’t know how much effort went into their new collar — but you will. And every time someone stops to ask “where did you get that?” you’ll get to say: “I made it.”
If you’re also thinking about other ways to upgrade your dog’s lifestyle, explore some creative dog accessory tips or check out ideas for a full dog room setup that matches your pup’s new handmade style.

Izzy is an experienced ranch worker who has a passion for exploring nature and getting up close to wildlife. With her connections to various animal organizations, Izzy is well-versed in animal care and rehabilitation.


