9 Baked Dog Treats Recipes That Are Easier Than You Think
Does your dog do the “treat dance” every time you open the pantry? Ears up, tail wagging, eyes locked on your hands like you’re holding the secret to happiness? That’s basically what’s happening at every dog owner’s house, every single day.
The good news is you don’t need a fancy bakery or a long list of weird ingredients to make your pup something special. With a handful of simple, dog-safe ingredients and an oven, you can whip up treats that are healthier, fresher, and honestly more fun than anything from a store shelf.
This guide rounds up nine tested baked dog treats recipes gathered from real dog parents, rescues, and pet bakers, plus simple tips on getting the dough right, storing your treats, and keeping your dog safe while baking. Whether you want crunchy biscuits, soft chewy bites, or something cute enough for Instagram, there’s a recipe here for you.
Let’s get straight into the recipes.
Contents
1. Easy Baked Dog Treats Recipes to Try Today
These four recipes are great starting points if you’re new to baking for your dog. They use simple pantry ingredients and come together fast.
1.1 Corgi-Face Peanut Butter Pumpkin Biscuits
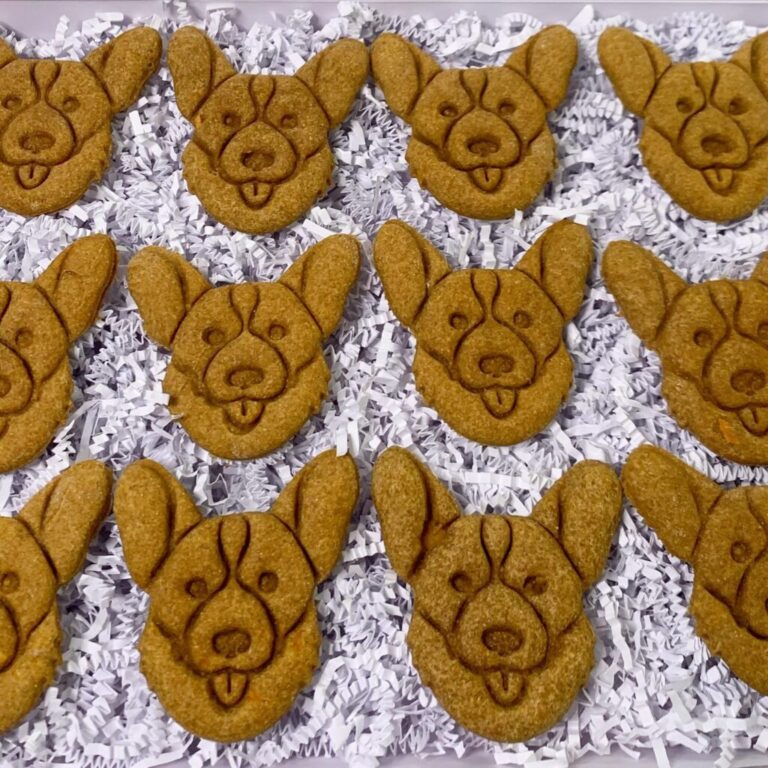
If you want treats that look as good as they taste, this one’s for you. These golden-brown biscuits use a cookie mold to emboss a cute little dog-face design right into the dough — nose, ears, tongue and all. They’re sturdy, crunchy, and genuinely look like something from a pet bakery window.
What makes this recipe work so well is the combination of peanut butter and pumpkin. Peanut butter adds protein and a flavor most dogs go crazy for, while pumpkin brings natural fiber that’s gentle on digestion. Eggs act as the binder, helping the dough hold together and giving the biscuits a slightly glossy, golden finish once baked.
Ingredients:
- 2 cups whole wheat flour
- ½ cup natural peanut butter (unsalted, xylitol-free)
- 2 eggs
- ¼ cup unsweetened pumpkin puree
- ¼ cup water (added gradually)
Instructions:
- Preheat your oven to 350°F.
- Mix the peanut butter, eggs, and pumpkin together first. Getting this fully combined before adding flour helps prevent cracking later when you press the mold or cutter.
- Add the flour gradually, then the water a little at a time, just until a firm dough forms.
- Roll the dough to about ¼-inch thickness on a floured surface.
- Press your cookie mold or cutter firmly and evenly for clean, sharp detail.
- Bake for 18–20 minutes, until deep golden brown.
- Let the biscuits cool completely on a wire rack before serving or packaging. Warm treats are soft and won’t hold their shape.
Prep Time: 15 minutes | Cook Time: 20 minutes | Yield: 12–14 treats
Pro tip: A firmer dough holds detail better, so don’t rush the water — add it slowly and stop as soon as the dough comes together.
Variation idea: No mold? No problem. A regular bone-shaped or paw-print cutter works just as well — the embossing is a nice touch, but not essential to the flavor or texture.
📸 Photo credit: Instagram @shantesfurryloves
1.2 Simple Pumpkin Oat Dog Chews

This one couldn’t be easier — just three ingredients and a short bake time. Pumpkin is gentle on a dog’s stomach and adds natural fiber, which makes this a great option if your pup has a sensitive tummy.
Oat flour is a nice alternative to wheat flour for dogs who do better on grain-light diets, and it has a milder taste that lets the pumpkin really shine through. Because this recipe skips peanut butter and cheese entirely, it’s also one of the lighter, lower-fat options on this list — a good choice if your dog is watching their weight or prone to an upset stomach after richer treats.
Ingredients:
- 1 cup plain pumpkin purée (no added sugar)
- 2 eggs
- 2½ cups oat flour
Instructions:
- Mix all the ingredients together until a dough forms.
- Roll the dough out on a floured surface.
- Cut into shapes using your favorite cookie cutter.
- Bake at 350°F (175°C) for 20 minutes.
- Let the treats cool fully before serving.
Prep Time: 10 minutes | Cook Time: 20 minutes | Yield: About 20 small chews
Pro tip: Store these in an airtight container for up to a week, or freeze a batch to keep them fresh longer.
Variation idea: Stir in a teaspoon of ground flaxseed for extra omega-3s, or swap in mashed sweet potato instead of pumpkin for a slightly sweeter chew.
📸 Photo credit: Instagram @kyondogdaycare
1.3 Almond Cheddar Grain-Free Treats
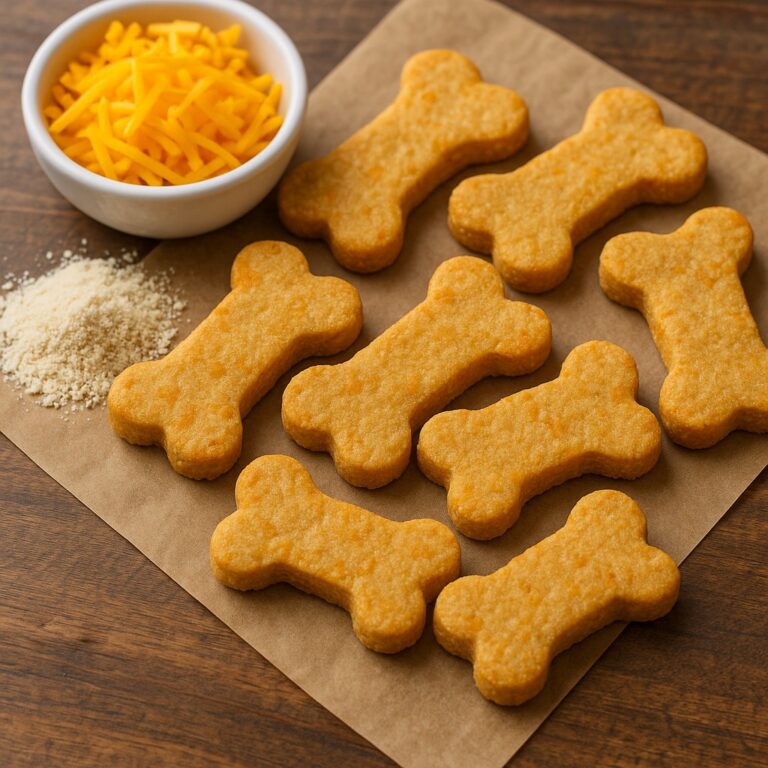
If your dog has a sensitivity to wheat, this cheesy almond flour recipe is a great swap. It’s crunchy, savory, and comes together with just four ingredients.
Almond flour is naturally grain-free, making this recipe a solid pick for dogs on limited-ingredient or grain-free diets. The cheddar cheese adds a strong, savory smell that tends to grab a dog’s attention fast — useful if you’re baking treats for training sessions where a quick, exciting reward matters. Since almond flour is denser and oilier than wheat flour, these treats also tend to have a slightly richer, more crumbly bite compared to the wheat-based biscuits on this list.
Ingredients:
- 2 cups almond flour
- ½ cup shredded cheddar cheese
- 1 egg
- 1–2 tablespoons water (as needed)
Instructions:
- Preheat your oven to 350°F.
- Mix all the ingredients in a bowl until a dough forms.
- Roll out the dough and cut into shapes — bone-shaped cutters work great here.
- Place the pieces on a parchment-lined baking sheet.
- Bake for 15–20 minutes.
- Let the treats cool completely before serving, then store in an airtight container.
Prep Time: 10 minutes | Cook Time: 18 minutes | Yield: 14–16 treats
Pro tip: Almond flour bakes a bit faster than wheat flour, so check your treats at the 15-minute mark to avoid over-browning.
Variation idea: Try mixing in a tablespoon of finely chopped parsley for fresh breath benefits, or swap cheddar for a milder cheese like mozzarella if your dog is sensitive to strong flavors.
📸 Photo credit: Instagram @thebarkinbeaglebakery
1.4 Oat, Pumpkin & Peanut Butter Bites
This recipe is perfect if you want something quick using just a food processor and your oven. It’s a favorite among shelter volunteers because it’s cheap, simple, and makes the whole house smell amazing while it bakes.
What’s nice about this one is how few steps it takes — grinding the oats into flour yourself means you don’t even need to buy a separate bag of oat flour. The lower baking temperature (300°F instead of the usual 350°F) draws moisture out slowly, giving these bites a drier, longer-lasting crunch that holds up well in a treat jar for weeks.
Ingredients:
- 1 cup oats
- ⅓ cup unsweetened pumpkin purée
- ¼ cup natural peanut butter (xylitol-free)
Instructions:
- Preheat your oven to 300°F (150°C).
- In a food processor, grind the oats into a fine powder.
- Add the pumpkin and peanut butter, then blend until a thick, pliable dough forms.
- Roll the dough out on a lined surface and cut into shapes with cookie cutters.
- Place the treats on a lined baking sheet.
- Bake for 25 minutes, or until dry and crunchy.
Prep Time: 10 minutes | Cook Time: 25 minutes | Yield: 12–15 small bites
Pro tip: The lower oven temperature here dries the treats out slowly, giving them a satisfying crunch without burning the edges.
Variation idea: No food processor? Use store-bought oat flour instead and skip the grinding step entirely — the texture comes out almost the same.
📸 Photo credit: Instagram @parkersanimalrescue
2. Classic & Celebration-Worthy Baked Dog Treats Recipes
Once you’ve got the basics down, these recipes bring a bit more variety — from a two-flavor biscuit combo to a birthday-worthy banana cookie.
2.1 Pumpkin & Peanut Butter Biscuit Duo
Why pick one flavor when you can bake two batches at once? This duo pairs a pumpkin biscuit with a classic peanut butter version, so your dog gets the best of both worlds.
Baking two flavors side by side is a great way to figure out which one your dog actually prefers — some dogs go straight for the pumpkin batch, others can’t get enough peanut butter. It’s also a smart way to make a bigger batch in one baking session, since both doughs use a similar process and can go in and out of the oven back to back.
Pumpkin Biscuits:
- 1 cup pumpkin purée
- 2 eggs
- 2½ cups oat flour
Peanut Butter Biscuits:
- 1 cup natural peanut butter (xylitol-free)
- 2 eggs
- 2 cups whole wheat flour
Instructions:
- For each batch, mix the ingredients together until a dough forms.
- Roll out and cut into shapes.
- Bake the pumpkin biscuits at 350°F for 20–25 minutes.
- Bake the peanut butter biscuits at 350°F for 15–20 minutes, or until golden.
- Cool completely before serving.
Prep Time: 15 minutes | Cook Time: 20–25 minutes | Yield: 20+ biscuits total
Pro tip: Always double-check that your peanut butter is xylitol-free — this sweetener is toxic to dogs, even in small amounts.
Variation idea: Use two different cutter shapes for each flavor — it makes sorting treats by flavor easy at a glance, especially if you’re tracking which one your dog prefers.
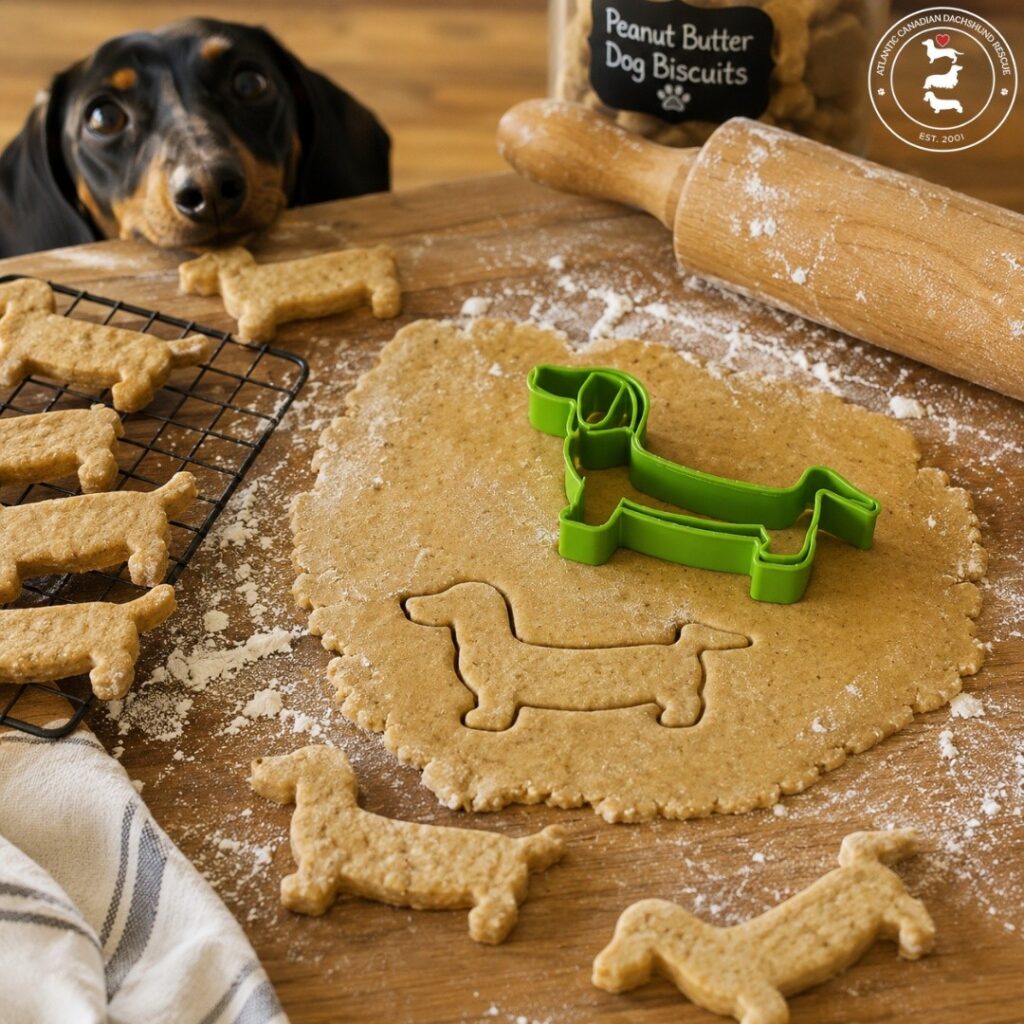
📸 Photo credit: Instagram @atlanticdaxrescue
2.2 Italian-Style Cheese Dog Biscuits
This simple, savory biscuit comes from an Italian dog-treat baker, and it’s a great option if your pup prefers cheese over sweet flavors like pumpkin or banana.
This recipe uses metric measurements, which actually makes it really precise and easy to scale up or down if you want a bigger batch. With just four ingredients and no added sugar, fat, or salt beyond what’s naturally in the cheese, it’s also one of the simplest, most “clean label” recipes on this list — great if you prefer treats with the shortest possible ingredient list.
Ingredients:
- 170g (about 1⅓ cups) whole wheat flour
- 1 egg
- 76g (about ⅓ cup) water
- 57g (about ½ cup) grated cheese
Instructions:
- Preheat a conventional oven to 175°C (350°F). Line a baking tray with parchment paper.
- Mix all the ingredients together in a large bowl until a dough forms.
- Roll the dough out on a lightly floured surface to about 0.5cm thickness.
- Cut into shapes using a cookie cutter and place on the prepared tray.
- Bake for 20–25 minutes.
- Let the biscuits cool completely before giving them to your dog.
Prep Time: 15 minutes | Cook Time: 22 minutes | Yield: 18–20 small biscuits
Pro tip: Once fully cooled, these keep well in an airtight container at room temperature or in the fridge for around two months.
Variation idea: Try parmesan instead of a milder cheese for a sharper, more aromatic biscuit that’s great for training treats.
📸 Photo credit: Instagram @lamagiadeidolci_
2.3 Apple Cinnamon Crunch Cookies
These crispy cookies bring a warm, fruity flavor that dogs seem to love. They use simple pantry staples and bake up into a satisfying crunch.
The combination of apple and oats gives these cookies a naturally sweet flavor without needing any added sugar — the apple’s natural sweetness does all the work. Large flake oats also add a slightly chewier texture compared to the finer oat flour used in other recipes on this list, giving these cookies a more rustic, homemade bite.
Ingredients:
- All-purpose flour
- Large flake oats
- Apple (grated or finely chopped)
- A small amount of cinnamon
Instructions:
- Preheat your oven according to your recipe’s standard biscuit temperature, around 350°F.
- Combine the flour and oats in a bowl.
- Mix in the grated apple and a pinch of cinnamon.
- Add water gradually until a firm dough forms.
- Roll out and cut into cookie shapes.
- Bake for 22–28 minutes, until golden and crisp.
- Cool completely before serving.
Prep Time: 15 minutes | Cook Time: 25 minutes | Yield: 18–24 cookies
Pro tip: Use only a small pinch of cinnamon — a little goes a long way, and too much can be overwhelming for a dog’s sensitive nose.
Variation idea: Swap apple for pear for a milder, less acidic version, especially if your dog has a sensitive stomach.
📸 Photo credit: Instagram @rogersgrains
2.4 Banana Honey Birthday Biscuits
Got a birthday or gotcha day coming up? These banana and peanut butter biscuits are sweet, soft-centered, and feel like a real celebration treat. If you’re planning a bigger party spread, you might also like browsing dog birthday cake recipes for the main event.
This recipe stands out because of its size and richness — between the bananas, peanut butter, and honey, it has more natural sweetness than any other recipe on this list, which is exactly what makes it feel like a special occasion treat rather than an everyday snack. The bigger batch size (300g of flour) also makes it ideal if you’re baking for a group of dogs at a party or a daycare.
Ingredients:
- 300g plain or wholemeal flour
- 100g rolled oats (unflavored)
- 2 eggs
- 2 bananas
- 1 teaspoon honey
- 250g peanut butter (xylitol-free)
Instructions:
- Preheat the oven to 180°C (170°C fan / 350°F).
- Blend the peeled bananas, eggs, peanut butter, and honey together. No blender? Mash the bananas with a fork and whisk in the rest.
- In a separate bowl, mix the flour and oats.
- Combine the dry ingredients with the wet mixture.
- Bring it together with a spoon or your hands until it forms a dough.
- Dust a surface with flour and roll the dough to about 1cm thick.
- Cut out biscuits using a cookie cutter.
- Place on a lined baking tray and bake for around 20 minutes, until golden brown.
- Cool completely before feeding to your dog.
Prep Time: 20 minutes | Cook Time: 20 minutes | Yield: 20–24 biscuits
Pro tip: These freeze really well, so you can make a big batch ahead of a birthday party and just thaw what you need.
Variation idea: Press a small dog-safe candle holder shape into one biscuit before baking, then use it as the centerpiece “cake” for a birthday photo.
📸 Photo credit: Instagram @chopthedoberman2024
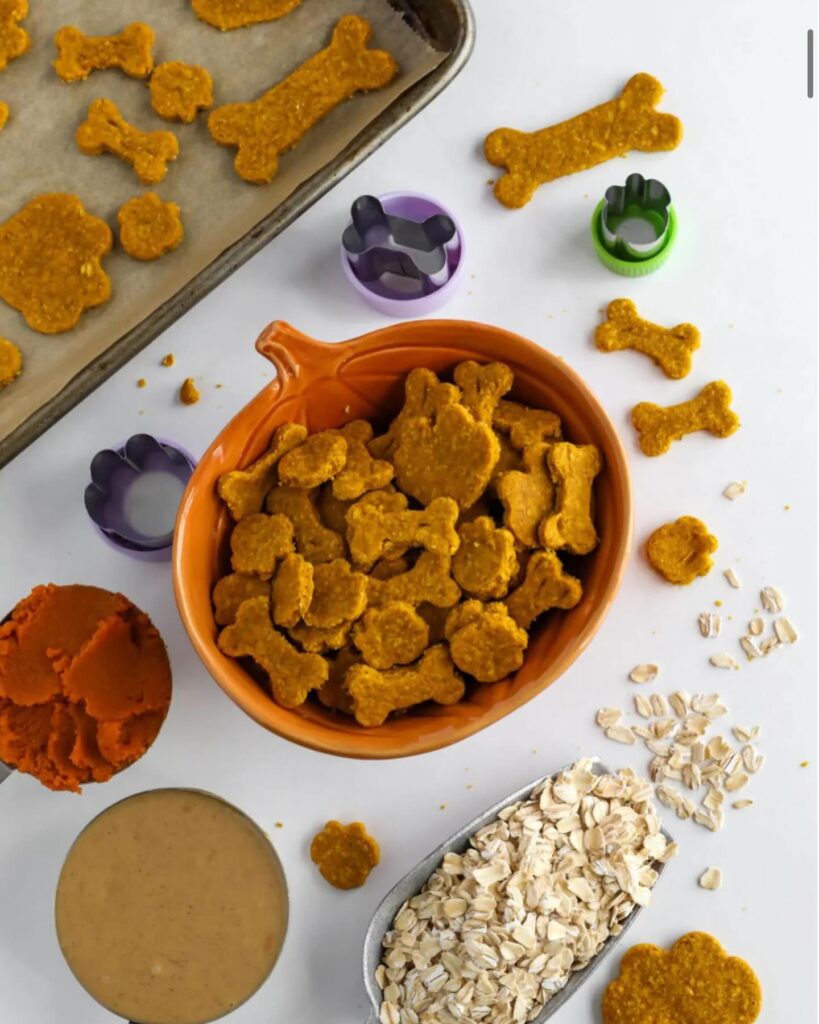
2.5 Apple & Carrot Veggie Cookies
A simple, no-nonsense recipe built around real, whole ingredients — no artificial flavors, no added sugar, just fruit, veggies, and a bit of olive oil.
This recipe leans heavily on vegetables rather than flour for its bulk, which makes it naturally lower in calories than most of the other recipes here. Carrots add a bit of natural crunch and beta-carotene, while olive oil brings healthy fats and helps keep the finished cookies from drying out too much during baking.
Ingredients:
- 1 grated apple, seeds removed
- 2 grated carrots
- 2 eggs
- 2 tablespoons extra virgin olive oil
- Whole wheat flour or ground oats (enough to form a firm dough)
- Optional: a small pinch of cinnamon
Instructions:
- Grate the apple and carrots. If they release a lot of liquid, squeeze out the excess.
- Mix with the eggs and olive oil.
- Add the flour gradually until a firm but workable dough forms.
- Roll out the dough and cut into shapes, or form small flattened balls.
- Bake at 180°C (350°F) for 20–25 minutes, until golden and dry.
- Let cool completely before storing or serving.
Prep Time: 15 minutes | Cook Time: 22 minutes | Yield: 16–20 cookies
Pro tip: These are meant as an occasional treat, not a daily meal — apple and carrot add fiber and texture, but they’re still extras, not a full diet.
Variation idea: Add a tablespoon of plain unsweetened yogurt to the dough for a softer, slightly tangy version of these cookies.
📸 Photo credit: Instagram @los4barferos
3. Must-Know Basics Before You Start Baking
Now that you’ve seen the recipes, here are a few quick basics worth knowing before you preheat your oven.
3.1 Common Safe Ingredients
Most homemade baked dog treats recipes rely on the same handful of dog-friendly staples:
- Whole wheat flour, oat flour, or almond flour
- Eggs (for binding and protein)
- Plain pumpkin purée (no added sugar or spices)
- Natural peanut butter (xylitol-free)
- Grated cheese
- Bananas, apples, and carrots in small amounts
- A small pinch of cinnamon for flavor
These ingredients are gentle, easy to digest, and widely available — you’ve probably got most of them in your kitchen right now. Many of them also bring small nutritional perks beyond just flavor: pumpkin supports digestion, eggs add protein, and grated carrots or apples sneak in a bit of extra fiber and vitamins without your dog even noticing.
3.2 Ingredients to Avoid
A few ingredients show up often enough in human baking that it’s worth calling out clearly: never use xylitol (a sugar substitute found in some peanut butters and baked goods), chocolate, grapes or raisins, onion, or garlic in any dog treat. Always read the label on store-bought peanut butter before using it, since xylitol is toxic to dogs even in small doses.
It’s also worth steering clear of added salt, refined sugar, and artificial sweeteners or flavorings in general — dogs simply don’t need them, and some can cause digestive upset even if they’re not outright dangerous.
If you’re curious about other everyday foods and whether they’re dog-safe, it’s worth checking out things like can dogs eat Cheerios before tossing your dog random snacks from the pantry.
4. Tips for Perfect Baked Dog Treats Every Time
A few small habits make a big difference in how your treats turn out:
Roll your dough evenly. Aim for about ¼-inch thickness for crunchy biscuits. Thicker dough bakes softer in the middle; thinner dough gets crunchier all the way through.
Don’t rush the wet ingredients. Add water or liquid gradually. Too much liquid makes the dough sticky and hard to shape; too little makes it crumbly.
Let treats cool completely. This isn’t optional — warm treats are soft and bendy, and they won’t hold their shape or texture properly until they’ve cooled on a wire rack.
Lower temperatures = crunchier treats. If you want extra-crispy biscuits, bake at a slightly lower temperature for longer rather than blasting heat for a short time.
Keep portions small. Treats should be a bonus, not a meal replacement. Stick to small pieces, especially for smaller dog breeds.
Test a small batch first. Especially with a new recipe or ingredient combination, bake a few pieces first to check texture and bake time before committing the whole batch.
Label your batches if you’re freezing multiple flavors. A simple sticky note in the freezer bag saves you from guessing whether it’s the pumpkin or peanut butter batch weeks later.
If you’re setting up a dedicated spot in your kitchen for all this baking and treat storage, you might enjoy some dog treat station ideas for organizing everything neatly.
5. Storing and Serving Your Homemade Treats
Once your treats are baked and fully cooled, storage is simple:
- Room temperature: Store in an airtight container for up to a week.
- Refrigerator: Cheese-based or egg-heavy treats last longer in the fridge, often up to two months.
- Freezer: For long-term storage, freeze a batch and thaw small portions as needed. This works especially well for bigger batches like birthday biscuits.
When serving, break treats into smaller pieces for puppies or small breeds, and always supervise the first time you give your dog a new recipe, just in case of any sensitivity.
It also helps to rotate between a couple of different recipes rather than sticking to just one. Not only does this keep things interesting for your dog, it also means you’re not relying too heavily on any single ingredient, which can be a smart move if your dog has food sensitivities you’re still figuring out.
If you enjoyed this roundup and want even more options, there’s a full collection of homemade dog treats recipes worth browsing too.
Final Thoughts
Baking treats for your dog doesn’t need to be complicated. With basic ingredients like flour, eggs, pumpkin, and peanut butter, you can make snacks that are healthier, fresher, and a lot more fun than anything off a store shelf. Whether you go for the cute embossed corgi biscuits, the cheesy almond flour bites, or the birthday-worthy banana cookies, your dog is going to appreciate the effort either way — and probably do that excited little treat dance the whole time you’re baking.
The best part about working through a list like this is finding out which flavors and textures your own dog actually prefers. Some dogs are all about peanut butter, others can’t resist anything with cheese, and some go wild for the fruity, slightly sweet cookies. Trying a few different recipes is really the only way to know for sure.
If you’re looking for more ways to spoil your pup, check out other ideas like dog bones and treats for additional inspiration.

Izzy is an experienced ranch worker who has a passion for exploring nature and getting up close to wildlife. With her connections to various animal organizations, Izzy is well-versed in animal care and rehabilitation.