Dog Treat Bag Free Crochet Pattern for a Cute Puppy Bag
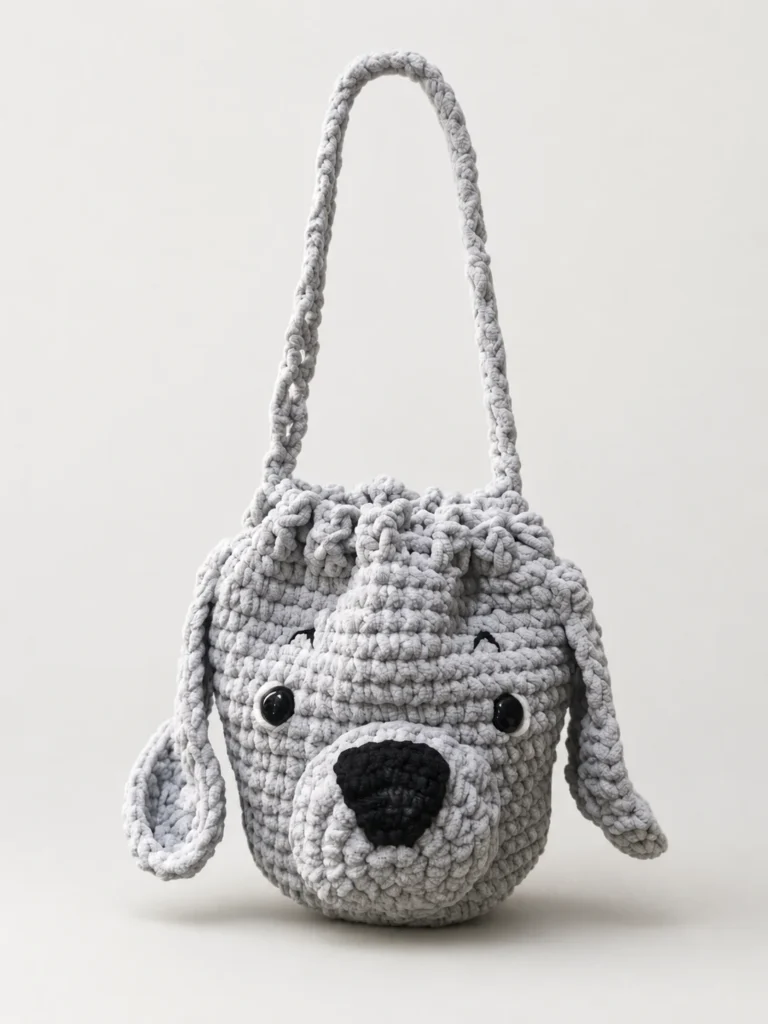
If you love crochet and you love dogs, this Dog Treat Bag Free Crochet Pattern is about to become your new favorite project. It turns basic stitches into an adorable puppy-shaped bag with floppy ears, a soft muzzle, and a braided strap. You can use it to carry treats on walks, store toys, or give it as a handmade gift to any dog lover.
What makes this project so satisfying is how much personality comes through in such a simple shape. It’s really just a few rounds of single crochet, a couple of small increase-and-decrease sequences, and some careful sewing at the end. Yet somehow, when all the pieces come together, you end up with something that genuinely looks like a puppy’s face staring back at you. That’s the kind of project that keeps you coming back to your crochet hook.
This Crochet Dog Treat Bag Tutorial walks you through every single step, from picking your yarn to sewing on the final ear. Even if you’re still learning to crochet, the instructions below break everything down into small, easy pieces. By the end, you’ll have a bag that looks like a cuddly puppy face, ready to hold anything you like.
Let’s get into it.
Part One: Getting Ready for This Crochet Dog Treat Bag Tutorial
Before you pick up your hook, it helps to know exactly what you need and what to expect. Getting organized ahead of time saves you from stopping mid-project to search for a missing tool or the wrong size hook. This section covers your materials, your tools, and the basic terms used throughout the pattern, so you can sit down and crochet without interruption.
1. Materials and Tools List
This project doesn’t need a huge stash of supplies. Most of what you need can be found at any craft store or ordered online, and you likely already own a few of these items if you’ve crocheted before.
Yarn
Use a bulky, plush-style yarn such as chenille or velvet yarn. This type of yarn gives the bag its soft, fuzzy look, almost like a stuffed animal. It’s also forgiving for anyone still building confidence with their stitches, since the thickness of the yarn tends to hide small unevenness that thinner yarn would show. You’ll need light gray for the main body and a small amount of black for the nose and detail work.
Chenille and velvet yarns behave a little differently than cotton or acrylic yarn. They’re softer and stretchier, which is part of what gives this bag its plush, huggable texture. Keep in mind that this same softness means your stitches need to stay fairly tight, or the fabric can look loose and floppy instead of structured.
Hook
A 7.0 mm crochet hook works best with bulky yarn like this. Using the right hook size keeps your stitches even and your bag sturdy enough to hold treats without stretching out of shape. If you only have a slightly smaller or larger hook on hand, you can still use it, but expect your finished size to shift a little from the measurements listed in the pattern.
Eyes
You’ll need one pair of 16 mm black safety eyes. These snap into place and give the puppy face its expression. If you’re making this bag for a small child, consider embroidering the eyes with yarn instead, since safety eyes can be a choking risk for little ones. Embroidered eyes take a bit more patience to get symmetrical, but they’re a safer choice for anyone under three.
Stuffing
A small amount of polyester fiberfill is used to lightly stuff the muzzle so it holds its rounded shape. You don’t need a full bag of stuffing for this project. A small handful is more than enough, since only the muzzle piece gets stuffed.
Other Tools
- Yarn needle, for sewing pieces together and weaving in ends
- Scissors
- Stitch markers, to help you keep track of where each round starts
Having a couple of stitch markers on hand makes a bigger difference than it might seem. Since most of this pattern is worked in continuous rounds rather than rows, it’s surprisingly easy to lose track of where a round begins, especially in fuzzy yarn where individual stitches can be hard to see clearly.
If you’re already stocking up on supplies for your dog at home, it’s worth browsing a few dog accessories tips while you shop, since some accessories pair nicely with a handmade treat bag like this one.
2. Skill Level, Finished Size, and Abbreviations to Know
This pattern is rated intermediate. That doesn’t mean beginners can’t try it, but it helps to already know how to single crochet, increase, and decrease before starting. If you’re brand new to crochet, practicing a simple round coaster or basket first will make this project much easier, since the bag body uses the exact same increase technique on a larger scale.
The intermediate rating mostly comes from the number of separate pieces involved, rather than any one stitch being particularly hard. You’re not just crocheting one continuous piece, you’re making a body, two ears, a muzzle, a nose, and a strap, then assembling them all by hand. That assembly step is where a little previous experience really helps.
Finished size: The bag measures about 6.5 inches tall, not counting the strap, and about 6 inches wide. That’s a good size for holding a decent amount of treats or a few small toys. It’s compact enough to carry comfortably over a shoulder or wrist, but roomy enough to be genuinely useful rather than purely decorative.
Here are the abbreviations used throughout the pattern, written in standard US terms:
- MR – Magic Ring
- ch – Chain
- sc – Single Crochet
- inc – Increase (2 single crochets worked into the same stitch)
- dec – Decrease (worked as an invisible decrease or sc2tog)
- sl st – Slip Stitch
- st(s) – Stitch(es)
- ( ) x – Repeat the instructions inside the parentheses the number of times listed
- [ ] – Total stitch count at the end of the round
A few quick notes before you begin: work in continuous rounds unless the pattern says otherwise, place a stitch marker at the start of each round so you don’t lose your place, and stuff the muzzle only lightly so it stays soft rather than firm. These small habits might feel unnecessary at first, but they save a lot of frustration later, especially once you’re several rounds deep and trying to remember exactly where you started.
Part Two: Dog Treat Bag Free Crochet Pattern – Step by Step
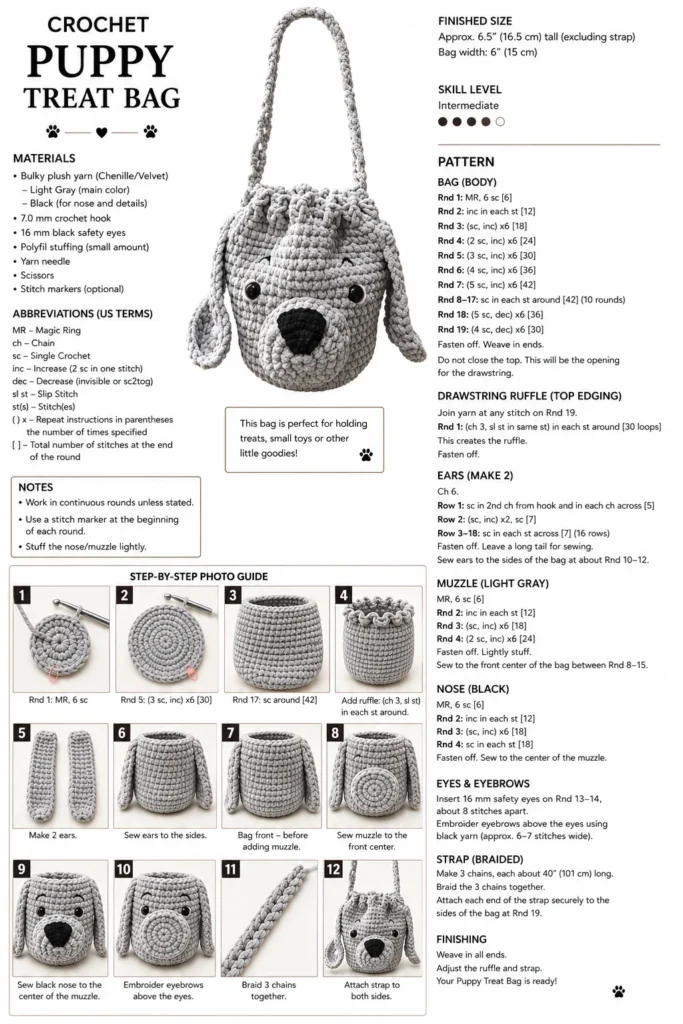
Now for the fun part. This section walks through building the bag piece by piece, in the same order shown in the pattern photos. Each part is simple on its own, and they all come together at the end to form the finished puppy bag. Try not to rush through any single piece, since the overall look really depends on each section being made carefully and attached in the right place.
3. Crocheting the Bag Body
The body starts small and grows outward, then works straight up to form the main shape of the bag. This is the largest single piece of the whole project, so it’s worth taking your time here.
Start with a magic ring and work 6 single crochets into it. From there, you’ll increase every round, adding six more stitches each time, until your circle reaches 42 stitches around. This growing circle becomes the base of the bag, and each round should lie completely flat on a table if your tension is even. If the base starts to cup upward like a bowl, you’re increasing too much for the stitch count. If it starts to ruffle at the edges, you may need to slow down your increases slightly.
Once the base is wide enough, stop increasing and simply single crochet in each stitch around for about ten rounds straight. This is what builds the height of the bag and gives it that rounded, bucket-like shape. Because there’s no shaping happening during these rounds, this is a good stretch to work on while watching TV or chatting with a friend, since you mostly just need to keep counting your stitches.
Near the top, you’ll decrease a couple of rounds to gently taper the opening inward. This tapering is what gives the top of the bag its rounded, head-like silhouette, similar to how a puppy’s head curves in at the top rather than staying perfectly cylindrical. Take your decreases slowly and evenly spaced around the round, since uneven decreasing here can leave the top of the bag looking lopsided once the ruffle is added.
Leave the top open at this stage. You are not closing the bag completely, since the top will become the opening that the drawstring ruffle sits on.
4. Adding the Drawstring Ruffle
This step is what gives the bag its playful, ruffled top edge, almost like a little furry crown around the opening. It’s a quick step compared to the body, but it has a big visual impact on the finished look.
Join your yarn at any stitch along the top edge of the bag. Then, in every stitch around, you’ll chain three and slip stitch back into the same stitch. Repeating this all the way around creates a row of small loops that bunch together into a ruffled edge. Because each loop is worked into every single stitch, the ruffle ends up quite dense and full, which is exactly what gives it that curly, textured appearance rather than a flat, plain border.
This ruffle isn’t just decorative. It also acts as the opening you can gather closed if you want to keep treats securely inside while carrying the bag. Some makers like to thread a short piece of cord or ribbon through the base of the ruffle loops for an actual functioning drawstring, though the pattern as written relies on the natural bunching of the loops to keep the top mostly closed.
5. Making the Ears
The ears are what really sell the puppy look, giving the bag its floppy, dog-like charm. Without them, the piece would honestly just look like a round pouch with a face, so don’t rush through this step even though it feels repetitive making two of the same piece.
You’ll make two identical ear pieces. Each one starts as a small chain, then is worked back and forth in rows of single crochet to build a long, narrow strip. After a couple of rows to shape the width, you continue straight for many more rows until the ear reaches its full length. Keeping your row count consistent matters a lot here, since even a couple of extra or missing rows on one ear will make the pair look mismatched once they’re both hanging from the bag.
Once both ears are finished, leave a long tail of yarn on each one. This tail is used to sew the ears onto the sides of the bag, positioned partway up from the base so they hang down naturally, just like a real puppy’s ears. Pin or hold both ears in place before sewing either one permanently, so you can step back and check that they’re level and symmetrical before committing with your needle.
6. Shaping the Muzzle
The muzzle is the rounded part of the face that holds the nose and gives the bag its 3D, puppy-like front. This piece is what turns a flat-looking round bag into something with real dimension and personality.
Like the body, the muzzle starts with a magic ring and increases outward in rounds until it forms a small, puffy circle. Add a light amount of stuffing inside before closing it up, just enough to give it a soft, rounded bump rather than a flat one. Resist the urge to overstuff at this stage. A slightly under-stuffed muzzle still looks soft and puppy-like, while an overstuffed one can start to look stiff or oddly shaped once it’s sewn onto the curved surface of the bag.
Once it’s stuffed and shaped, sew the muzzle onto the front center of the bag, positioning it in the middle-lower area of the face so it sits right where a puppy’s snout would naturally be. Take a moment before sewing to look at the bag from a distance and imagine where the eyes will eventually go, so the muzzle placement leaves enough room above it for the face to look balanced.
7. Adding the Nose
The nose is small but it makes a big difference in bringing the whole face together. It’s often the very last detail people notice consciously, but it’s the piece that makes the difference between a bag that looks like a vague animal shape and one that clearly reads as a dog.
Using black yarn, work a tiny circle the same way you started the body and muzzle: magic ring, then a couple of rounds of increases until it reaches the right size. Fasten off and sew it directly onto the center of the muzzle you just attached, positioning it toward the lower-front portion of the muzzle rather than dead center, which tends to look more natural and dog-like.
Because this piece is so small, it goes quickly, but take a moment to center it carefully. A nose that’s placed even slightly off to one side can throw off the whole look of the face, since our eyes are naturally very sensitive to small asymmetries in faces, even on a crocheted bag.
8. Attaching the Eyes and Eyebrows
This step is where the bag really starts to feel alive. Up until now, you’ve mostly been building shapes, but once the eyes go in, the piece suddenly stops looking like a bag and starts looking like a puppy.
Insert your 16 mm safety eyes into the face, spacing them a good distance apart on either side, roughly where a puppy’s eyes would naturally sit above the muzzle. Safety eyes snap securely into place from the back, so no extra stitching is needed to hold them. Before snapping the backing washers on permanently, hold the eyes in place and step back to check the spacing and height from a distance, since it’s much easier to reposition them now than after they’re locked in.
For the eyebrows, use black yarn and embroider two short curved lines just above each eye. These small details add a surprising amount of expression, giving the puppy face a slightly curious or sleepy look, depending on how you angle them. Angling the inner ends of the eyebrows slightly upward tends to create a more alert, curious expression, while flatter eyebrows give a calmer, sleepier look, so feel free to experiment a little with the angle before committing to your final stitches.
9. Braiding and Attaching the Strap
The strap is what turns this from a soft toy into an actual usable bag, so it’s worth spending a little extra care on this section even though it might feel like a simple finishing touch.
Make three separate long chains, each roughly 40 inches long. Once you have all three, braid them together just like you’d braid hair, keeping the tension even so the finished strap looks neat and twisted rather than loose. If you’ve never braided cord or yarn before, it helps to anchor one end under something heavy, or have someone hold it for you, so you can keep even tension with both hands while you work.
Attach both ends of the braided strap securely to the sides of the bag near the top opening. Sew through several stitches at each end to make sure it can hold weight without pulling loose, especially if you plan to fill the bag with treats regularly. A few extra passes with your yarn needle at each attachment point go a long way toward making sure the strap holds up to regular use rather than tearing loose after a few walks.
10. Finishing Touches
You’re almost done. This last step is all about tidying everything up, and it’s often the step that gets rushed, even though it makes a real difference in the final presentation.
Weave in any loose yarn ends from each piece so nothing unravels over time. Take a moment to fluff and adjust the ruffle around the top opening so it sits evenly, and check that the strap hangs straight on both sides. If any part of the bag looks slightly lopsided once it’s all assembled, this is your last chance to adjust stitching before calling the project finished.
Once everything looks even, your Puppy Treat Bag is complete and ready to use.
Part Three: Styling and Using Your Finished Bag
Once you’ve finished the pattern once, you’ll probably want to make it again in a new color or use it in different ways. This section covers a few extra ideas to get more out of your finished bag, whether you’re keeping it for yourself or planning to make more as gifts.
11. Color and Yarn Variations to Try
While the original pattern uses light gray with black details, this design works beautifully in almost any color combination. Try a warm tan or brown for a golden retriever look, or a mix of white and black for a border collie style face. A honey-colored yarn with a slightly darker muzzle can also give a labrador-inspired look, which makes a thoughtful, personalized gift if you know the recipient’s own dog’s coloring.
You can also swap the chenille yarn for a different plush yarn brand, as long as it’s a similar weight, without changing any of the stitch counts. If you want a firmer bag that holds its shape better, consider using a slightly smaller hook than recommended, which tightens the stitches and reduces the gaps between them, giving the finished piece a bit more structure.
If your dog already has a few favorite snacks, this is also a fun chance to fill your new bag right away using ideas from these homemade dog treats recipes, so the bag has something tasty inside as soon as it’s finished.
12. Common Mistakes to Avoid
A few small mistakes can throw off the look of your finished bag, so it helps to watch out for them as you go rather than fixing them after the fact.
Uneven tension. Since this pattern uses bulky yarn, tension mistakes are more noticeable than they would be with thinner yarn. Try to keep your stitches consistent, especially during the increase rounds, so the base sits flat instead of curling or rippling. If you notice your work curling upward like a bowl, your tension may be too tight for the recommended hook size.
Skipping the stitch marker. It’s easy to lose track of where a round starts when working in continuous rounds. Skipping the stitch marker step often leads to miscounted stitches, which can throw off the whole shape later, sometimes not becoming obvious until several rounds after the mistake actually happened.
Over-stuffing the muzzle. A common mistake is packing too much stuffing into the muzzle, which makes it look stiff and unnatural. Stick to a light amount so it stays soft and slightly squishy, matching the texture of the rest of the bag.
Rushing the strap braid. If the three chains aren’t kept at even tension while braiding, the strap can end up twisted or lopsided. Take your time here, since the strap is one of the most visible parts of the finished bag and it hangs at eye level whenever the bag is being carried.
Mismatched ears. Because the ears are made separately, it’s easy for one to accidentally end up a row or two longer than the other. Counting rows carefully, or laying both ears side by side before sewing, helps avoid this easy-to-miss mistake.
13. Creative Ways to Use This Bag
While it’s designed as a treat bag, this little puppy pouch is more versatile than it looks, and many makers end up using it for far more than just carrying snacks.
Use it to carry small dog toys, poop bags, or a spare leash clip when you’re heading out for a walk. It also works well as a car organizer, hanging from a headrest to keep quick-access dog items within reach whenever you’re driving somewhere with your pet.
If you travel with your dog often, this handmade bag makes a cute addition to your setup. Pair it with a checklist like these dog travel essentials so nothing important gets left behind on your next trip.
It also doubles as a training tool. Many owners like to keep treats in an easy-to-reach bag during training sessions, especially when practicing positive reinforcement training methods that rely on quick treat rewards delivered right after good behavior.
Because it’s handmade, this bag also makes a thoughtful gift. It works well tucked into a small basket alongside other dog gift ideas for any dog lover on your list, especially around the holidays when handmade gifts tend to stand out more than store-bought ones.
Finally, if you enjoyed this pattern, keep an eye out for a matching treat station idea at home, so your new bag has a proper spot to hang between walks instead of getting tossed in a drawer.
Wrapping Up
This Dog Treat Bag Free Crochet Pattern turns a handful of simple stitches into a genuinely charming, functional bag. Each part, from the rounded body to the floppy ears and braided strap, comes together to create a puppy face that’s hard not to smile at every time you pick it up.
Whether you’re making it for your own dog, gifting it to a friend, or simply enjoying a new crochet challenge, this pattern is a rewarding one to work through. Take your time with each section, especially the face details, and you’ll end up with a bag that’s both practical and genuinely cute. The combination of a useful shape and an expressive little face is exactly what makes amigurumi-style projects like this one so popular among crocheters of every skill level.
Once you’ve finished your first one, don’t be surprised if you want to make a second, in a whole new color, for a completely different look. Many makers who try this pattern once end up making several, giving them out as gifts or keeping a small collection of different colored puppy bags for different moods or outfits. Either way, this is one of those projects that’s just as enjoyable to make as it is to use once it’s finished.

Izzy is an experienced ranch worker who has a passion for exploring nature and getting up close to wildlife. With her connections to various animal organizations, Izzy is well-versed in animal care and rehabilitation.