DIY Dog Clothes Ideas: 20 Easy Dog Cloth Patterns to Sew, Knit or Crochet
If you’ve ever looked at your dog and thought, “I could make something cuter than what’s in that pet store” — you’re not wrong.
DIY dog clothes ideas have exploded in popularity over the past few years. Dog parents are picking up their sewing machines, crochet hooks, and knitting needles to create one-of-a-kind outfits for their furry companions. And honestly? The results are incredible.
Making your own dog clothes has a handful of real advantages. You control the fit (because every dog body is different), you choose the fabric (so it’s actually comfortable for your dog), and you can create something that perfectly matches your dog’s personality — or even your own outfit.
This article brings you 20 unique DIY dog clothes ideas, each inspired by real outfits shared by dog owners on Instagram. You’ll find everything from beginner-friendly t-shirts and knit tanks to more advanced crochet coats and full-body matching onesies. Whether you sew, crochet, knit, or just love the idea of trying something new, this list has something for you.
Before you scroll through the ideas, grab a measuring tape and jot down your dog’s neck circumference, chest girth, and back length. These three measurements will be your best friend for every single project on this list.
Let’s get into it.
Contents
- Why DIY Dog Clothes Are Worth Your Time
- 1. Pink Denim Dungarees
- 2. Floral Button-Down Shirt + Matching Cap Set
- 3. Matching Full-Body Fleece Onesies for Two Dogs
- 4. Streetwear Tee + Cargo Shorts Combo
- 5. Solid Hoodie + Matching Cap Set
- 6. Graphic Character Tee + Denim Skirt or Pants
- 7. Novelty Print T-Shirt
- 8. Polka Dot Bloomers/Pants
- 9. Granny Square Print Fabric Onesie
- 10. Quilted Puffer Vest
- 11. Paw-Print Puffer Jacket
- 12. Fleece Coat with Sherpa Collar and Cuffs
- 13. Gingham Dog Dress — With Sewing Pattern
- 14. Tiered Ruffle Dress — With Sewing Pattern
- 15. Granny Square Crochet Coat
- 16. Hand-Crocheted Colorblock Vest With Button Closure
- 17. Intarsia Crochet Sweater With Dog Silhouette Motif
- 18. Knit Romper With Bunny Ear Straps
- 19. Striped Knit Sleeveless Tank/Vest
- 20. Teddy Bear Sherpa Costume
- General Tips for Making DIY Dog Clothes
- Final Thoughts
Why DIY Dog Clothes Are Worth Your Time
Store-bought dog clothes are often made in standard sizes that don’t account for the huge variety of dog body shapes. A French Bulldog has a totally different build than an Italian Greyhound, even if they weigh the same. DIY lets you tailor every stitch to your specific dog.
Beyond fit, there’s also the fun factor. Crafting something for your pet is genuinely satisfying. And if you’re already into sewing, crochet, or knitting, dog clothes are one of the most beginner-friendly projects because they’re small and require very little material.
You can also pair your DIY dog clothes hobby with other dog lifestyle upgrades. Check out these dog accessories tips to round out your pup’s wardrobe and daily routine.
Now — onto the ideas.
1. Pink Denim Dungarees
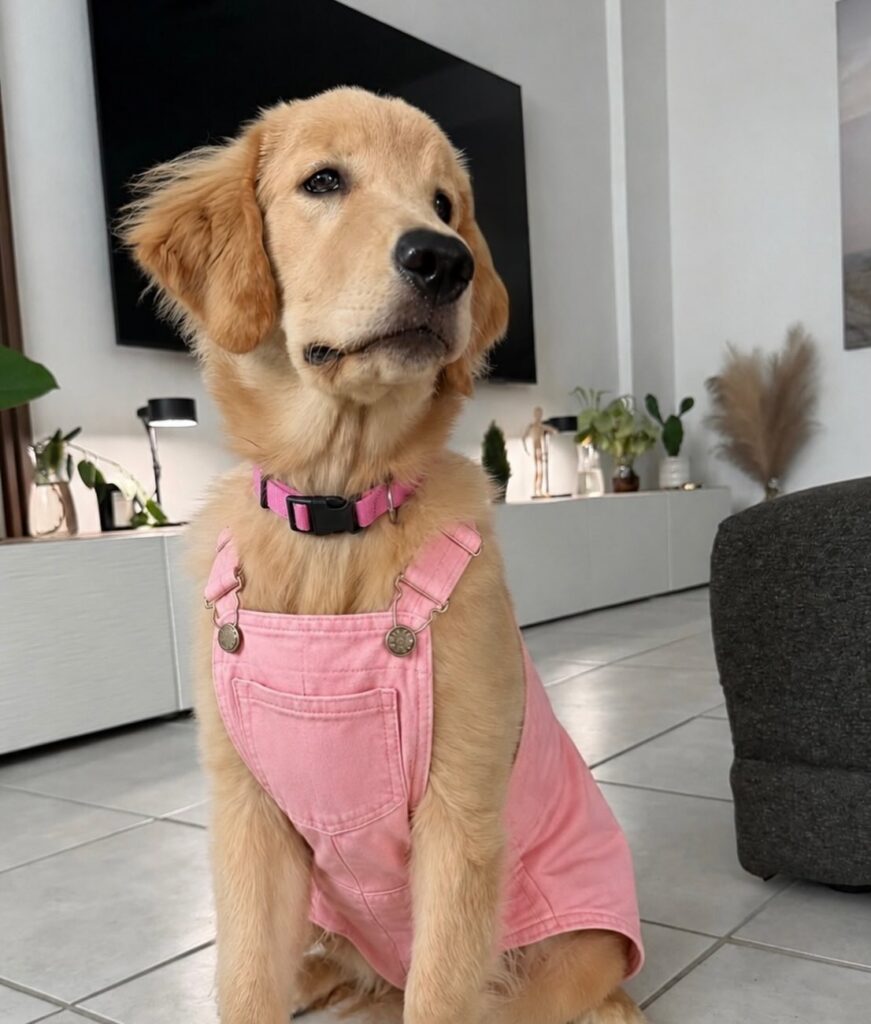
What It Looks Like
Imagine a fluffy Golden Retriever puppy sitting proudly in a pair of soft pink denim overalls, complete with adjustable straps, antique brass buttons, and a front chest pocket. It’s the kind of outfit that stops people in their tracks on the street.
What You’ll Need
- Pink denim or chambray fabric (washed for softness)
- Small brass or antique buttons (4–6 pieces)
- Adjustable overall hardware (buckles)
- Basic sewing machine
- Fabric scissors and chalk
How to DIY It
Start by making a simple paper pattern based on your dog’s measurements. The dungarees have four main pieces: a front bib panel, a back panel, and two leg loops. The key to getting these right is measuring your dog’s chest width and the distance from their withers (top of the shoulders) down to where the legs meet the belly.
Cut the denim pieces with a half-inch seam allowance. Sew the front bib first, adding a small patch pocket at the center. Then attach the back panel and create the leg holes by leaving open curves at the bottom of each side seam.
For the straps, cut two long strips of denim, fold and sew them into flat tubes, then attach the buckles at one end and loop the other end to the back panel. The buttons on the front bib are decorative but also functional — they help with putting the outfit on and off.
Wash the finished dungarees before the first wear to soften any stiff edges.
Pro Tips
- Use stretch denim or a denim-jersey blend for more comfortable movement.
- Add iron-on interfacing to the bib area to keep it structured.
- Sew a small Velcro strip under the belly for easy fastening on wiggly dogs.
Why Dogs Can Wear It
Dungarees sit mostly on the back and chest, leaving the legs free. This makes them one of the more comfortable clothing styles for active dogs. The pink color is completely washable with regular laundry.
📸 Photo credit: Instagram @oops.itsadela
2. Floral Button-Down Shirt + Matching Cap Set
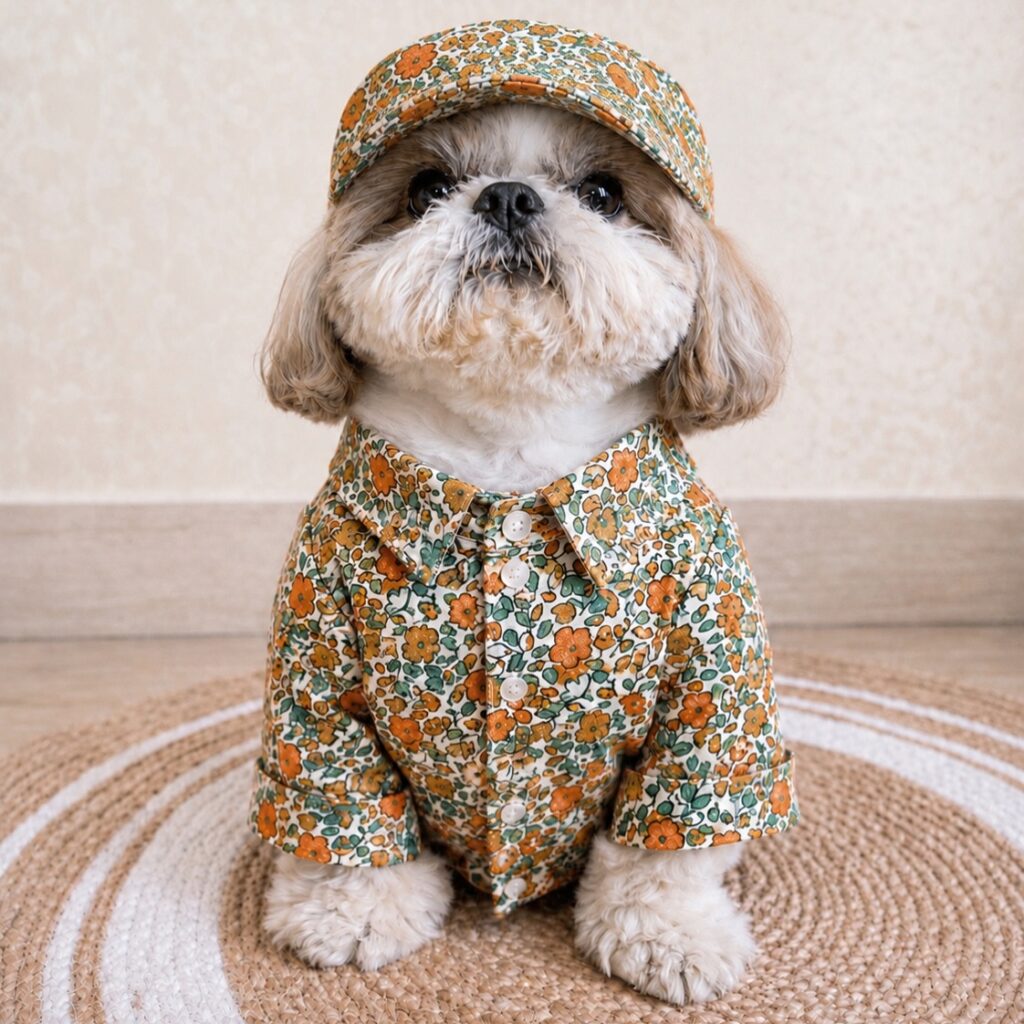
What It Looks Like
A Shih Tzu dressed in a retro orange and green floral button-down shirt, with a perfectly matched flat cap made from the exact same fabric. The cohesion between the shirt and the hat makes this look genuinely impressive — like something from a tiny vintage boutique.
What You’ll Need
- 0.5–1 metre of floral cotton fabric (Liberty-style print works beautifully)
- Buttons (5–7 small ones)
- Basic sewing machine
- Cap pattern (brim + crown + side band)
- Interfacing for the cap brim
How to DIY It
The magic of this outfit is that both pieces are cut from the same fabric, so the print automatically matches without any extra effort on your part.
For the shirt: Draft a simple dog shirt pattern with a collar, front button placket, and short sleeves. The collar is the trickiest part — cut two collar pieces, sew them together leaving one edge open, turn right-side out, and press flat. Attach it to the neckline using a careful slip stitch or topstitch. Add the button placket down the center front and stitch on your buttons.
For the cap: A simple dog cap has five pieces — a crown (the main dome), a brim, and side panels. Interface the brim so it holds its shape. Sew the crown panels together, attach the side band around the base, then add the brim at the front. Sew elastic around the interior base so the cap sits snugly on your dog’s head without being too tight.
The coordinated set takes the whole look to another level and uses up fabric scraps from the shirt efficiently.
Pro Tips
- Pre-wash your fabric to prevent shrinkage after the first dog wash.
- Choose a lightweight cotton — heavy fabrics will make the shirt stiff and uncomfortable.
- If making the cap feels too advanced, skip it and pair the shirt with a solid-colored bandana instead.
📸 Photo credit: Instagram @thegtcloset
3. Matching Full-Body Fleece Onesies for Two Dogs
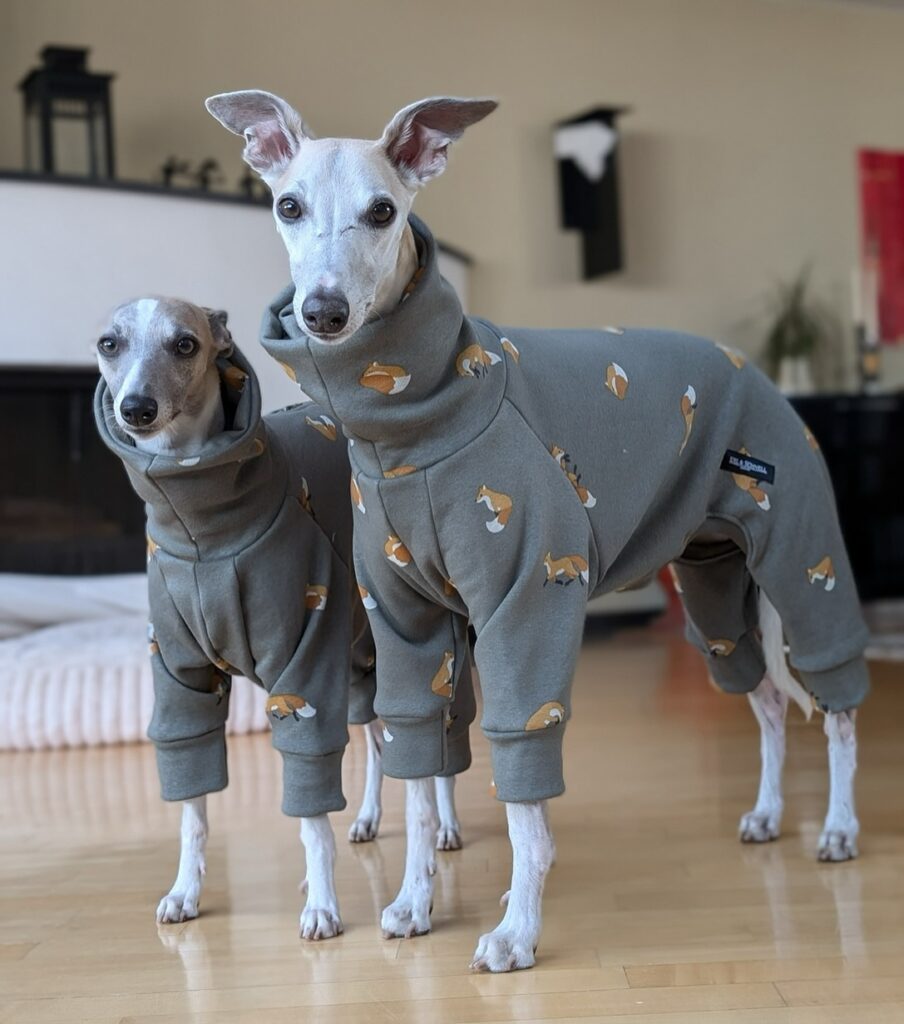
What It Looks Like
Two Italian Greyhounds standing side by side in identical grey-green fleece onesies covered in a fox print. The onesies cover all four legs with ribbed cuffs at the wrists and ankles, plus a cozy turtleneck. This is peak coordinated dog fashion.
What You’ll Need
- Fleece fabric (1–2 metres depending on dog size)
- Ribbing fabric for cuffs and collar
- Sewing machine with stretch stitch
- Dog onesie pattern (available free online for sighthound or standard builds)
How to DIY It
Fleece is one of the best fabrics for beginner sewers because it doesn’t fray at the edges. You can skip hemming on most edges and just cut clean.
A full-body dog onesie has a top half (covering the torso and front legs) and a bottom half (covering the back legs). The pieces connect at the belly. The trickiest part is getting the leg holes the right size — too tight and your dog won’t be able to walk, too loose and the fabric bunches.
Cut your fleece pieces using a downloaded onesie pattern scaled to your dog’s measurements. Use a stretch stitch or a narrow zigzag stitch throughout — regular straight stitches will pop when the fabric stretches.
Sew the ribbing into tubes for the wrists, ankles, and neck. Attach these last. The turtleneck is just a wide ribbing tube folded in half and sewn to the neckline — quick and effective.
If you have two dogs, just cut double the pieces and sew two at the same time.
Pro Tips
- Anti-pill fleece is worth the slightly higher price — it stays looking clean longer.
- Italian Greyhounds and Whippets genuinely need warm layers in cold weather due to their thin skin and low body fat. This project is both stylish and functional for these breeds.
- Add a small snap closure at the belly for easy bathroom breaks.
📸 Photo credit: Instagram @edel_und_schnell_berlin
4. Streetwear Tee + Cargo Shorts Combo
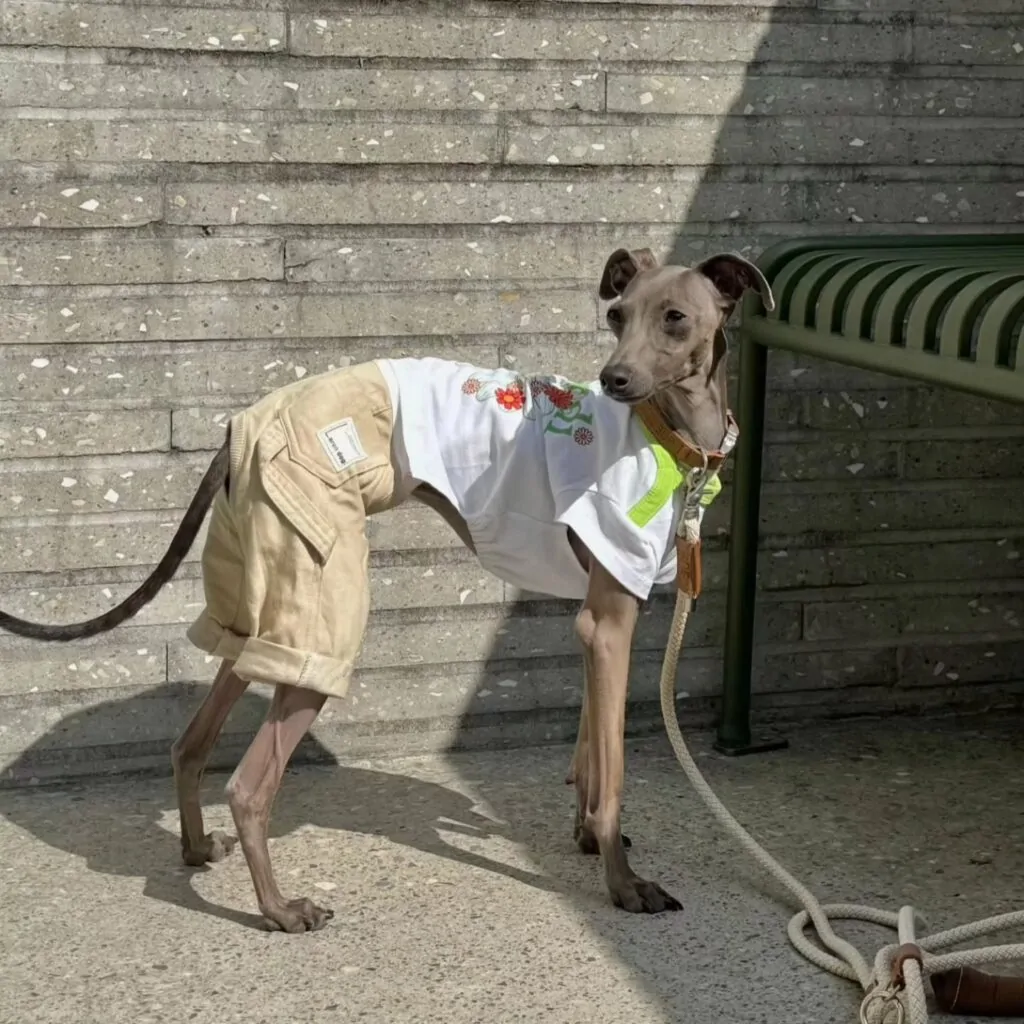
What It Looks Like
An Italian Greyhound rocking a white oversized graphic tee with floral embroidery on the collar, paired with perfectly tailored khaki cargo shorts complete with a rolled cuff and a label tab on the back pocket. The whole look is pure casual streetwear — just scaled way down.
What You’ll Need
- White jersey/t-shirt fabric
- Khaki cotton twill for the shorts
- Iron-on embroidery patches or embroidery thread
- Small woven label tabs (buy from craft stores)
- Sewing machine
How to DIY It
For the tee: Cut a simple drop-shoulder t-shirt shape in jersey fabric. Jersey stretches, which is great for easy on-and-off dressing. The collar is just a narrow ribbing strip sewn into a loop and attached to the neckline. If you want embroidery, add iron-on patches before assembling — it’s much easier than embroidering on a finished garment.
For the cargo shorts: These are essentially a pair of simple dog pants with two wide-opening side pockets added. Cut the main pant shape first — two front pieces and two back pieces. Sew the inner leg seams, then the crotch seam. Add a simple flat waistband with elastic inside.
For the cargo pockets, cut four rectangles, sew them into flat pouches, and topstitch them onto the side of the shorts. A small sewn label tab on the back (like a brand label) adds an authentic detail that really sells the streetwear look. Cuff the hem of the shorts slightly and press.
Pro Tips
- The boxy, oversized look of the tee is actually easier to sew than a fitted shirt — less precise fitting required.
- Lightweight twill or linen works better than heavy denim for shorts because dogs run and sit at odd angles constantly.
- For leaner breeds like IGs, make sure the waistband has plenty of elastic — they have almost no hips to hold clothes up.
5. Solid Hoodie + Matching Cap Set
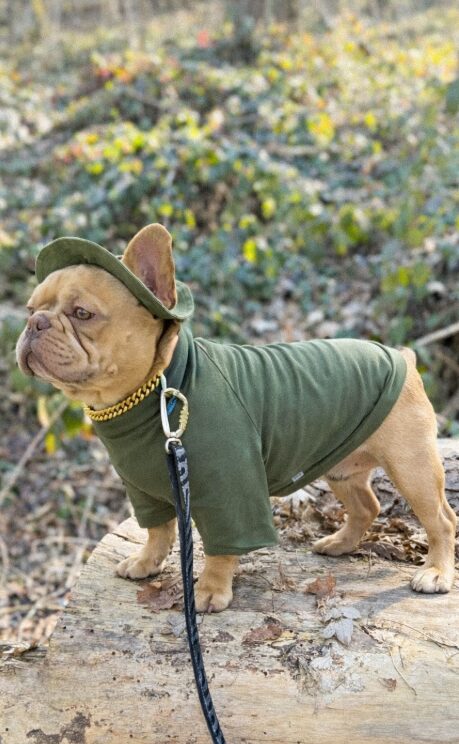
What It Looks Like
A compact French Bulldog standing on a log in an olive green hoodie with matching flat cap. The gold chain collar adds a street-style edge. Simple, sharp, and completely elevated by the coordinated headwear.
What You’ll Need
- Sweatshirt fleece or French terry fabric
- Ribbing for cuffs and waistband
- A drawstring cord (optional)
- Cap pattern
How to DIY It
For the hoodie: A dog hoodie pattern has a main body piece, two sleeve pieces, a hood piece, and ribbing strips. The hood is where most people get nervous, but it’s simpler than it looks. Sew the two hood pieces together along the curved top seam, leaving the front open. Attach the hood to the neckline of the body, right sides together, and sew all the way around.
The ribbing goes at the sleeve cuffs and the hem — stretch it slightly as you sew to give it that snug, elasticated finish.
For French Bulldogs specifically, make the neck opening wider than you think. Frenchies have big, blocky heads that are tricky to pull clothing over. A wider neckline or a back opening with snaps will save you a lot of frustration.
For the cap: Follow the same cap construction from Idea #2, but in matching solid fabric. Keep it simple — a five-panel cap with a stiff brim and elastic at the back.
Pro Tips
- Add a small D-ring on the back of the hoodie so you can still attach a leash without taking the outfit off.
- Olive, khaki, and camel tones look incredible on fawn-colored French Bulldogs.
- Keep the fabric medium-weight — heavy sweatshirt fabric can be too warm for dogs who run hot.
6. Graphic Character Tee + Denim Skirt or Pants
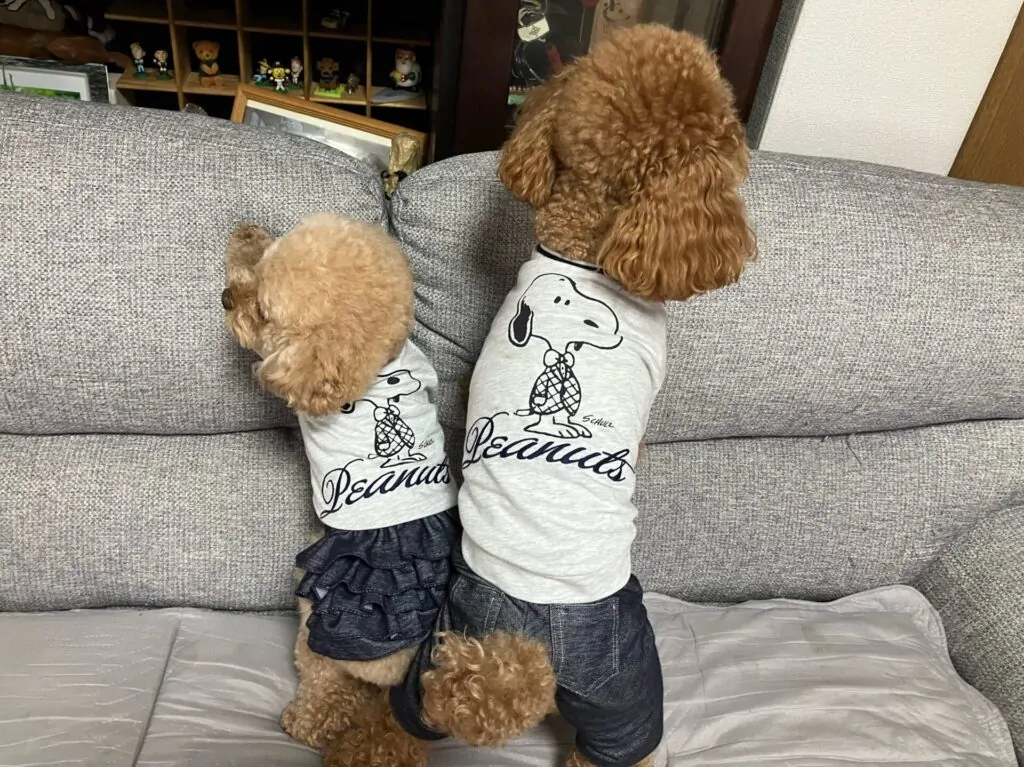
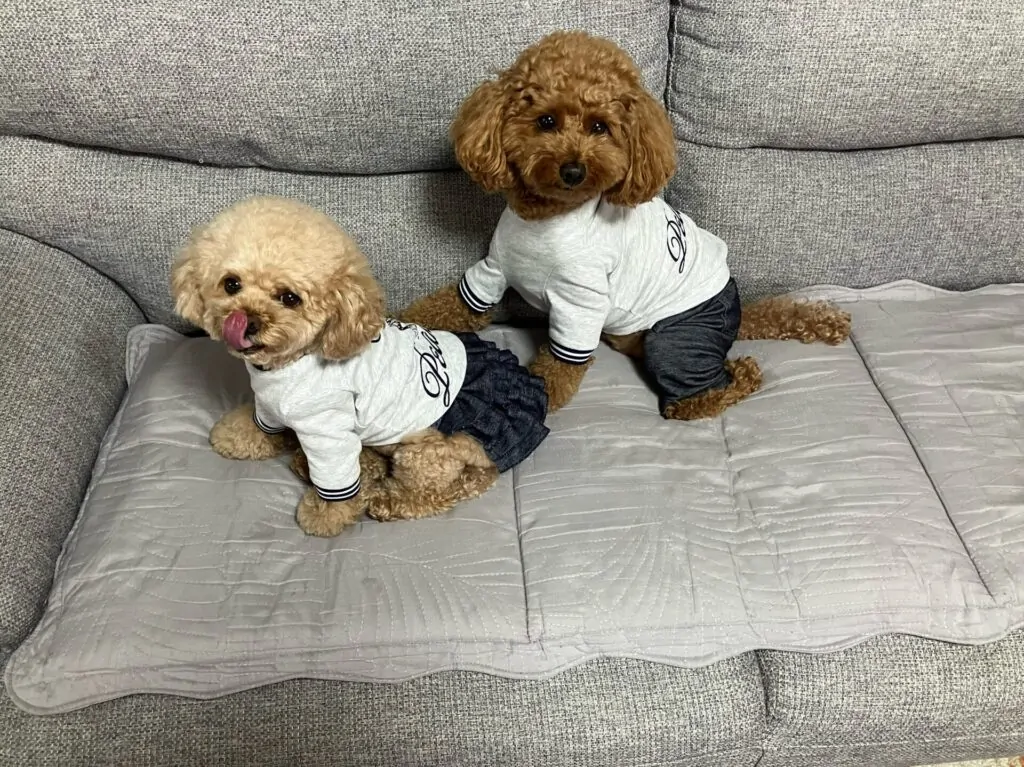
What It Looks Like
Two fluffy Toy Poodles wearing the same graphic long-sleeve tee — one paired with a navy denim ruffle skirt, the other with straight denim trousers. The coordinated “his and hers” styling is adorable and shows how one shirt pattern can create two very different looks.
What You’ll Need
- Grey jersey fabric for the tee
- Iron-on transfer paper for the graphic
- Navy denim (lightweight)
- Ribbing for sleeve cuffs
- Elastic for waistbands
How to DIY It
For the graphic tee: The graphic is the highlight of this outfit. Use iron-on transfer paper to print your chosen design (a cartoon character, your dog’s name, or any graphic you like) and iron it onto the front of the tee before assembly. Then sew the shirt as a standard long-sleeve dog shirt with ribbing at the cuffs.
For the ruffle denim skirt: Cut a rectangular piece of lightweight denim about twice the width of your dog’s waist measurement. Fold the top edge over, thread elastic through, and sew the elastic waistband shut. Then cut the ruffle pieces — two or three long strips with gathered top edges. Layer them from longest at the bottom to shortest at the top and attach each layer to a center panel. Sew the ruffle assembly to the skirt waistband.
For the straight denim trousers: These follow a basic four-piece pant pattern. Stitch the inner and outer leg seams, connect the crotch seam, and add an elastic waistband at the top.
Pro Tips
- When using iron-on transfer paper, mirror your image before printing so it reads correctly once applied.
- Lightweight denim or denim-look jersey will give you much better results than thick selvedge denim — dogs need to be able to sit and walk comfortably.
- One shirt pattern, two bottoms = two outfits. This is efficient crafting.
7. Novelty Print T-Shirt
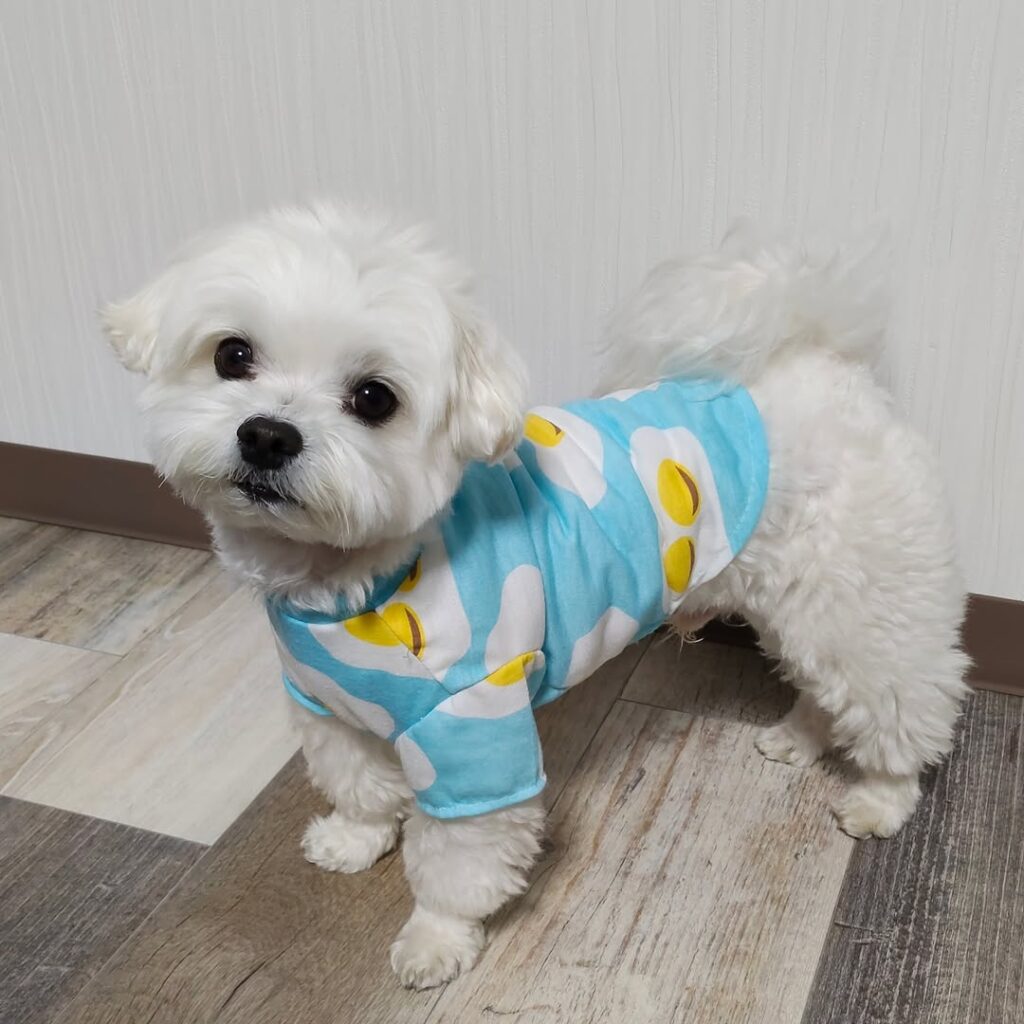
What It Looks Like
A small white Maltese in a bright teal t-shirt covered in a large fried egg print. The oversized, cheerful pattern against the dog’s white fur is completely charming. This is one of the easiest entries on this DIY dog clothes ideas list.
What You’ll Need
- Novelty print jersey fabric (fried egg, fruit, stars — whatever makes you smile)
- Ribbing for neck and armholes
- Sewing machine with stretch stitch
How to DIY It
This is truly a beginner-friendly project. A basic dog t-shirt has three pieces: a main body (front and back in one piece, or two separate pieces), and optional sleeves.
Cut your main body piece — it should cover from the base of the neck to just past the ribcage. Leave armhole curves on each side. The neck opening needs to be wide enough for your dog’s head to pass through comfortably.
Sew the ribbing into small loops and attach one to the neckline and one around each armhole opening. The ribbing stretches naturally to let the shirt go on and off easily.
The best part of this project? Let the fabric do the work. A bold novelty print needs zero embellishment — the design carries the entire outfit.
Pro Tips
- Buy novelty print fabric from online fabric stores — the variety is endless and much better than anything in local pet shops.
- Jersey fabric has a “right” and “wrong” side. The right side is usually smoother and the colors are more vivid.
- If your dog is small (Maltese, Chihuahua, Pomeranian), a quarter metre of fabric is plenty for one shirt.
Looking for more ways to style your small dog? Check out this guide on best small dog breeds to see which breeds rock the smallest outfits best.
📸 Photo credit: Instagram @sora_malti
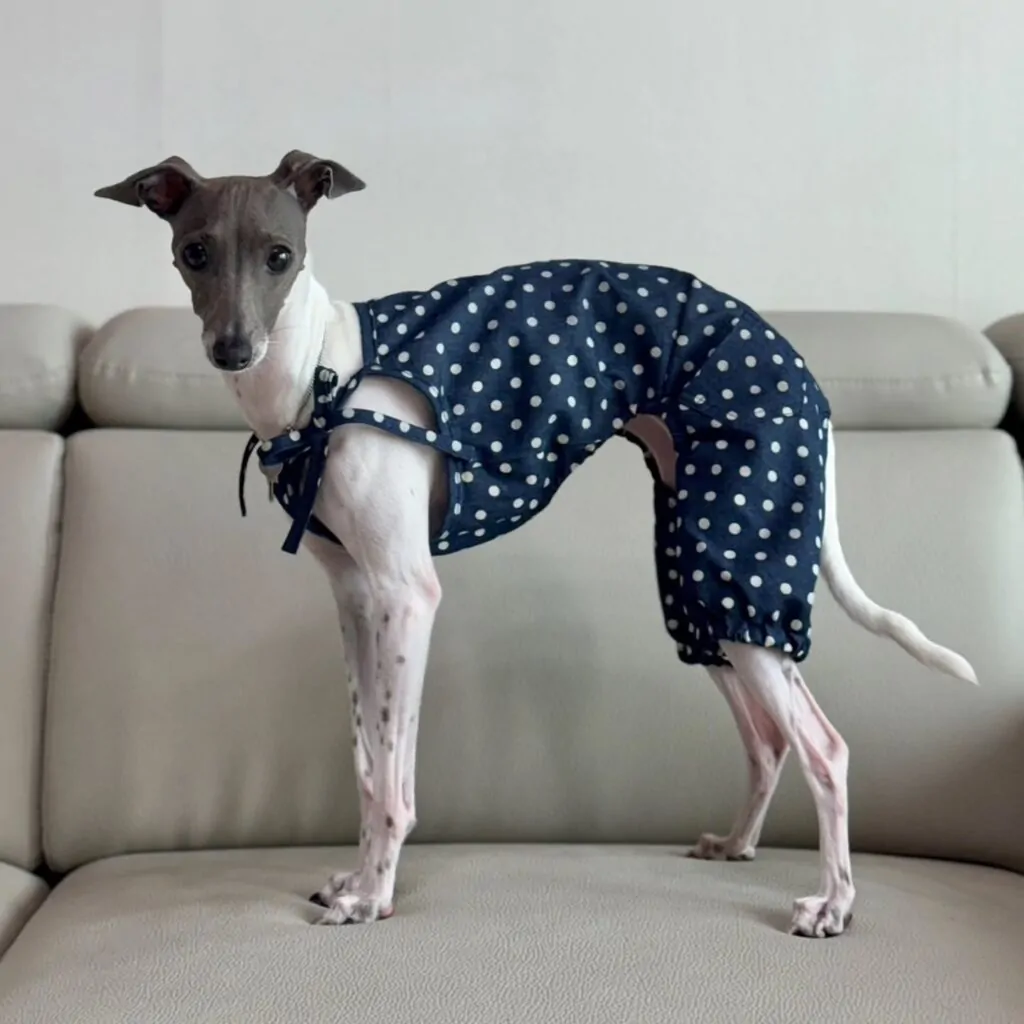
8. Polka Dot Bloomers/Pants
What It Looks Like
An Italian Greyhound standing on a cream sofa, wearing a navy cotton outfit covered in white polka dots. The outfit features gathered bloomers on the back legs with elasticated ankles, giving it a vintage, elegant feel. A built-in harness opening at the chest keeps it functional.
What You’ll Need
- Navy cotton with white polka dot print
- Elastic (narrow, 6mm works well)
- Sewing machine
- Snap or button for the belly closure
How to DIY It
This style works especially well for Italian Greyhounds, Whippets, and similar lean breeds because the bloomers cover the back half of the body where these dogs are most vulnerable to cold.
The main body piece wraps over the dog’s back and drapes down to cover the back legs. The leg openings are gathered with elastic to create the bloomer effect. The front has a simple harness opening — essentially a cut-out panel with finished edges — so the dog’s harness can still be used underneath.
Cut the main back panel first, following the curve of your dog’s back. Then cut two identical leg tube pieces. Sew a channel at the ankle end of each leg tube and thread narrow elastic through before closing the channel. Gather the tops of the leg tubes slightly and attach them to the lower edge of the main back panel.
Add snap closures along the belly and chest for easy dressing. The polka dot fabric makes the gathering look intentional and decorative.
Pro Tips
- Italian Greyhounds have very deep chests but narrow waists — measure both carefully before cutting.
- Don’t skip the harness opening if your dog wears a harness on walks. A small oval cut-out at the chest, finished with bias tape, solves this immediately.
- Stiffer cotton will hold the bloomer shape better than soft jersey.
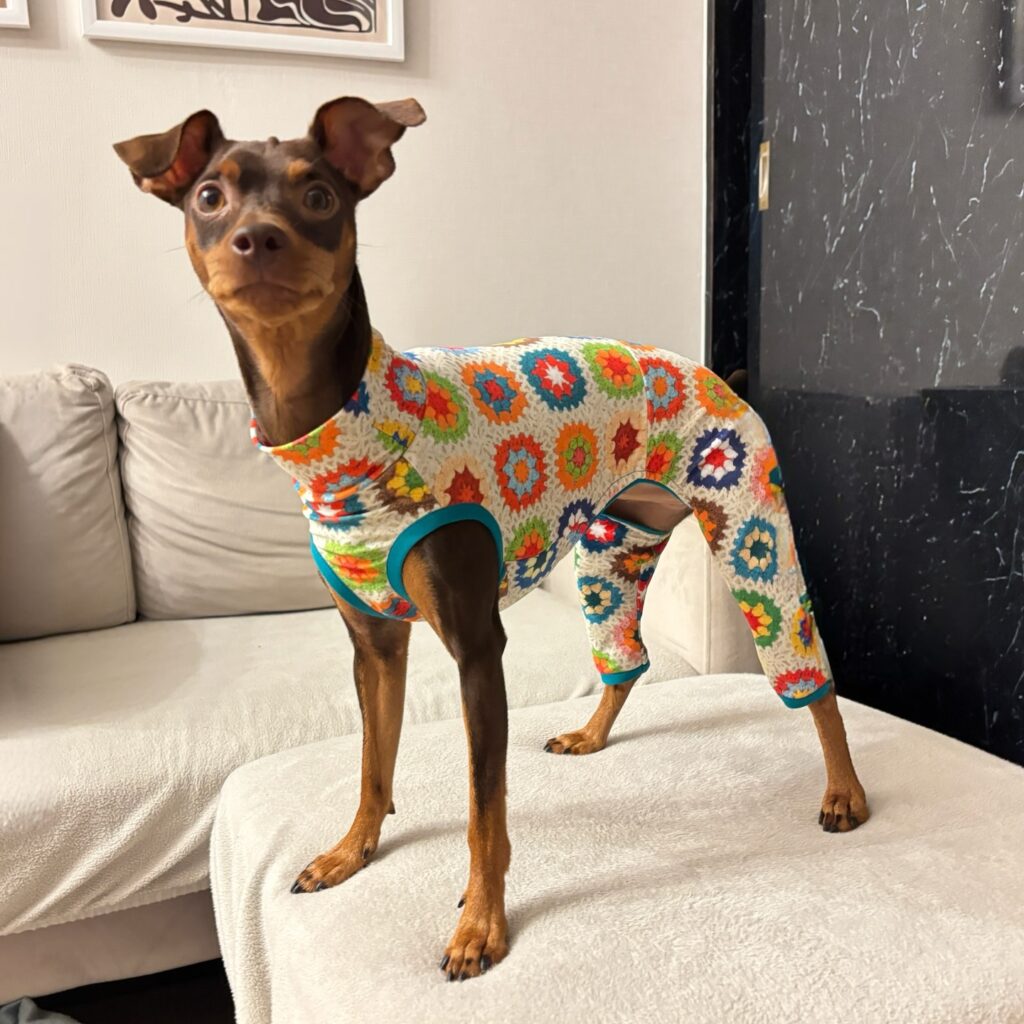
9. Granny Square Print Fabric Onesie
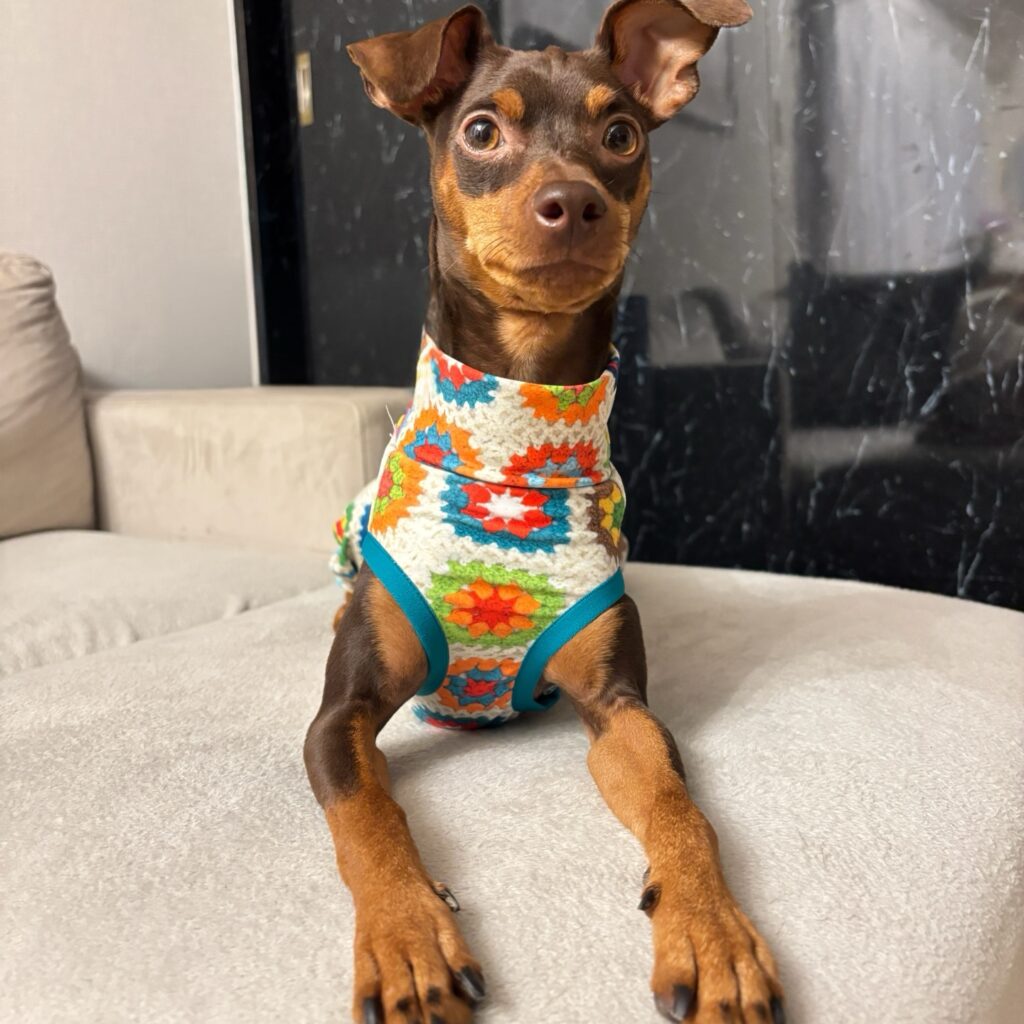
What It Looks Like
A small Min Pin (Miniature Pinscher) wearing a bright, colorful onesie made from a fabric that’s printed to look exactly like joined granny squares. The teal ribbed trim at the sleeves and hem ties the whole look together beautifully. This is the smart crafter’s shortcut — all the granny square visual impact, none of the crochet hours.
What You’ll Need
- Granny square print cotton or jersey fabric
- Teal or coordinating ribbing fabric
- Sewing machine
- Snaps or Velcro for belly closure
How to DIY It
This onesie is sewn from a standard full-body dog jumpsuit pattern. The genius is entirely in the fabric choice — a printed granny square fabric gives you that handmade crochet aesthetic without the weeks of actual crocheting.
Lay out your pattern pieces and cut: main body top, main body bottom, sleeve pieces, and leg pieces. If your fabric is jersey, use a stretch stitch. If it’s cotton, a regular stitch is fine but make sure the onesie isn’t too fitted, or your dog won’t be able to move.
Assemble the top and bottom halves separately, then join them at the waist. Attach the ribbing trim at each sleeve opening and the hem. The ribbing acts as a stretchy cuff that keeps the onesie in place without restricting movement.
Add snap closures along the belly for bathroom breaks and easy dressing.
Pro Tips
- This is a great project if you love the look of crochet dog clothes but don’t crochet.
- Choose a cotton-jersey blend for breathability — Min Pins and similar short-coated breeds regulate temperature well, so you don’t want anything too heavy.
- If the granny square print feels too busy, pair it with solid-colored ribbing in one of the accent colors from the print.
10. Quilted Puffer Vest
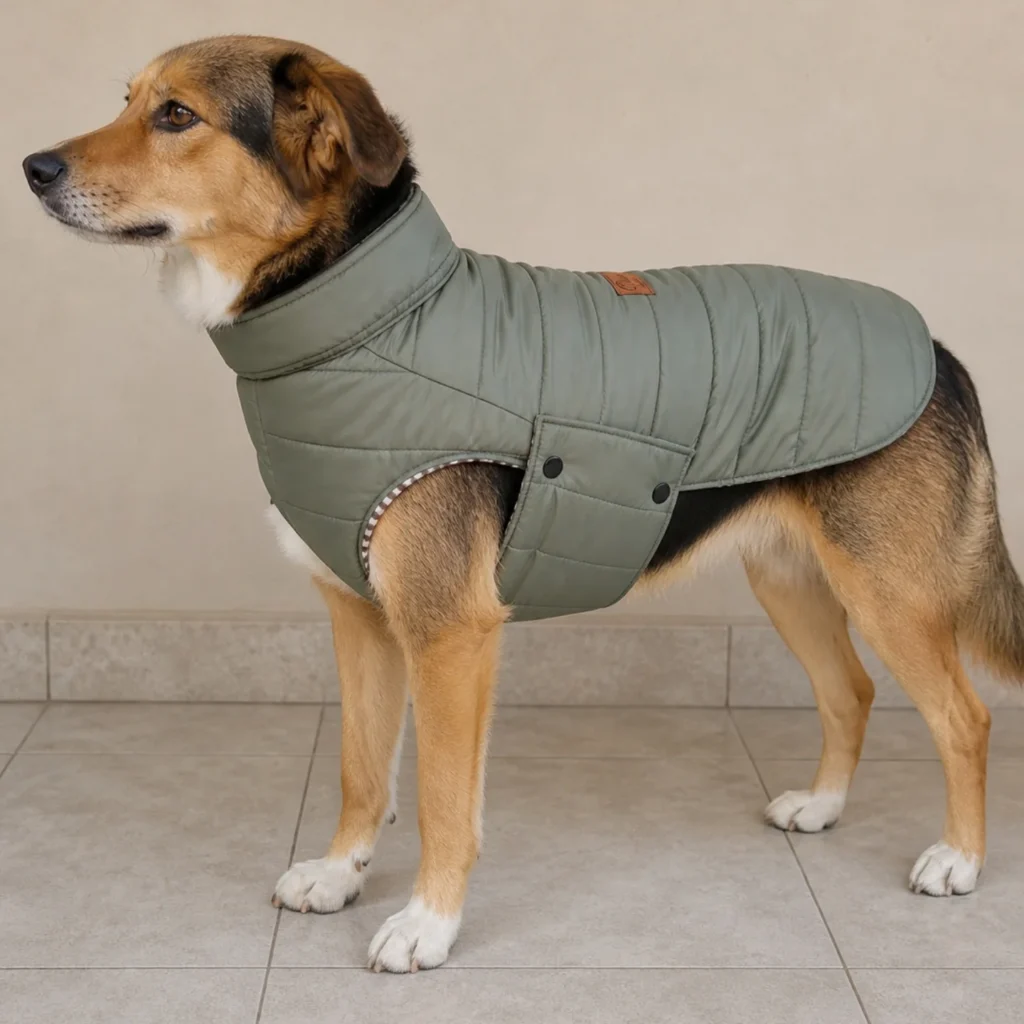
What It Looks Like
A large mixed-breed dog modelling a structured olive green puffer vest with a high collar, snap closures on the belly, and a small leather brand label on the shoulder. The quilted stitching runs in horizontal lines across the back, giving it a premium outerwear look.
What You’ll Need
- Quilted nylon or polyester fabric (pre-quilted saves time)
- Lining fabric
- Snap fasteners
- Small faux leather label (optional but charming)
- Walking foot for your sewing machine
How to DIY It
The secret to a good dog puffer vest is using pre-quilted fabric. You can buy this by the metre online and it already has the insulating batting sewn in, so you skip a major construction step.
Cut the main body of the vest — it covers the dog’s back and sides but leaves the belly mostly open (which is why it’s a vest rather than a coat). Add side panels that come down far enough to snap shut under the belly.
The high collar is a wide rectangle sewn into a loop and attached to the neckline. For large dogs, the collar should be tall enough to provide real wind protection. Line the collar in the same or contrasting fabric.
Sew snaps along the belly panels — two or three snaps is usually enough. Add a small faux leather tab to the shoulder seam with your dog’s initial stamped into it for a personal touch.
Pro Tips
- A walking foot is essential when sewing quilted fabric — regular presser feet shift the layers and cause puckering.
- Leave the armholes large — dogs need full range of front leg movement.
- For dog grooming styles that pair well with structured outerwear, a neat trim on the face and paws makes the whole look more polished.
📸 Photo credit: Instagram @handmade.olivia.sr
11. Paw-Print Puffer Jacket
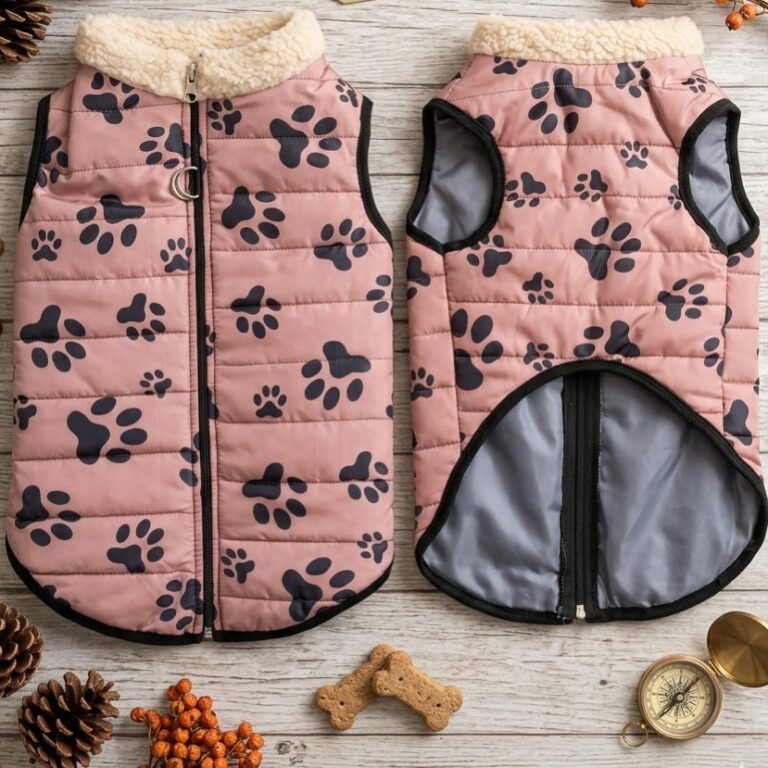
What It Looks Like
A product-style flat-lay photo showing a pink puffer jacket printed with dark navy paw prints, with a cream sherpa lining at the collar. The jacket is shown from both front and back, revealing a back zipper opening. It’s the ultimate combination of cute and functional.
What You’ll Need
- Pink puffer fabric (pre-quilted)
- Sherpa fabric for collar
- Dark binding tape for edges
- Two zippers (front and back)
- Snap or D-ring for leash attachment
How to DIY It
This jacket has slightly more construction than the plain puffer vest because it adds a zippered front opening and a back zipper vent — both practical features for dogs who need to be dressed quickly or need leash access.
The main jacket body is cut in two pieces — a top half and a bottom half that are sewn along the dog’s back centerline. The sherpa collar is sewn separately and attached to the neckline last.
The front zipper runs along the belly from chest to tail — this is the easiest entry point for most dogs. The back zipper is a short vent that allows a leash or harness attachment to pass through.
Bind all raw edges with the dark binding tape — this gives the jacket a clean, professional finish and eliminates the need for complicated hemming on the curved edges.
Pro Tips
- Paw print fabric can be found at most online fabric shops and is one of the most popular choices for dog accessories.
- The sherpa collar adds real warmth — ideal for short-haired breeds in cold climates.
- A D-ring sewn into the back seam gives you a leash attachment point without needing a separate harness.
12. Fleece Coat with Sherpa Collar and Cuffs
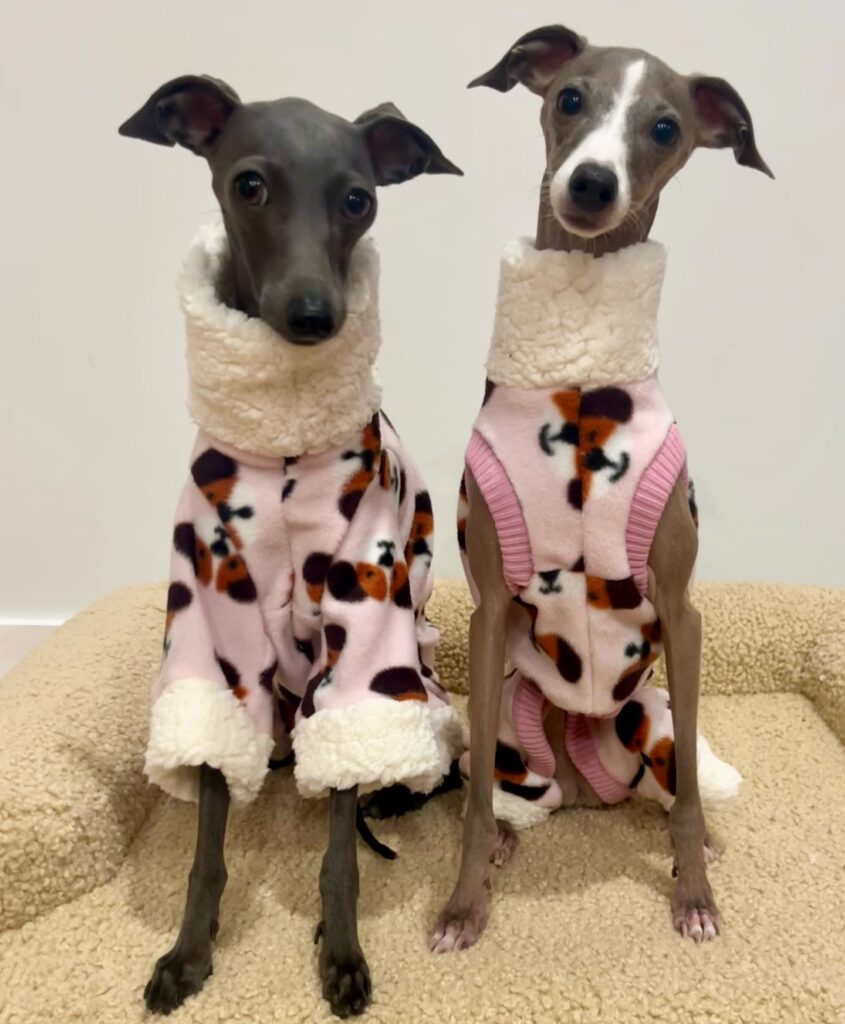
What It Looks Like
Two Italian Greyhounds sitting side by side on a cream dog bed, both wearing pink fleece coats printed with little dog faces. Each coat has a thick cream sherpa roll collar and sherpa cuffs at the sleeve ends. Matching outfits on sibling dogs — genuinely adorable.
What You’ll Need
- Printed fleece fabric (dog face print or any fun pattern)
- Sherpa fleece for collar and cuffs
- Sewing machine with stretch stitch
- Optional: pink ribbing strip for harness opening
How to DIY It
This coat style is particularly popular for Italian Greyhounds and other sighthound breeds that get cold easily. The coat covers the back, sides, and reaches down to the belly, with front leg holes left open.
Cut the main coat body in the printed fleece. The front edge of the coat comes to a V-shape at the chest, leaving the front legs completely free. This is important — sighthounds need totally unrestricted front leg movement.
The sherpa collar is the hero piece. Cut a long rectangle of sherpa fleece, fold it in half lengthways, and sew it along the neckline with the fold facing outward so the fluffy sherpa side faces out when the collar is worn. Roll the collar forward to reveal the sherpa texture.
The sherpa cuffs at the sleeves follow the same logic — sherpa strips folded and attached at the sleeve hems.
A small ribbing strip sewn into the chest opening creates the harness access point.
Pro Tips
- Sew two at once if you have two dogs — it’s barely more work and the result is twice as satisfying.
- Fleece plus sherpa can feel warm. For dogs that tend to overheat, stick with just the fleece body and skip the sherpa lining inside.
- This coat can be washed in a regular washing machine on a gentle cycle.
📸 Photo credit: Instagram @blossom_theiggy
13. Gingham Dog Dress — With Sewing Pattern
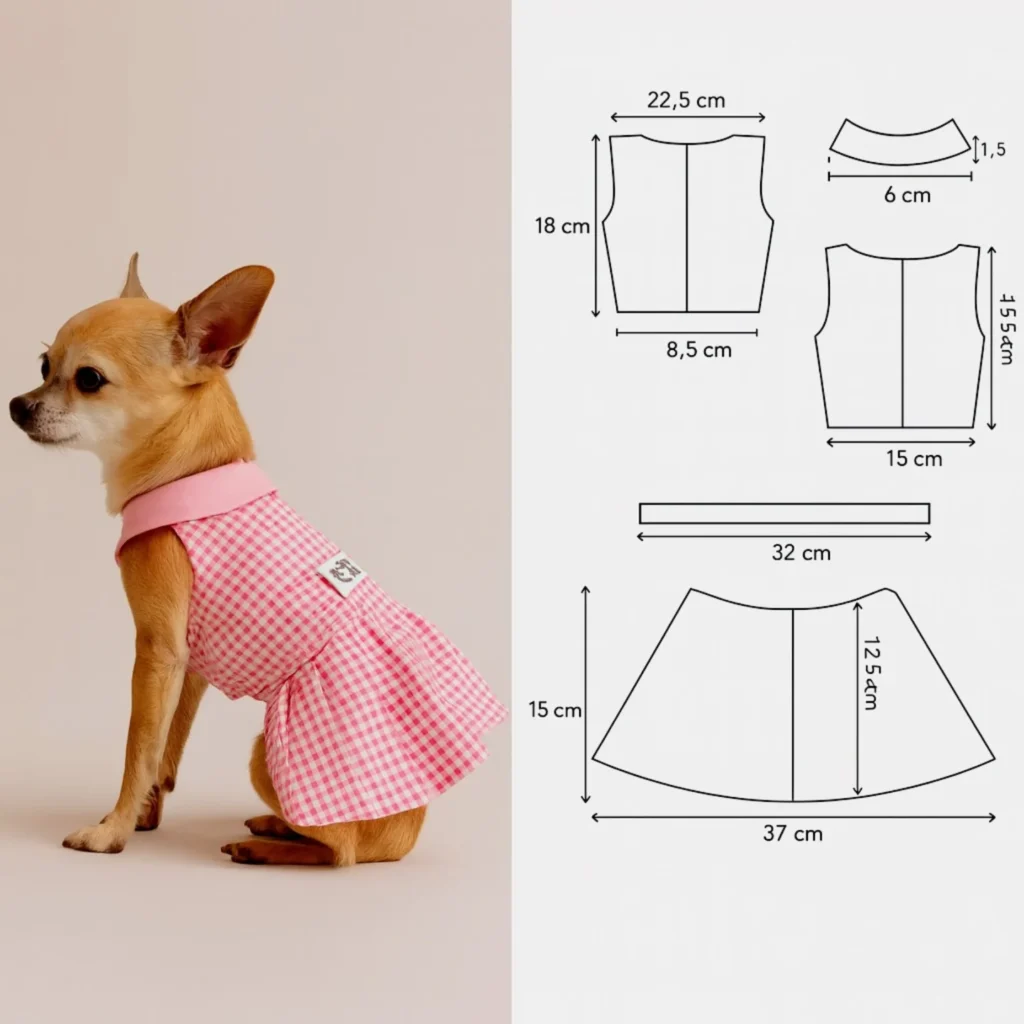
What It Looks Like
A Chihuahua in a pink and white gingham dress with a structured bodice, a gently flared skirt, and a wide pink contrast collar. Alongside the dog, the image shows the actual sewing pattern pieces with measurements — a complete beginner’s tutorial in one photo.
What You’ll Need
- Pink gingham cotton fabric (lightweight)
- Pink jersey or ribbing for the collar
- Small brand label or bow trim (optional)
- Sewing machine
Pattern Pieces:
- Front bodice: 22.5 cm wide × 18 cm tall
- Back bodice: 15 cm wide × 15.5 cm tall
- Collar strip: 6 cm wide × 32 cm long
- Skirt panel: 37 cm wide × 15 cm tall
How to DIY It
Scale these measurements to your dog’s actual body if your dog is larger or smaller than a Chihuahua. A general rule: the back length of the pattern should match your dog’s back length, and the chest width should match your dog’s chest girth divided by two (since you’re cutting one panel at a time).
Sew the front and back bodice pieces together at the shoulder seams. Attach the collar strip around the neckline, pressing the seam toward the collar. Sew the skirt panel into a loop, gather the top edge, and attach it to the bodice waistline. Close the back seam of the dress, leaving room for a snap or hook closure.
The gingham check automatically creates a geometric pattern that looks aligned and intentional — making even beginner sewing look polished.
Pro Tips
- Cut all gingham pieces so the checks run in the same direction — misaligned gingham looks messy.
- Pre-shrink the fabric before cutting. Gingham is 100% cotton and will shrink in the wash.
- This dress pattern works brilliantly for best small dog breeds for kids — it’s the perfect starter sewing project to do with children.
📸 Photo credit: Instagram @costura_moldesonline1
14. Tiered Ruffle Dress — With Sewing Pattern
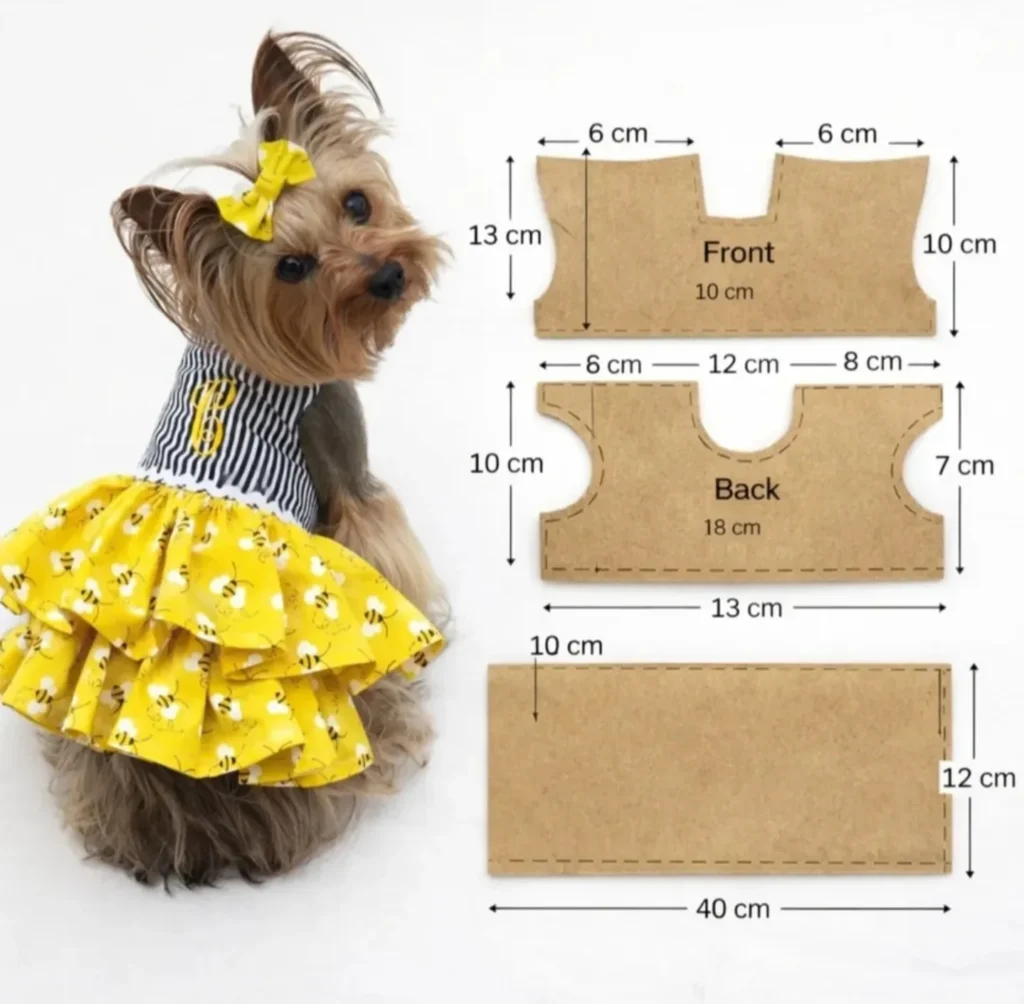
What It Looks Like
A Yorkshire Terrier in a striped navy bodice top with a dramatic two-tiered ruffle skirt in yellow bee-print fabric. A matching bow in the same bee print sits on the dog’s head. The image also shows the flat pattern pieces with measurements — another shareable tutorial layout.
What You’ll Need
- Striped cotton for the bodice
- Novelty print cotton for the ruffle skirt layers
- Matching ribbon or scrunchie fabric for the bow
- Elastic
Pattern Pieces:
- Front piece: 12 cm wide × 13 cm tall
- Back piece: 18 cm wide × 10 cm tall
- Skirt/ruffle panel: 40 cm wide × 12 cm tall (per tier)
How to DIY It
The tiered ruffle skirt is what makes this dress stand out. You need two skirt layers — the bottom tier is the widest and longest, and the top tier sits above it and is slightly shorter.
Cut both ruffle panels. Sew each one into a loop. Run a basting stitch along the top edge of each loop and pull the threads to gather the fabric into tight, even ruffles. Attach the bottom tier first, then layer the top tier over it so the top edge of the bottom ruffle peeks out below the top ruffle.
The bodice is sewn separately using the front and back pieces, then joined to the gathered ruffle waistband. A back opening with snaps or Velcro makes dressing easy.
The matching bow is the finishing touch — just a rectangle of the ruffle fabric tied into a bow and clipped to a hair clip.
Pro Tips
- For maximum ruffle volume, cut your skirt panels at least 2–2.5x wider than the dog’s waist measurement.
- Lightweight quilting cotton works better than heavy fabric for ruffles — it gathers and drapes beautifully.
- The layered ruffle technique works for any scale — from Chihuahua to Corgi — just adjust the measurements proportionally.
15. Granny Square Crochet Coat
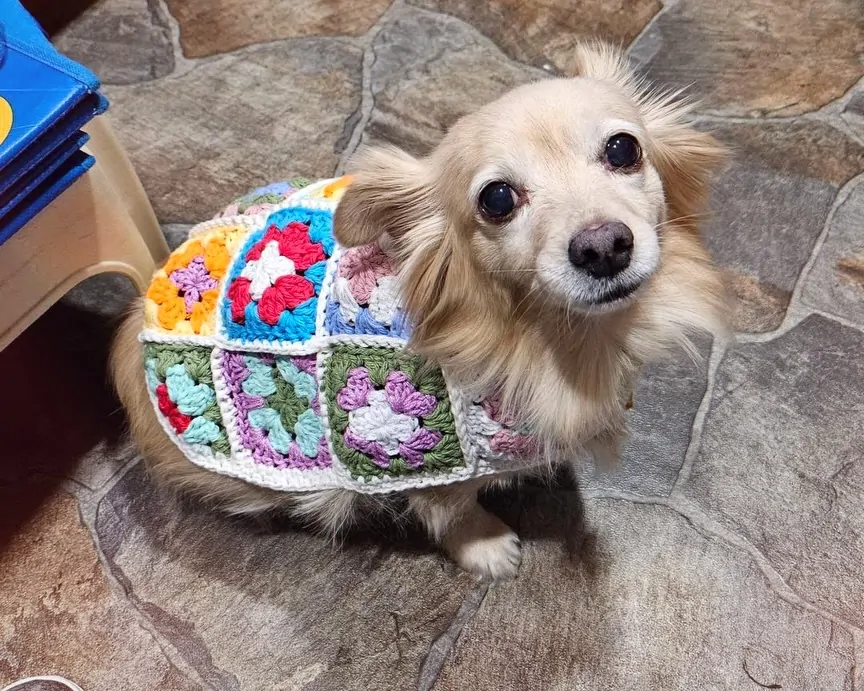
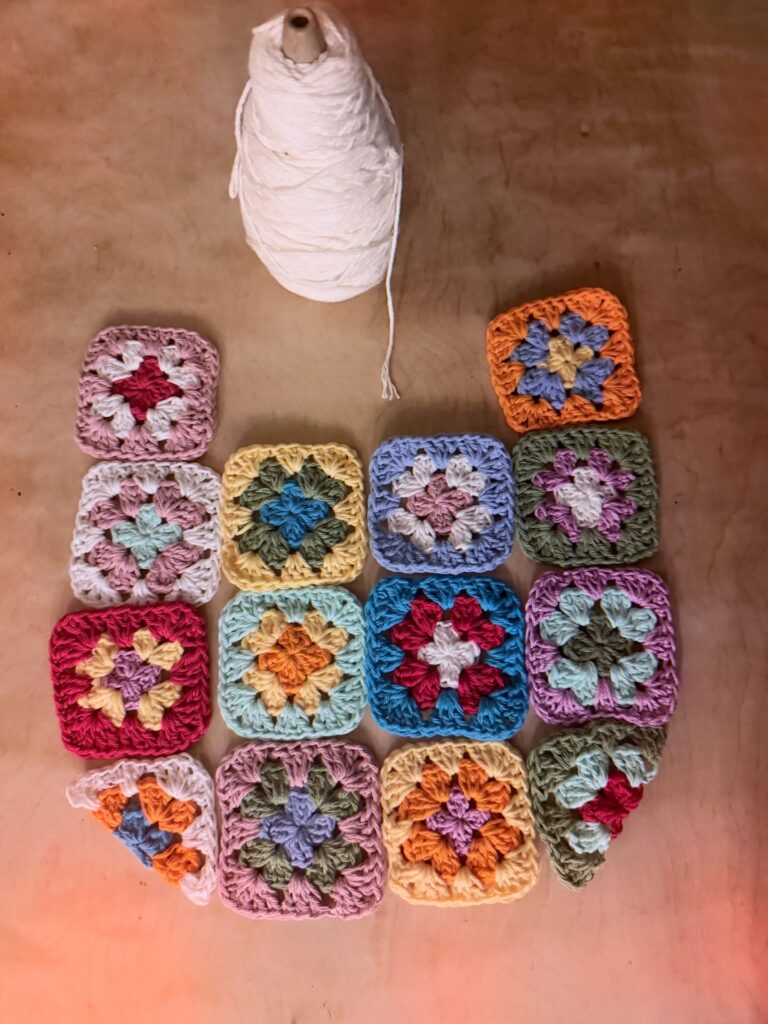
What It Looks Like
A flat-lay photo of 16 individually crocheted granny squares in a spectrum of colors — pink, yellow, green, blue, orange, red — arranged in a coat shape, alongside a ball of cream joining yarn. Then, the finished coat worn on a small Chihuahua mix: a patchwork masterpiece.
What You’ll Need
- Cotton yarn in 8–10 colors
- Cream or white yarn for joining
- 3.5mm or 4mm crochet hook
- Yarn needle for joining and weaving ends
How to DIY It
Each granny square in this coat is a classic four-round square. The center ring is worked in one color, and each outer round introduces a new color. For a small dog coat, you’ll need approximately 12–18 squares depending on your dog’s size and how large you make each square.
Basic granny square (4mm hook):
- Round 1: Magic ring, 3ch, 2dc, 2ch, [3dc, 2ch] × 3, join
- Round 2: Join new color at corner space, 3ch, 2dc, 2ch, 3dc in same corner, 1ch, [3dc, 2ch, 3dc] in next corner, repeat, join
- Round 3 & 4: Continue adding dc clusters at each corner and 1 cluster in each gap between corners
Once you have enough squares, join them using a slip stitch method through the back loops — this creates a neat ridge line that actually looks like a design feature.
The coat is essentially a rectangle of joined squares that fits over the dog’s back, with two smaller squares hanging down on each side that close under the belly using buttons or snaps.
Pro Tips
- Use cotton yarn rather than acrylic for dog coats — it’s washable, breathable, and kinder to skin.
- Make all your squares the same size by blocking each one before joining — this makes the joining process much more satisfying.
- This is a great project to use up scraps from other yarn projects.
📸 Photo credit: Instagram @audreygurumi
16. Hand-Crocheted Colorblock Vest With Button Closure
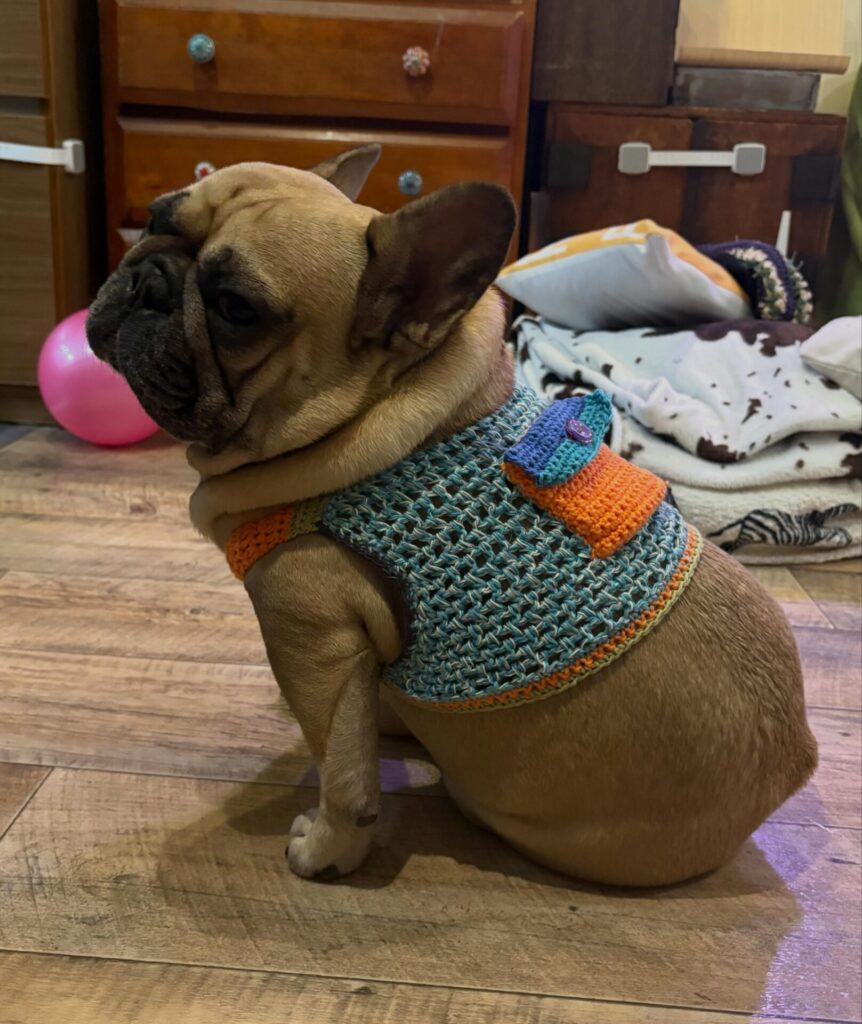
What It Looks Like
A French Bulldog wearing a hand-crocheted vest in teal and orange colorblocking, with a small pocket square detail at the chest in purple and orange, and a single button closure. The texture of the crochet stitch is visible and beautifully crafted.
What You’ll Need
- Teal and orange cotton yarn
- Small purple yarn for pocket detail
- 4mm crochet hook
- One large button
How to DIY It
This vest is worked from the bottom up in a mesh or basic half-double crochet stitch. Start with the main body panel — a rectangle wide enough to cover your dog’s back from the base of the neck to just past the ribcage.
Work in the main color (teal) for the majority of the body. When you reach the chest area, switch to orange for a contrasting colorblock band. The color change in crochet is simple — just drop the old color, pick up the new one, and continue working.
The chest pocket square is crocheted separately in a contrasting color combination, then slip-stitched onto the front of the vest as a decorative detail.
For French Bulldogs, the vest needs wide armhole openings — Frenchies have very broad, muscular shoulders. Leave generous gaps at each side when shaping the armholes.
Finish with a button and a small crocheted button loop on the opposite edge. This replaces the need for a full closure and gives the vest a blazer-like sophistication.
Pro Tips
- Test your stitch tension by crocheting a 10cm swatch before starting — crochet tension varies hugely between crafters.
- A mesh stitch (chains and single crochets in a grid pattern) creates a lighter, airier vest that’s better for warmer weather.
- This style works especially well for trendy dog Christmas gifts — a handmade crocheted vest is a genuinely meaningful present for a fellow dog lover.
17. Intarsia Crochet Sweater With Dog Silhouette Motif
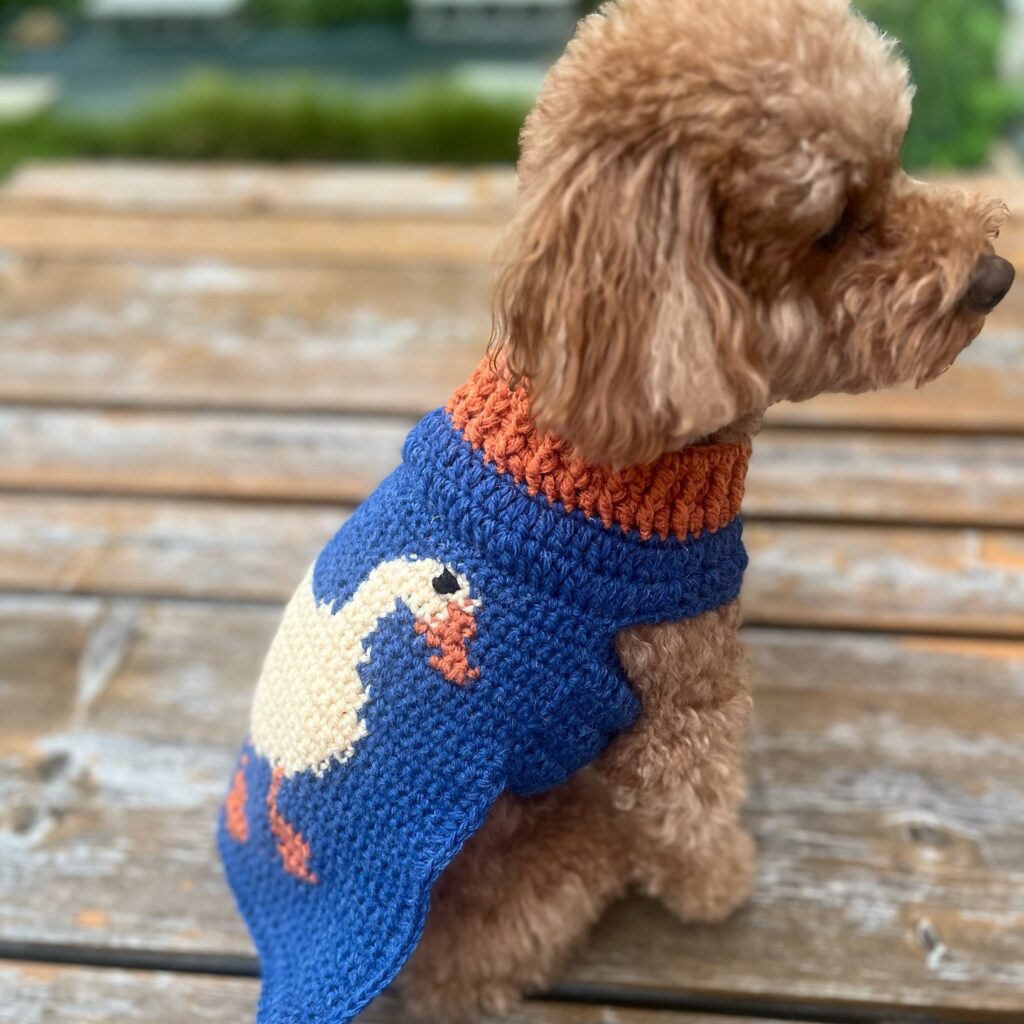
What It Looks Like
An apricot Toy Poodle sitting on a wooden park bench wearing a royal blue crocheted sweater with a cream and orange dog silhouette motif on the side. An orange turtleneck collar completes the look. This is one of the most advanced projects on this list — and one of the most impressive.
What You’ll Need
- Royal blue cotton yarn (main color)
- Cream and orange yarn for the motif
- 3.5mm crochet hook
- Yarn needle
- Graph paper to chart your motif
How to DIY It
Intarsia crochet is a colorwork technique where different colored yarn sections are worked independently across the same row. Unlike stranded colorwork where you carry all yarns across the back, intarsia keeps each color section separate, which creates a cleaner image.
Start by drawing your dog silhouette motif on graph paper — each square represents one stitch. Keep it simple: a side-profile dog shape in cream with a tiny orange accent (like a bandana or collar detail) works beautifully.
Work the sweater body in blue from the bottom up. When you reach the motif rows, follow your graph chart: work in blue until you reach the motif section, drop the blue, pick up the cream yarn, work the cream stitches, then pick up the orange for accent stitches, and finally pick up the blue again for the remaining stitches in that row.
The turtleneck collar is worked in rounds in the orange yarn, then attached to the neckline of the finished body.
Pro Tips
- Intarsia creates a lot of yarn ends. Weave them in as you go rather than leaving them all until the end.
- Work tension is crucial in colorwork — if you pull too tight when switching colors, the motif area will pucker. Practice on a swatch first.
- This is a wonderful project for dog grooming styles pairings — a neat Poodle trim with a show-stopping hand-crocheted sweater is an unbeatable combination.
18. Knit Romper With Bunny Ear Straps
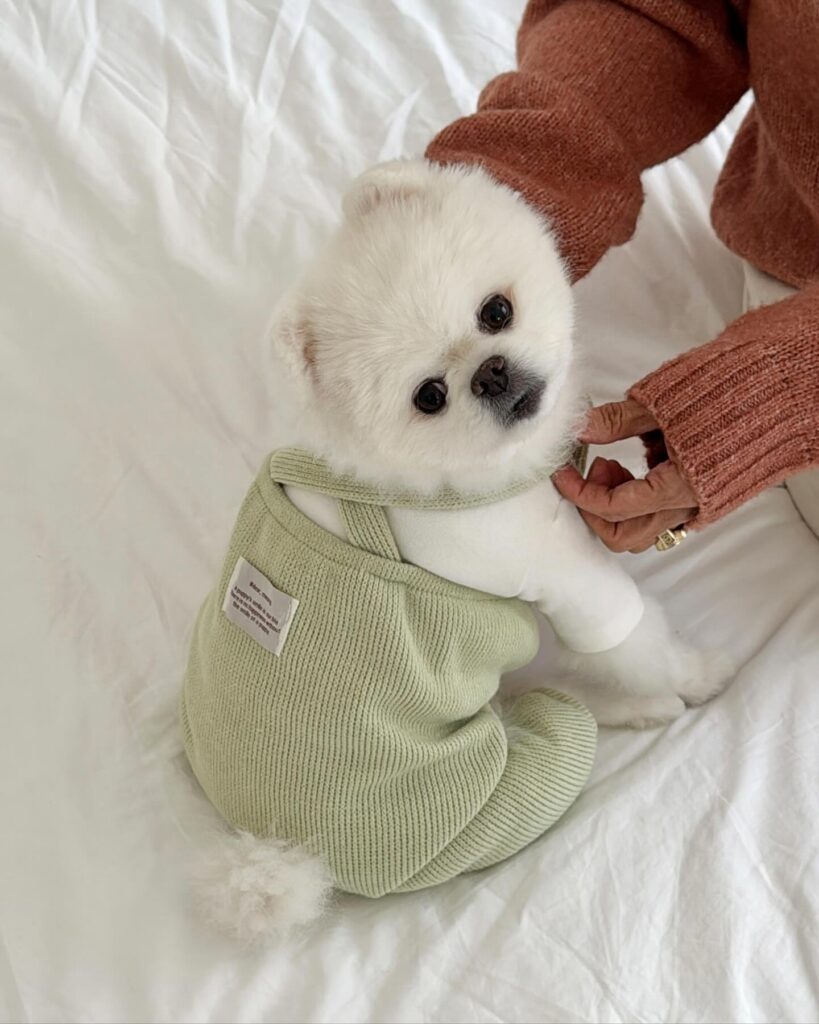
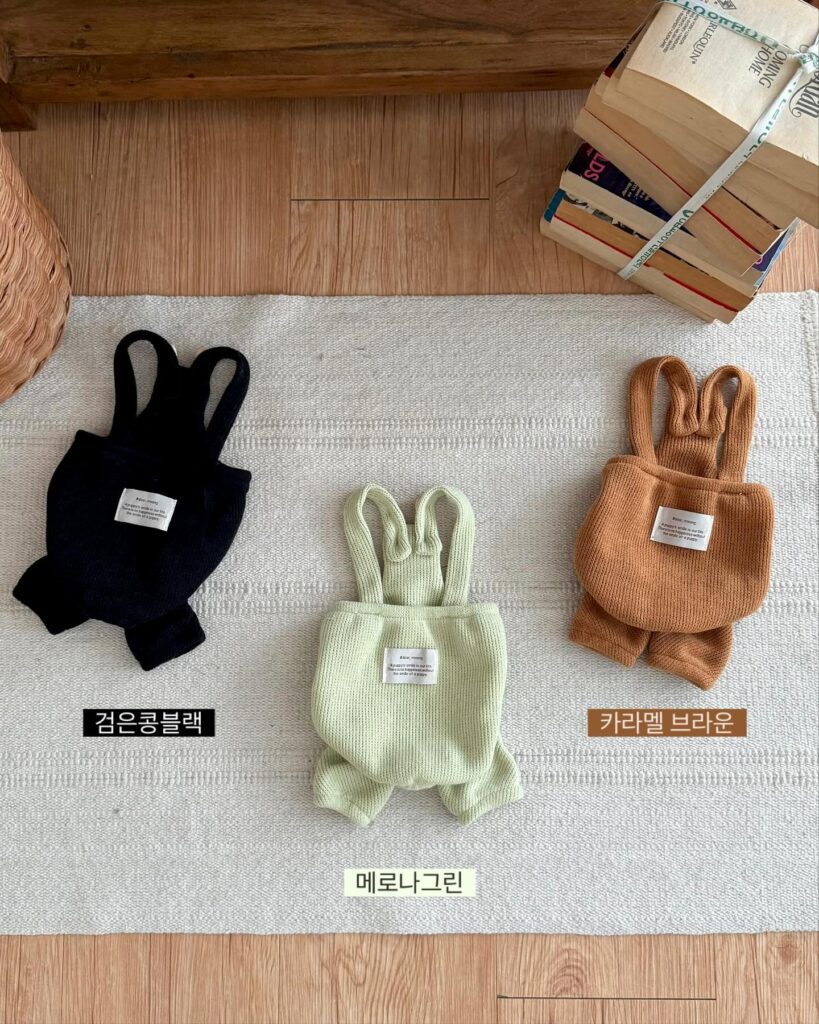
What It Looks Like
Three knitted dog rompers laid flat — one black, one sage green, and one caramel brown. Each romper has wide knitted shoulder straps with bunny ear shaping at the tips. The sage green version is shown being worn by a tiny white Pomeranian, which makes the whole thing absolutely irresistible.
What You’ll Need
- Cotton or cotton-blend DK weight yarn
- 4mm knitting needles (straight or circular)
- Stitch markers
- Small label patch (optional)
How to DIY It
This romper is knitted in a simple ribbed stitch throughout — knit 1, purl 1 ribbing gives the fabric natural stretch and a neat, textured finish.
Start with the main body: cast on enough stitches to cover your dog’s chest measurement. Work in 1×1 ribbing until the piece reaches from just below the dog’s neck to past the belly. This becomes the front panel.
The shoulder straps are worked as attached extensions at the top corners of the front panel. Knit each strap as a narrow rectangle (about 2–3cm wide) and continue upward for the strap length. At the tip of each strap, shape the bunny ears: work both ear lobes as separate short sections — pick up half the strap stitches for one ear, decrease to a point, then repeat for the second ear.
The back panel is simply a shorter rectangle that attaches to the back of the straps and sits flat against the dog’s back.
Pro Tips
- Ribbing naturally has a lot of stretch, so size down slightly rather than up — a slightly snug ribbed romper will stretch to fit, but a loose one will fall off.
- These are available in three colorways for a reason — make one in a neutral and one in a fun color. You’ll reach for both.
- This project is ideal for small breeds. If you’re unsure about sizing, browse our guide to best small dog breeds for seniors — senior dog owners often prefer easy-on, warm clothing options.
📸 Photo credit: Instagram @peppy_land
19. Striped Knit Sleeveless Tank/Vest
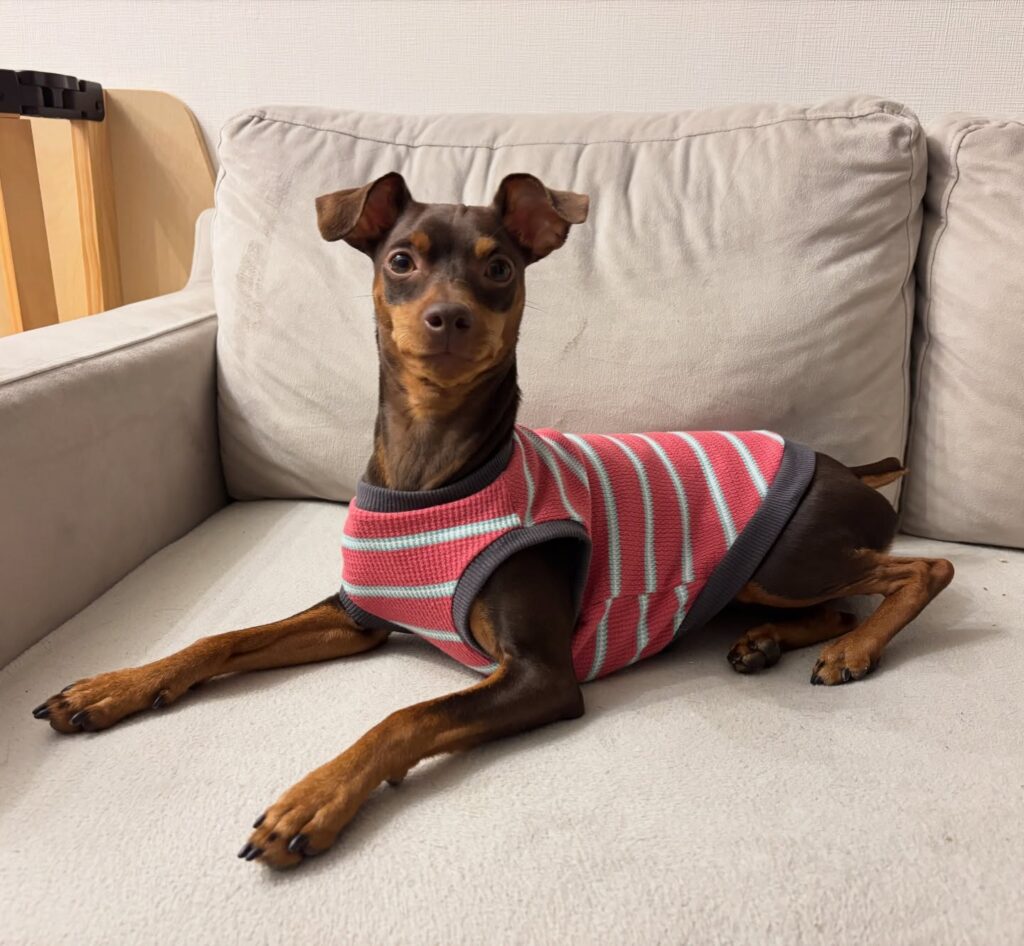
What It Looks Like
A compact Min Pin (Miniature Pinscher) lying relaxed on a cream sofa in a pink and white striped sleeveless knit tank with grey ribbed trim at the neck and armholes. Clean, simple, and perfectly fitted.
What You’ll Need
- Pink and white DK or sport weight yarn
- Grey yarn for ribbing sections
- 3.5mm or 4mm knitting needles
- Stitch holders
How to DIY It
This is the most beginner-friendly knitting project on the entire list. A sleeveless dog tank is essentially a small rectangle with armhole shaping — no sleeves to pick up, no complex construction.
Cast on enough stitches to cover your dog’s chest girth. Work 3–4 rows of grey 1×1 ribbing for the hem. Then switch to the stripe pattern: 4 rows pink, 4 rows white, alternating until the tank reaches your dog’s back length. Work matching grey ribbing for a few rows before the armhole shaping.
For the armholes: bind off a set number of stitches at each side on the same row. Continue working just the center stitches for the back saddle (the section that goes over the dog’s back). Then work each shoulder strap separately.
Finish with a matching grey ribbed neckline, picking up stitches around the entire neck opening and working a few rows of ribbing in the round.
Pro Tips
- Stripes are the perfect beginner colorwork pattern — no charts, no counting, just color changes every few rows.
- Pin Pinschers and similar short-coated breeds are a natural match for fitted tanks — they have clean, athletic lines that show knitwear off well.
- This project uses very little yarn. A single 50g ball of each color is more than enough for a small dog.
20. Teddy Bear Sherpa Costume
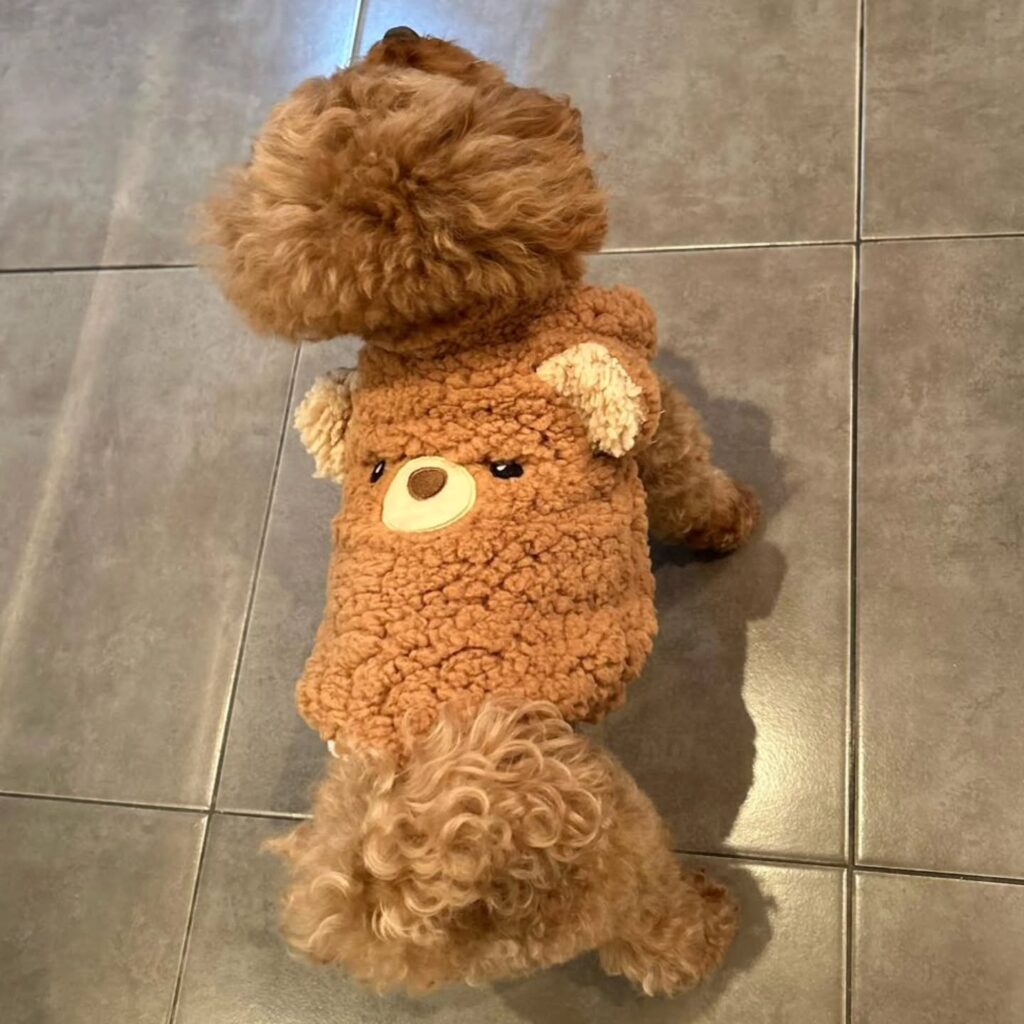
What It Looks Like
An apricot Toy Poodle wearing a sherpa bear costume — viewed from above — showing a brown textured body with a sewn-on bear face at the back, 3D ears on the shoulders, and curly poodle legs peeking out below. The poodle’s own fluffy head completes the illusion of a teddy bear come to life.
What You’ll Need
- Brown sherpa or boucle fabric
- Cream felt or sherpa for the bear face details
- Black felt for the eyes and nose
- Fabric glue or hand-sewing needle
- Elastic for leg openings
How to DIY It
This is a costume project more than a wearable outfit, and it’s one of the most fun DIY dog clothes ideas on this entire list.
The main body is a simple dog vest pattern cut in brown sherpa. The sherpa fabric’s natural texture immediately reads as “bear fur” without any extra effort. Sew the main body panels together, leaving armholes and a neck opening.
The bear face panel is the highlight. Cut an oval of cream sherpa for the muzzle area, a circle of cream felt for the inner ear (inside each ear), and small circles of black felt for the eyes. Arrange these on the back panel of the vest where the dog’s back would sit, and either glue or hand-sew them in place.
For the 3D ears: cut four ear-shaped pieces of sherpa (two outer, two inner in cream). Sew each outer and inner ear pair together, leaving the base open. Turn right side out. Stuff lightly with a little fiberfill and hand-stitch the bases closed. Sew the ears to the shoulder seam area of the vest so they stick upward.
The whole costume slides onto the dog like a regular vest, and suddenly the dog’s own head becomes the bear’s head.
Pro Tips
- This works best on dogs with fluffy or curly coats — the contrast between the bear costume and the real fur below is what makes the illusion magical.
- Use fabric glue rated for fabric washing if you want to be able to wash the costume — hot glue will not survive laundering.
- Toy Poodles in particular are perfect for this because their fluffy pom head is the exact right shape for a teddy bear face. See more on caring for your poodle by checking out how to groom a dog at home.
📸 Photo credit: Instagram @mindythetoy
General Tips for Making DIY Dog Clothes
Now that you’ve seen all 20 ideas, here are the most important general principles to keep in mind across every project:
✅ Always Measure First
The three measurements you need before starting any project are: neck circumference, chest girth (the widest part, usually just behind the front legs), and back length (from base of neck to base of tail). Write these down and refer to them constantly.
✅ Choose Dog-Friendly Fabrics
Avoid fabrics with loose threads that could wrap around legs or toes. Steer clear of fabrics with large holes (coarse knit or open crochet) where paws could get caught. Fleece, jersey, and tightly woven cotton are generally the safest choices.
✅ Test the Fit Before Finishing
Before sewing final seams or casting off final stitches, hold the garment against your dog. Most dogs will tolerate a brief fitting session if you keep treats nearby. Look for pinching at the armpits, tightness at the neck, or excess fabric dragging under the belly.
✅ Make Bathroom Breaks Possible
Any outfit that covers the belly area should have a fastening that can be quickly opened for bathroom breaks. Snaps, Velcro, or a strategically placed opening at the back work well.
✅ Let Your Dog Get Used to Clothes Gradually
If your dog has never worn clothes before, start with a simple, lightweight option like Idea #7 (the novelty print t-shirt) and let them wear it for short sessions indoors. Build up the duration gradually and always reward calm behavior with treats and praise.
Final Thoughts
These 20 DIY dog clothes ideas prove that dressing your dog doesn’t have to mean buying mass-produced outfits in generic sizes. With a little fabric, some basic sewing or crochet skills, and the inspiration from real dog owners who’ve actually made these looks, you can create something genuinely special for your pup.
Whether you start with a simple striped tank or dive straight into an intarsia crochet sweater, the process is part of the joy. Every stitch you sew or loop you crochet is made with your specific dog in mind — and that makes the finished garment more valuable than anything you’d find in a store.
Start small, have fun, measure twice, and don’t forget to share your finished projects on Instagram. The dog fashion community is one of the most supportive corners of the internet, and your pup deserves their moment in the spotlight.
Looking for more ways to show your dog some love? Explore our guides on dog accessories tips, the best dog breeds for different lifestyles, and even trendy dog Christmas gift ideas for when your DIY skills need a complement from the shopping world.

Izzy is an experienced ranch worker who has a passion for exploring nature and getting up close to wildlife. With her connections to various animal organizations, Izzy is well-versed in animal care and rehabilitation.