14 Dog Paw Wreath DIY Ideas to Welcome Guests (and Good Boys)
If you love dogs and you love a good front door glow-up, a dog paw wreath diy project is one of the easiest ways to show off both. These wreaths are shaped like an actual paw print, so anyone walking up to your porch instantly knows a dog lives there — and probably runs the household too.
The best part? You don’t need to be crafty to make one. Most of these ideas use grapevine wreath forms, yarn, ribbon, or even dollar store supplies. Whether you want a romantic floral look, a cozy farmhouse vibe, or a true dollar tree dog paw wreath on a budget, there’s an idea below for you.
Below are 14 real, tested dog paw wreath ideas — seven inspired by talented Instagram crafters, and seven more you can build using the same basic techniques. Each one includes what you’ll need and how to put it together, so grab your glue gun and let’s get started.
14 Dog Paw Wreath DIY Ideas
1. Blush Rose Grapevine Paw Wreath
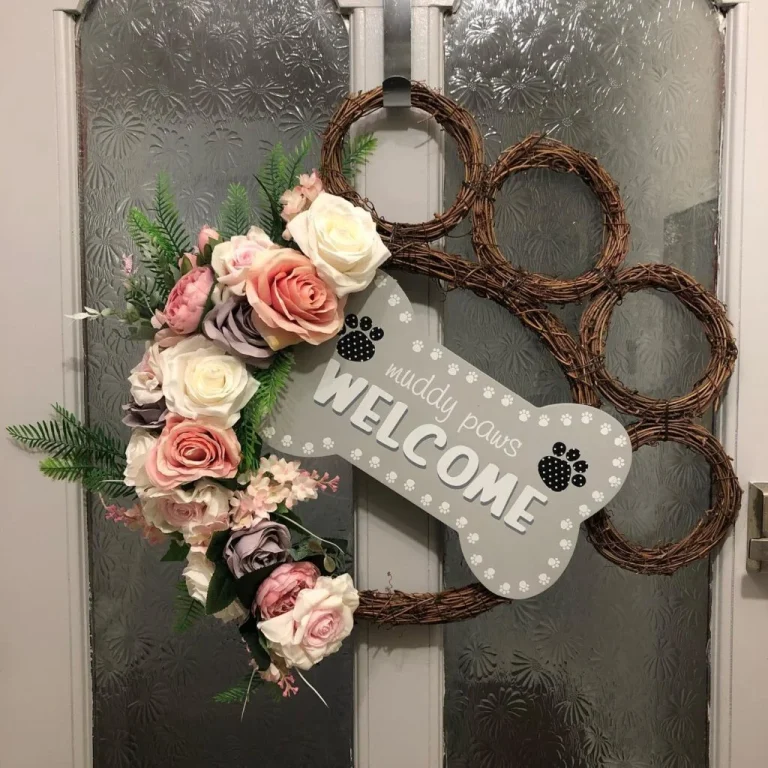
This is the wreath to make if you want your front door to look like it belongs in a bridal magazine — but with a paw print twist. It starts with a standard grapevine wreath form shaped into a paw (one large circle for the pad, four smaller circles for the toes). A lush swag of blush pink, ivory, and mauve roses cascades down one side, mixed with soft ferns and greenery. A wooden bone-shaped sign reading “Muddy Paws Welcome” sits right in the center, decorated with tiny black paw prints.
What makes this design work so well is the asymmetry. Instead of spreading flowers evenly around the whole wreath, the florals are concentrated on one side, which gives it a more organic, “just picked from the garden” feel rather than a stiff, store-bought look. This same trick is used in a lot of high-end wedding and porch decor, so it’s a great technique to borrow even if florals aren’t your usual style.
What you’ll need:
- Grapevine wreath form (or 5 mini grapevine rings wired together)
- Faux rose stems in blush, ivory, and mauve
- Faux fern picks
- A paw-print bone welcome sign
- Floral wire and hot glue
How to make it: Wire four small grapevine rings around one larger ring to form the paw shape. Trim your rose and fern stems short, then hot glue them in a cluster along one side, layering roses first and tucking greenery in the gaps. Attach the bone sign across the center pad with wire or glue. For extra fullness, tuck in a few smaller filler flowers like baby’s breath between the roses so there are no obvious gaps once the glue dries.
If you want to switch up the color palette for a different season, this same layout works beautifully with deep red and burgundy blooms for fall, or white and eucalyptus for a winter version.
📸 Photo credit: Instagram @thedoorcrown
2. Eyelash Yarn “Dog Mom” Paw Wreath
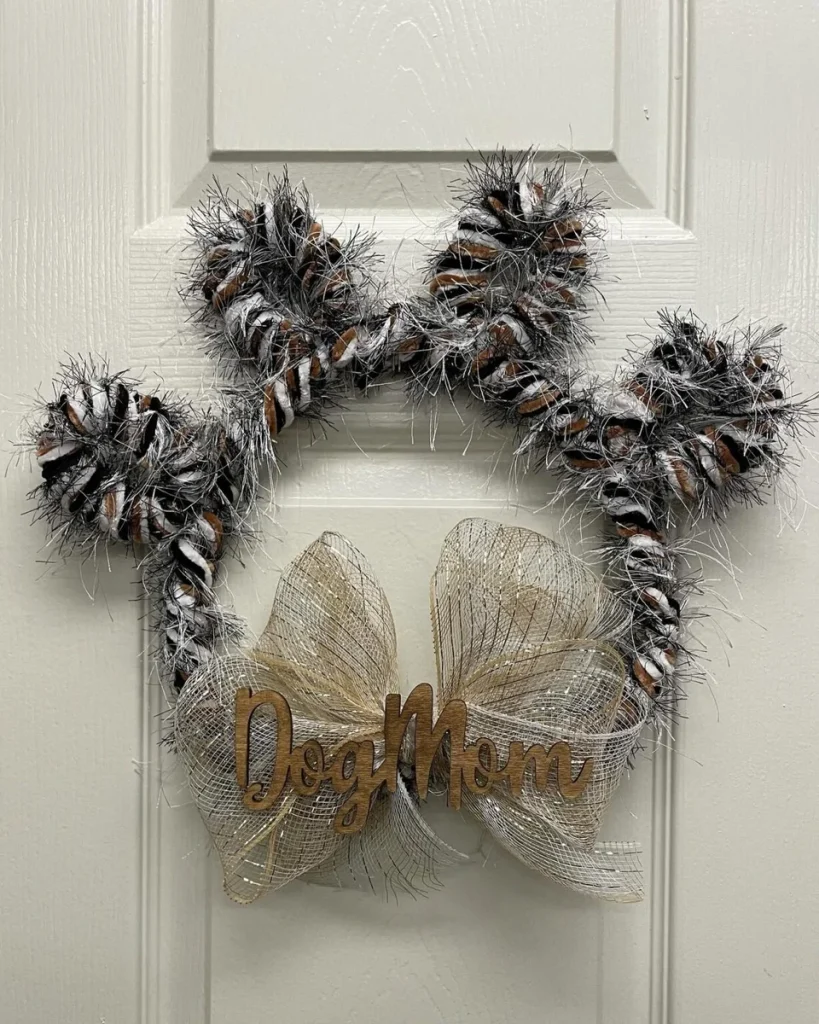
No grapevine base here — this wreath is built entirely from twisted eyelash and tinsel yarn in black, white, and tan, giving it a super fluffy, glam texture. A gold and cream mesh bow sits at the base, with a laser-cut wood “Dog Mom” script sign layered on top.
This design stands out because of the yarn texture alone. Eyelash yarn has a slightly fuzzy, almost fur-like quality, which makes total sense for a dog-themed wreath — it practically looks like a paw print made of fur. Mixing two or three different yarn textures (smooth, fuzzy, metallic) adds visual interest without needing any extra embellishments.
What you’ll need:
- A wire wreath frame (paw-shaped or DIY-bent)
- Eyelash/tinsel yarn in 2–3 colors
- Wide mesh ribbon
- A “Dog Mom” (or any word) wood cutout sign
How to make it: Wrap the yarn tightly and continuously around your wire frame, alternating colors as you go for a mixed texture. Keep tension consistent so the wraps don’t loosen over time, and secure the start and end of each yarn color with a small dot of hot glue before switching. Once fully covered, tie a mesh bow at the bottom pad and hot glue your wood sign directly onto the bow.
A helpful trick here is to wrap the toes and the main pad separately before wiring them together. It’s much easier to control the yarn tension on smaller sections than trying to wrap the whole paw shape in one continuous pass.
📸 Photo credit: Instagram @sassysouthernncgirl
3. Black & White Buffalo Check Paw Wreath
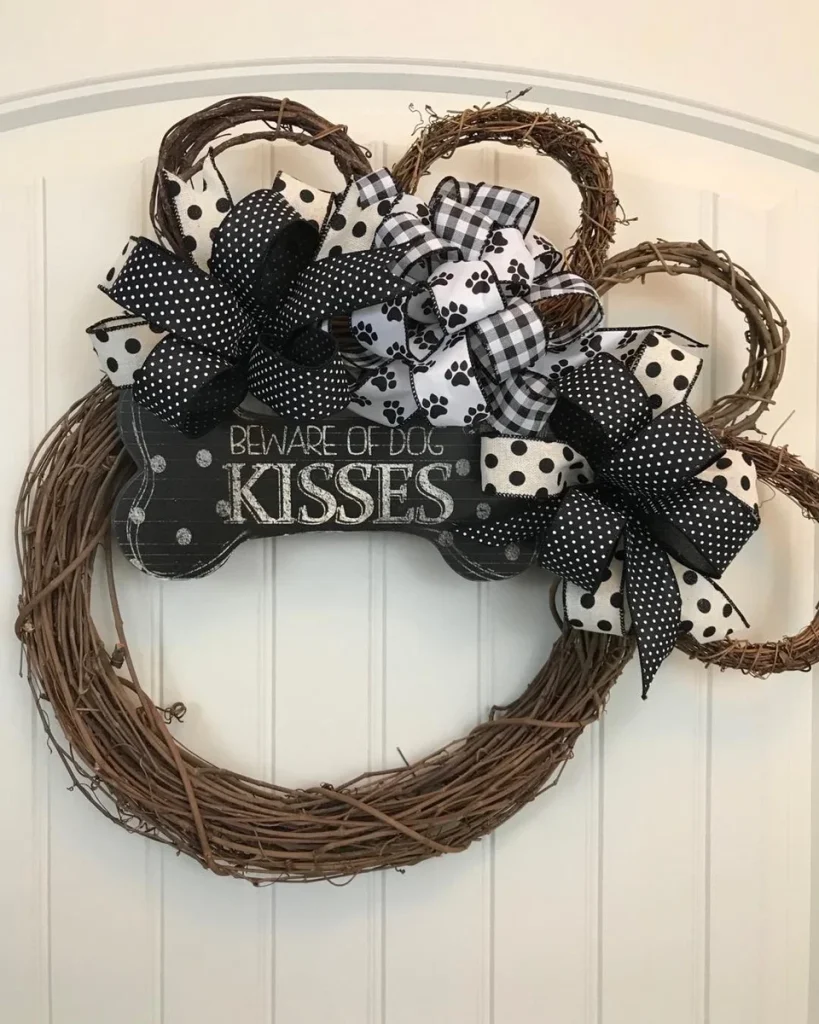
This one leans classic and slightly funny — perfect if your dog is more “mischief maker” than “good boy.” A traditional grapevine paw wreath is topped with a mix of polka dot and buffalo check ribbon bows, all piled around a chalkboard-style wooden bone sign that reads “Beware of Dog Kisses.”
The humor in the sign pairs really well with the timeless black-and-white color scheme, which means this wreath works year-round instead of feeling tied to one season. It’s also one of the more budget-friendly ideas on this list since ribbon bows are cheap and easy to make in bulk.
What you’ll need:
- Grapevine wreath form (paw-shaped)
- Polka dot ribbon
- Black and white buffalo check ribbon
- A chalkboard-style bone sign
- Floral wire
How to make it: Make several small ribbon bows using both ribbon types — aim for 4 to 6 bows of different sizes. Cluster them together at the top of the paw pad using wire, then attach your bone sign in front of the bow cluster so the text stays visible. When layering the bows, place the largest ones at the back and the smallest toward the front so each layer is visible instead of hidden behind bigger loops.
If you’d rather skip bow-making entirely, pre-made wired ribbon bows sold at most craft stores work just as well and save a good chunk of time.
📸 Photo credit: Instagram @reviewsfromtheheart
4. Farmhouse Paw-Print Ribbon Wreath
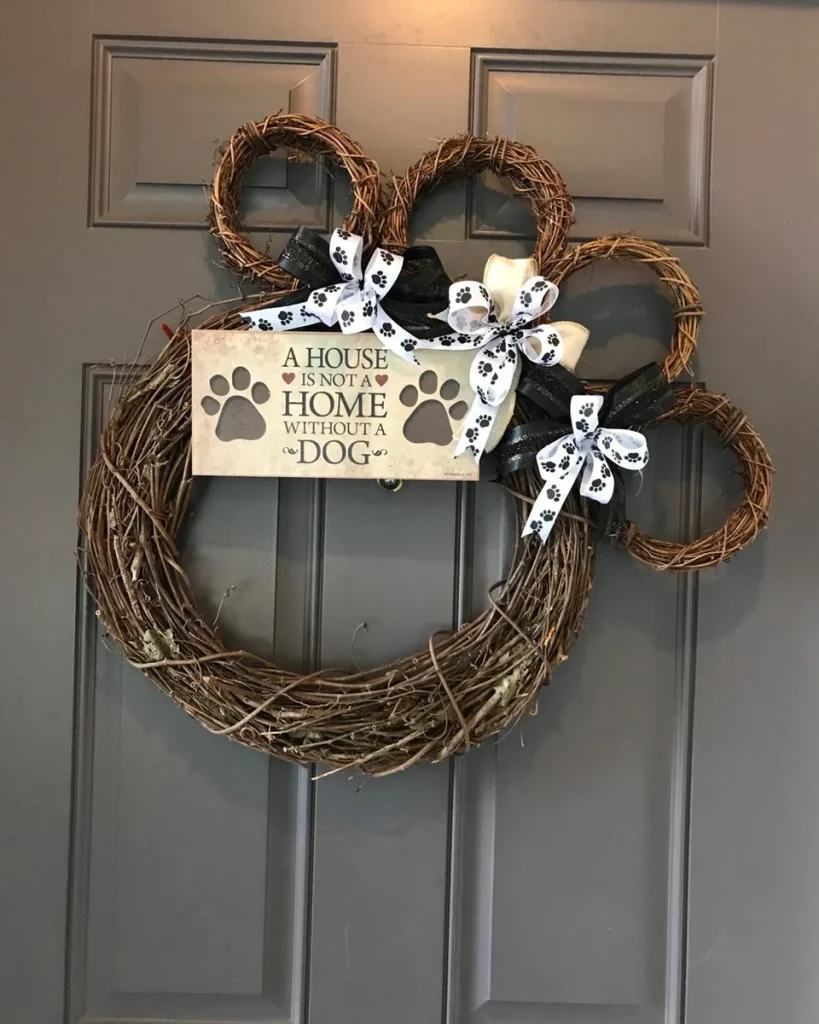
This is a great beginner project because it keeps things simple. A large grapevine paw wreath is left mostly bare, letting the natural texture shine, with small black and white paw-print ribbon bows scattered across the toes. A printed wood sign reading “A House Is Not a Home Without a Dog” sits across the pad.
Because so much of the grapevine is left exposed, this idea takes the least amount of time and materials of anything on this list — making it perfect if you’re short on crafting supplies or just want something quick to hang before guests arrive.
What you’ll need:
- Grapevine wreath form
- Paw-print ribbon (black and white)
- Solid black and cream ribbon
- A printed wood quote sign
How to make it: Tie 3 small bows using a mix of paw-print and solid ribbon, then attach one to each toe loop with wire. Center your quote sign on the largest circle and secure with hot glue or a small nail through the grapevine. Because the grapevine itself is the star here, try to choose a form with tight, even weaving so it looks intentional rather than messy.
This is also a good design to build on later — you can always add a floral swag or seasonal pick to one side if you decide you want more color down the road.
📸 Photo credit: Instagram @katscreationswreaths
5. Boxwood Greenery Paw Wreath with Scrabble Sign
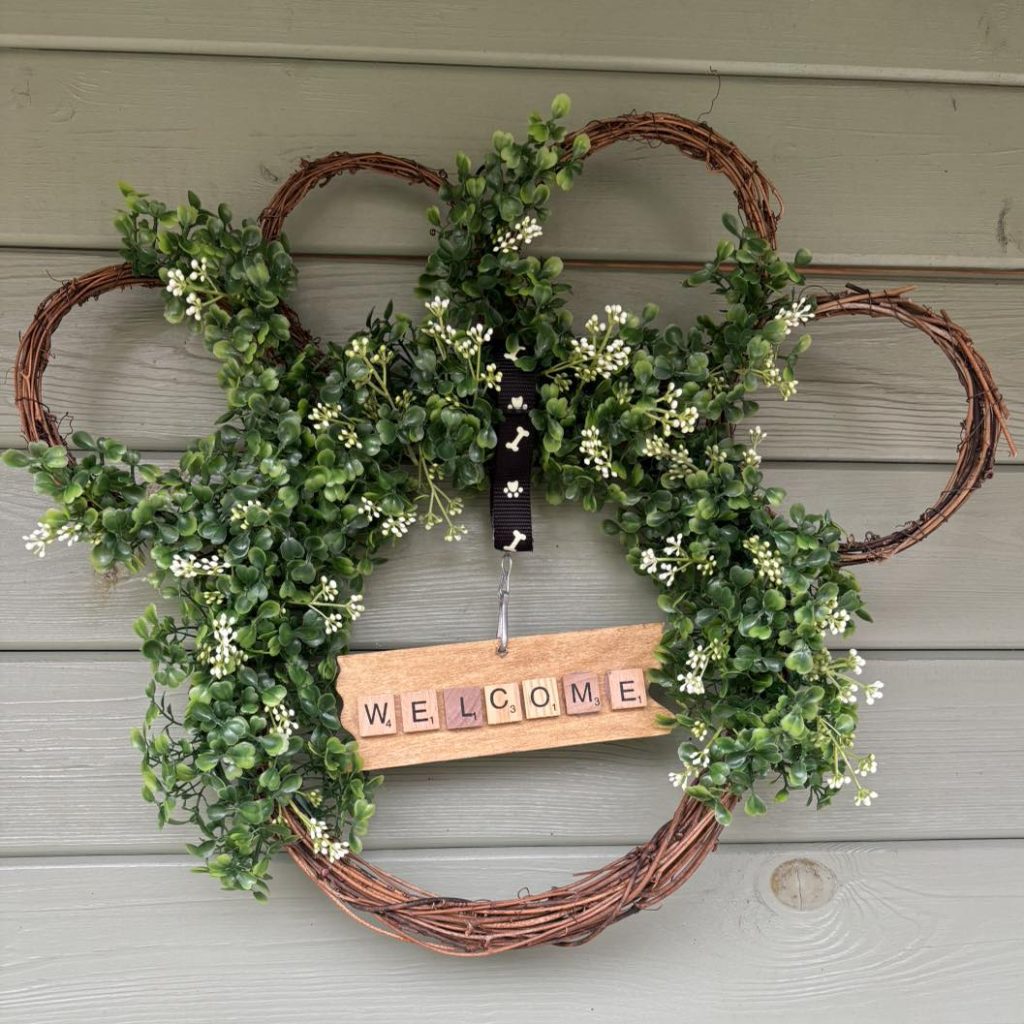
If you want something that looks fresh and natural year-round, this greenery-covered paw wreath is it. A grapevine paw base is fully wrapped in faux boxwood with tiny white blossoms, and a fun Scrabble-tile “Welcome” sign hangs from a paw-print ribbon in the center.
Greenery wreaths like this one tend to photograph really well because the deep green color contrasts nicely against almost any door color, whether it’s a bold navy, classic white, or natural wood. The Scrabble tile detail also adds a playful, handmade touch that’s easy to personalize with a pet’s name instead of “Welcome” if you’d prefer.
What you’ll need:
- Grapevine wreath form
- Faux boxwood garland or picks
- Small white faux blossom stems
- Scrabble tiles (or a wood letter sign)
- Paw-print grosgrain ribbon
How to make it: Cut boxwood picks into short sections and hot glue them around the entire wreath until the grapevine is fully hidden. Tuck in blossom stems randomly for texture. Glue your Scrabble letters onto a small wood plaque, then hang it from the center using a short length of paw-print ribbon. Working in small sections, rather than trying to glue the whole wreath at once, helps keep the coverage even and prevents any bald spots from showing.
For a bit more dimension, mix in a second greenery type, like eucalyptus or fern, so the wreath doesn’t look flat from a distance.
📸 Photo credit: Instagram @thelittlesecretgardenuk
6. Jute-Wrapped Hydrangea Paw Wreath
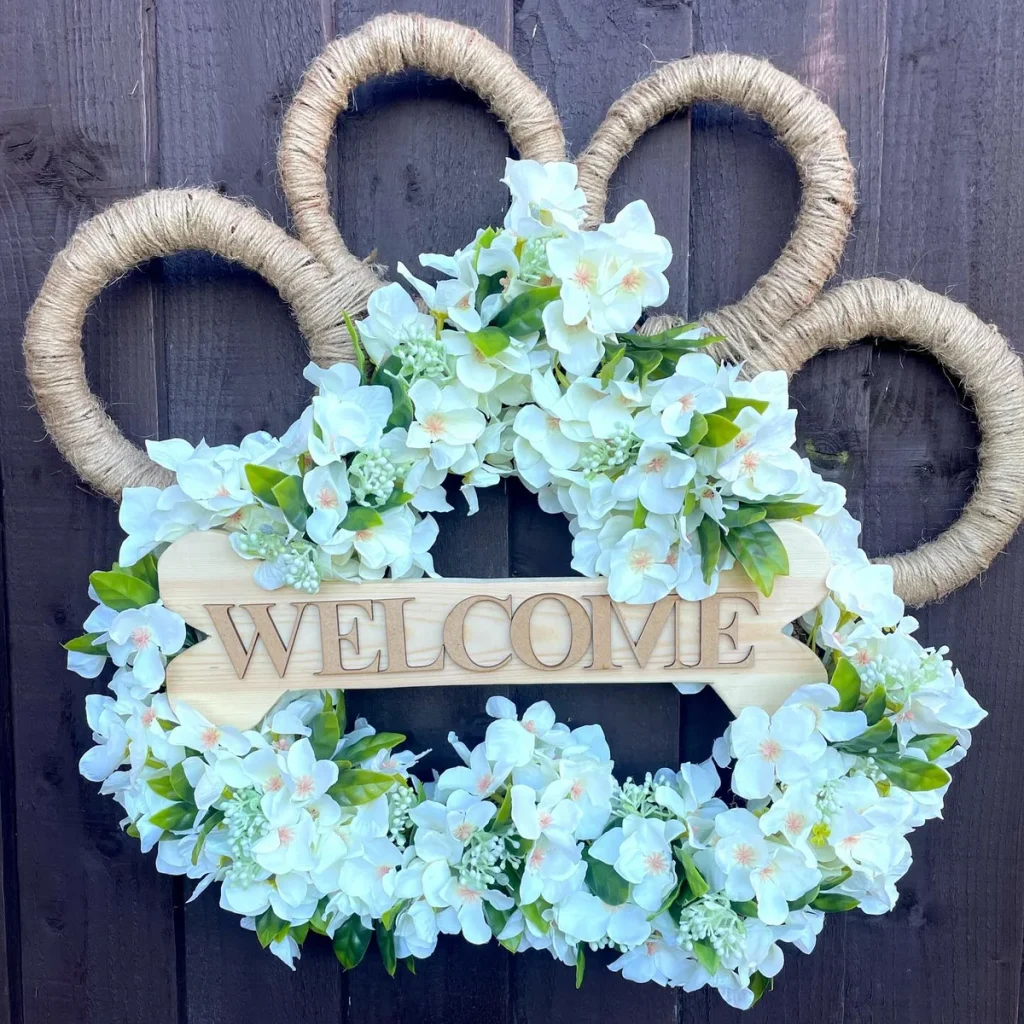
This idea swaps grapevine for a jute-wrapped base, giving the wreath a warmer, rope-like texture. It’s then piled generously with white hydrangea blooms and greenery, finished with an engraved wood bone sign that says “Welcome.”
The jute base is a nice alternative if you don’t love the look of exposed grapevine or if your local craft store is out of paw-shaped forms. Jute also tends to be more forgiving to shape by hand, which makes it a good option if you’re bending your own wire frame from scratch.
What you’ll need:
- Wire paw-shaped frame
- Natural jute twine
- Faux white hydrangea stems
- Greenery picks
- An engraved wood bone sign
How to make it: Wrap jute twine tightly and evenly around your entire wire frame, gluing the ends to secure. Cut hydrangea stems short and glue them densely around the top and bottom of the paw pad, leaving the toe loops mostly bare. Attach the bone sign across the center. Hydrangea heads are naturally large and full, so a little goes a long way — 3 to 4 stems is usually enough to fill the whole pad area.
This design also works nicely with pastel hydrangeas instead of white if you want a softer, spring-ready version.
📸 Photo credit: Instagram @creationsbykelseyx
7. Cozy Bouclé Yarn Paw Wreath
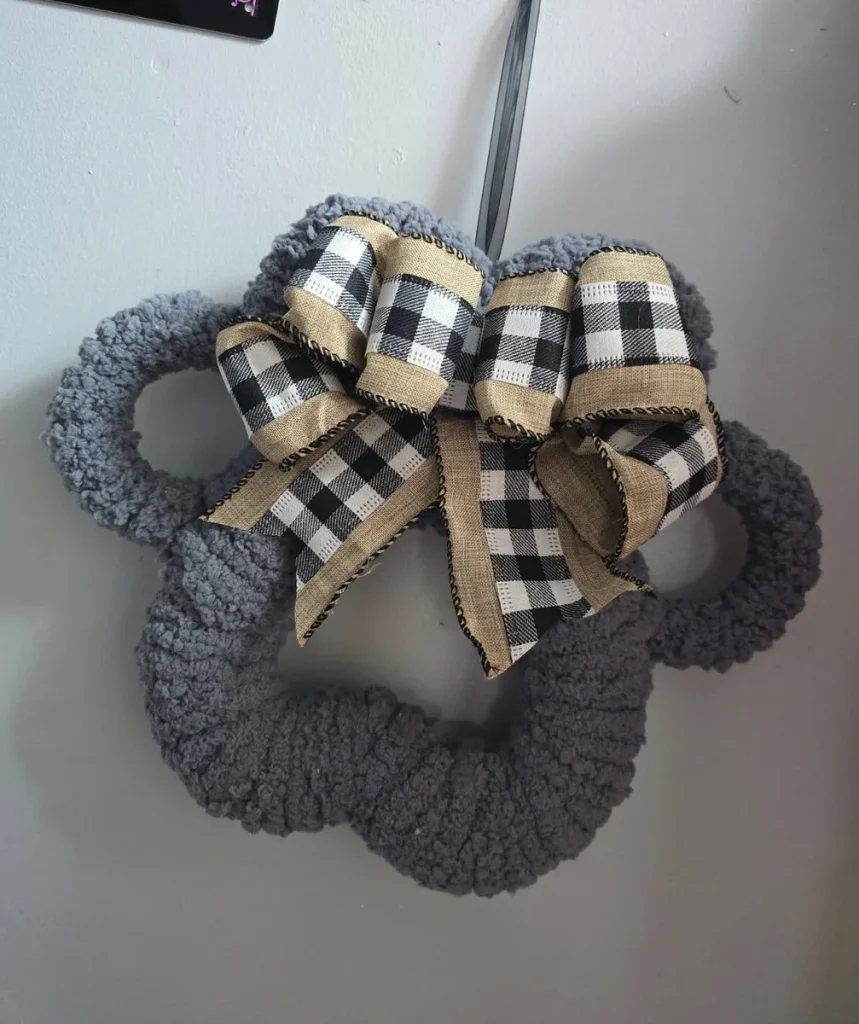
For a modern, minimalist take, this wreath skips florals and signs entirely. It’s made from chunky gray bouclé yarn wrapped around a paw-shaped frame, giving it a soft, crochet-like look. The only decoration is a black and white buffalo check bow with burlap accents.
This is easily one of the coziest ideas on the list, and it fits especially well with modern farmhouse or neutral home decor styles. Because it has no signage or florals, it also tends to last the longest without needing touch-ups, since there are fewer small pieces that can fall off or fade.
What you’ll need:
- Wire paw-shaped frame
- Chunky bouclé or “faux fur” yarn
- Buffalo check and burlap ribbon
How to make it: Wrap the bouclé yarn snugly around the entire frame, keeping tension even so the texture stays consistent. Make one full bow using both ribbon types, then attach it to the top of the paw pad. This one works well for readers who want a paw print dog wreath without any fuss.
If you want to switch up the color later, bouclé yarn comes in dozens of shades, so you can easily make a matching version in cream, blush, or sage to rotate by season.
📸 Photo credit: Instagram @poochparlour_dog_services
8. Dollar Tree Dog Paw Wreath
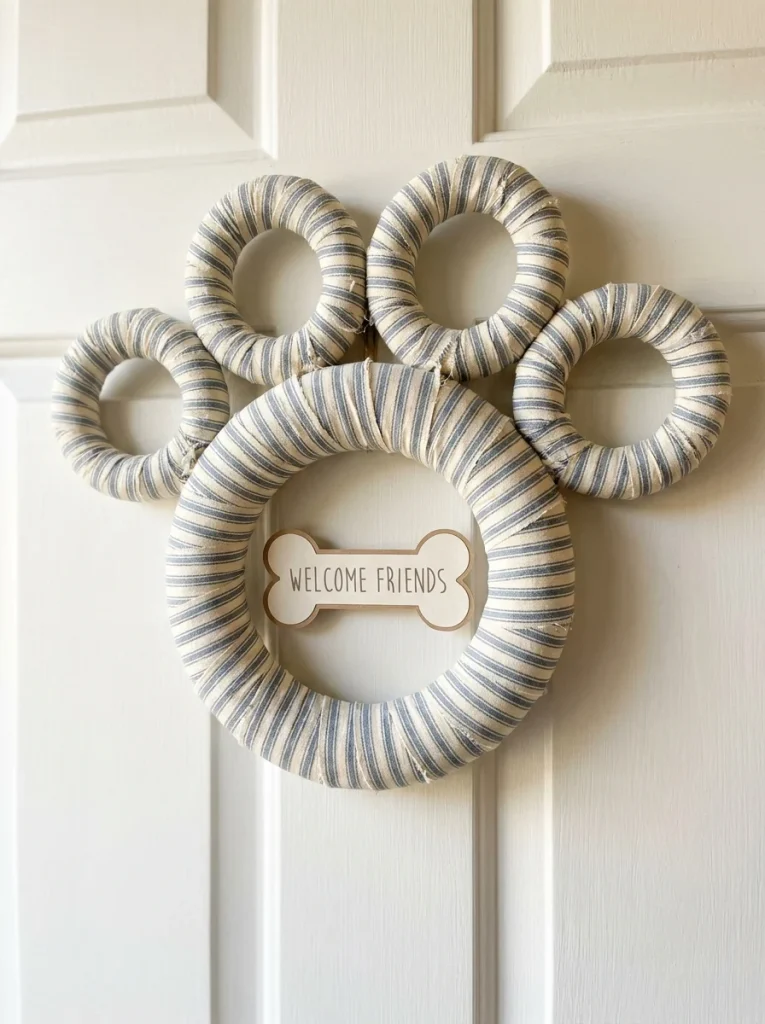
This is the go-to project if you’re on a tight budget. Nearly every supply for a dollar tree dog paw wreath can be found for a few dollars total — foam wreath rings, ribbon, and a printable paw sign.
What makes this version so appealing is how customizable it is without costing much more no matter which direction you take it. Add a bow, add a sign, add florals — each add-on is still just a dollar or two, so you can build up the design gradually instead of buying everything at once.
What you’ll need:
- 5 dollar store foam or straw rings (1 large, 4 small)
- Dollar store ribbon in your color of choice
- Printable or dollar store dog sign
- Hot glue
How to make it: Arrange your rings into a paw shape and hot glue them together where they overlap. Wrap each ring in ribbon, securing the ends with glue. Add a small dog-themed sign or tag in the center. Since dollar store ribbon tends to be thinner than craft store ribbon, wrapping in two layers gives a fuller, more finished look without much extra cost.
If you’re stocking up on other budget-friendly dog supplies while you’re at it, check out these dog accessories tips for more ideas that won’t break the bank.
9. Fall Pumpkin Paw Wreath
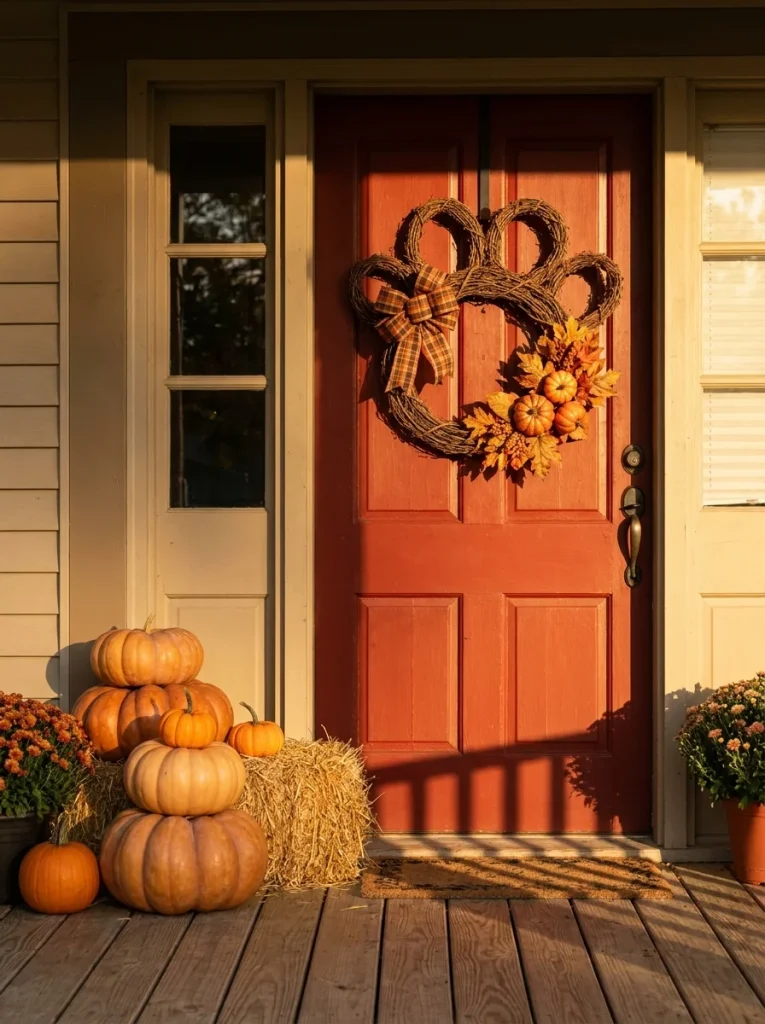
Give your paw wreath a seasonal update with mini pumpkins, dried leaves, and a plaid bow. This idea works well layered over any grapevine paw base you already have, which means it doubles as a great way to reuse a wreath you built earlier in the year.
What you’ll need:
- Grapevine paw wreath form
- Mini faux pumpkins
- Faux fall leaf picks
- Orange or plaid ribbon
How to make it: Cluster 2–3 mini pumpkins with wired stems onto one side of the paw pad. Fill in gaps with leaf picks, then tie a plaid bow near the pumpkins to pull the look together. Mixing pumpkin sizes, rather than using three identical ones, gives the cluster more visual depth and keeps it from looking too uniform.
For an extra cozy touch, tuck a few dried wheat stems or cinnamon sticks into the cluster for texture and a subtle seasonal scent.
10. Christmas Plaid Paw Wreath
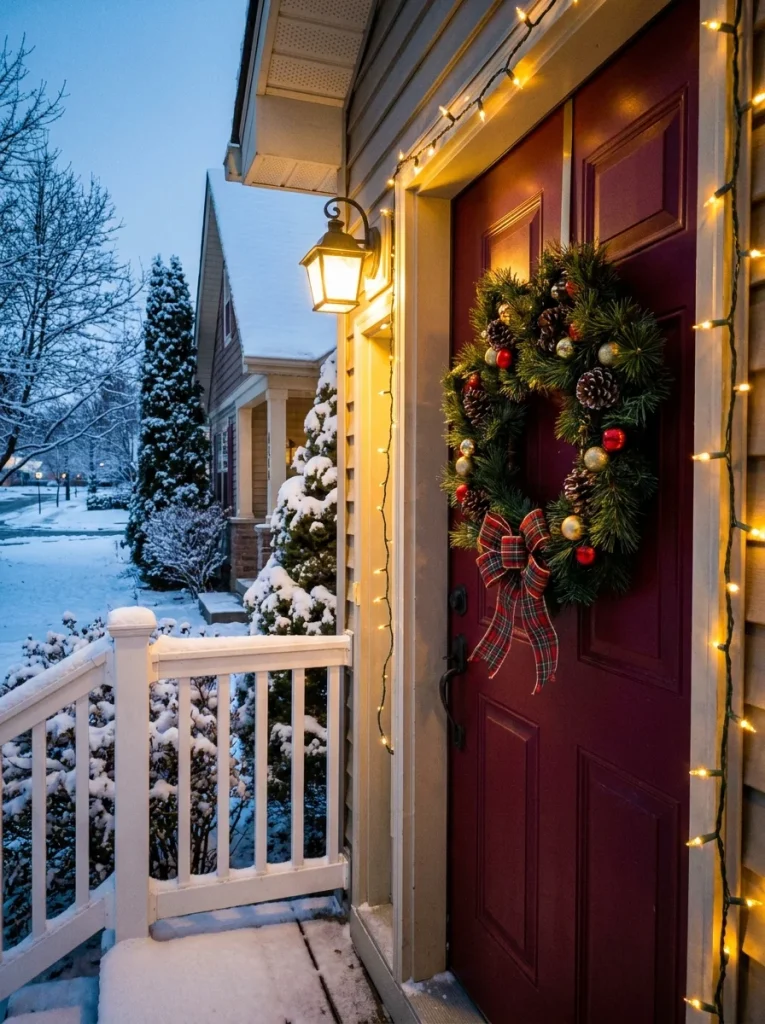
Turn your paw wreath into a holiday piece with pinecones, small ornaments, and a red or green plaid bow. This is a fun one to swap in seasonally without buying a whole new wreath form, since it can go right over the same base used for the fall pumpkin design.
What you’ll need:
- Grapevine or foam paw base
- Mini pinecones
- Small faux ornaments
- Plaid or velvet ribbon
How to make it: Hot glue pinecones and ornaments in a cluster across the paw pad, then add a plaid bow at the top. Choosing ornaments with a bit of shine or glitter helps the wreath catch the light nicely if it’s hanging near porch lights or string lights.
If you’re already planning your dog’s holiday shopping list, this pairs nicely with these trendy dog Christmas gifts for a fully decked-out season.
11. Denim & Bandana Paw Wreath
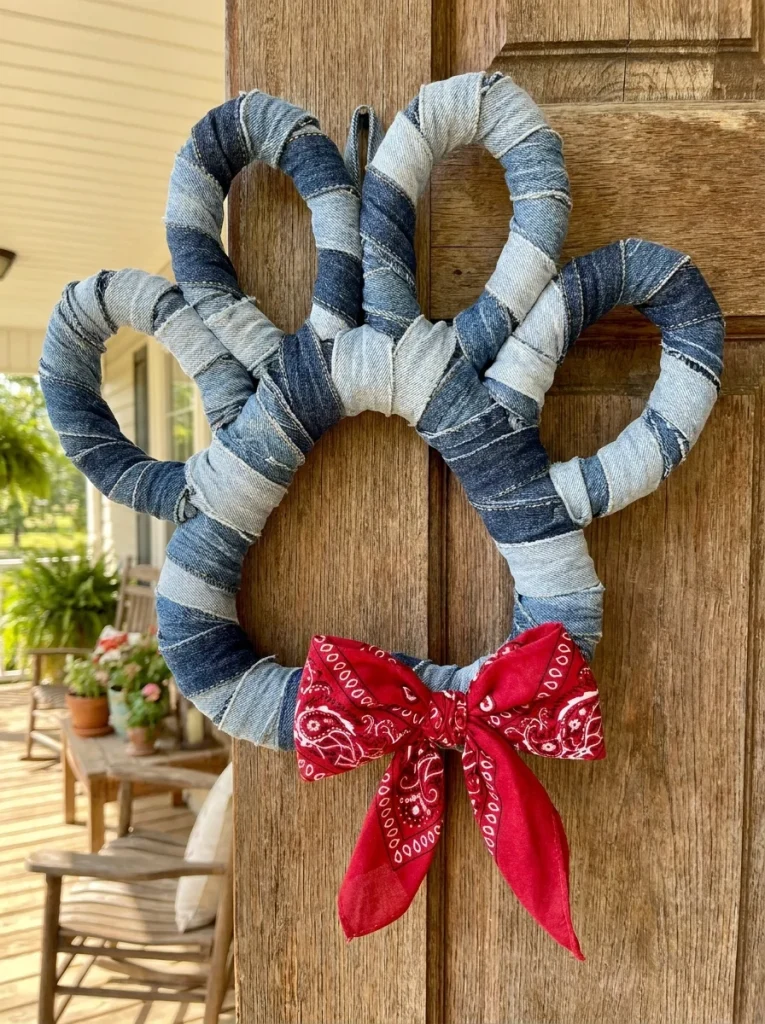
For a western or country-style front door, try building your paw wreath from strips of denim fabric instead of ribbon or yarn, finished with a classic red bandana bow.
This idea is a great way to repurpose old jeans instead of throwing them away, and the slightly frayed, textured look of denim strips gives the wreath a rugged, lived-in charm that ribbon or yarn just can’t match.
What you’ll need:
- Wire paw-shaped frame
- Old denim jeans or denim fabric strips
- A cotton bandana
- Hot glue
How to make it: Cut denim into 1-inch strips and wrap them tightly around the frame, gluing the ends as you go. Fold your bandana into a bow shape and secure it at the base of the paw pad with wire. For an even more rustic look, leave the raw edges of the denim strips unfinished so they fray slightly over time.
Mixing light and dark denim washes as you wrap also adds subtle variation instead of one flat color across the whole wreath.
12. Personalized Dog-Name Paw Wreath
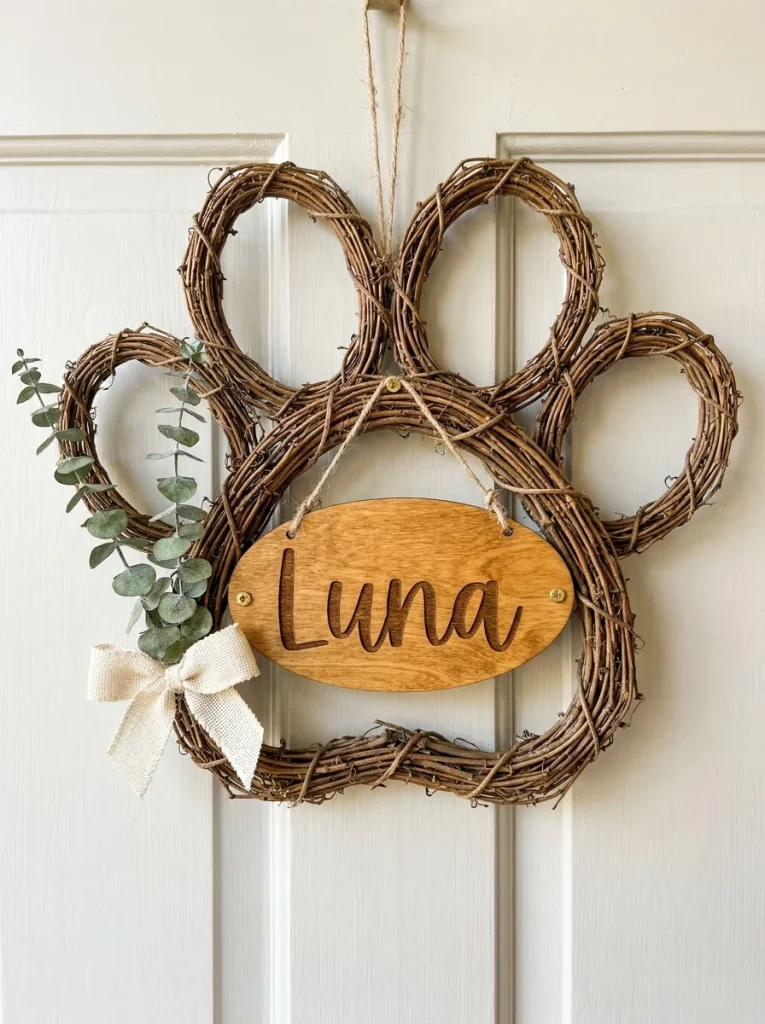
Nothing says “this is our dog’s house too” like a wreath with your pup’s actual name on it. This idea uses wood letters or a custom-cut sign to make it personal, and it tends to make a great gift for other dog owners too.
What you’ll need:
- Grapevine or yarn-wrapped paw base
- Wood letters or a custom laser-cut name sign
- Ribbon or florals of your choice
How to make it: Build your base using any technique above, then center your dog’s name sign across the paw pad. Keep the surrounding decoration simple so the name stays the focal point. A single small bow or a light dusting of greenery is usually enough — too many extra elements can compete with the lettering and make it harder to read from the street.
Need name inspiration first? Browse these dog name ideas before you order your sign.
13. Ribbon-Wrapped Foam Paw Wreath
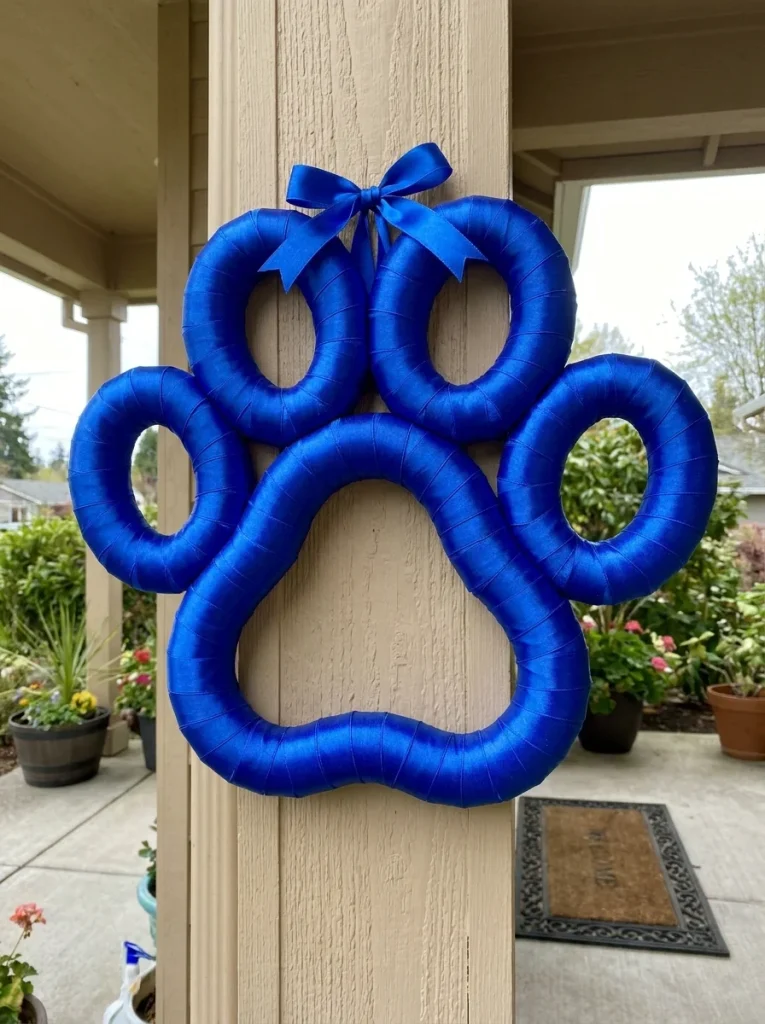
This technique skips grapevine entirely and uses foam rings wrapped edge-to-edge in ribbon, giving a clean, colorful, fully finished look with no visible base material.
Because the whole surface is covered in ribbon rather than left natural, this style is easy to color-match to your front door, porch furniture, or seasonal decor, making it one of the more flexible options if you like to redecorate often.
What you’ll need:
- Foam wreath rings (1 large, 4 small)
- Wired ribbon in 1–2 colors
- Floral pins or hot glue
How to make it: Starting at one point, wrap ribbon around the foam ring at a slight angle, overlapping slightly each time so no foam shows. Pin or glue the ends, then wire all five rings together into the paw shape. Wired ribbon holds its shape better than unwired ribbon during this step, which makes the wrapping process noticeably easier for beginners.
Once wrapped, you can still layer on a small bow, sign, or floral pick if you want to dress it up further.
14. Pool Noodle Dog Paw Wreath
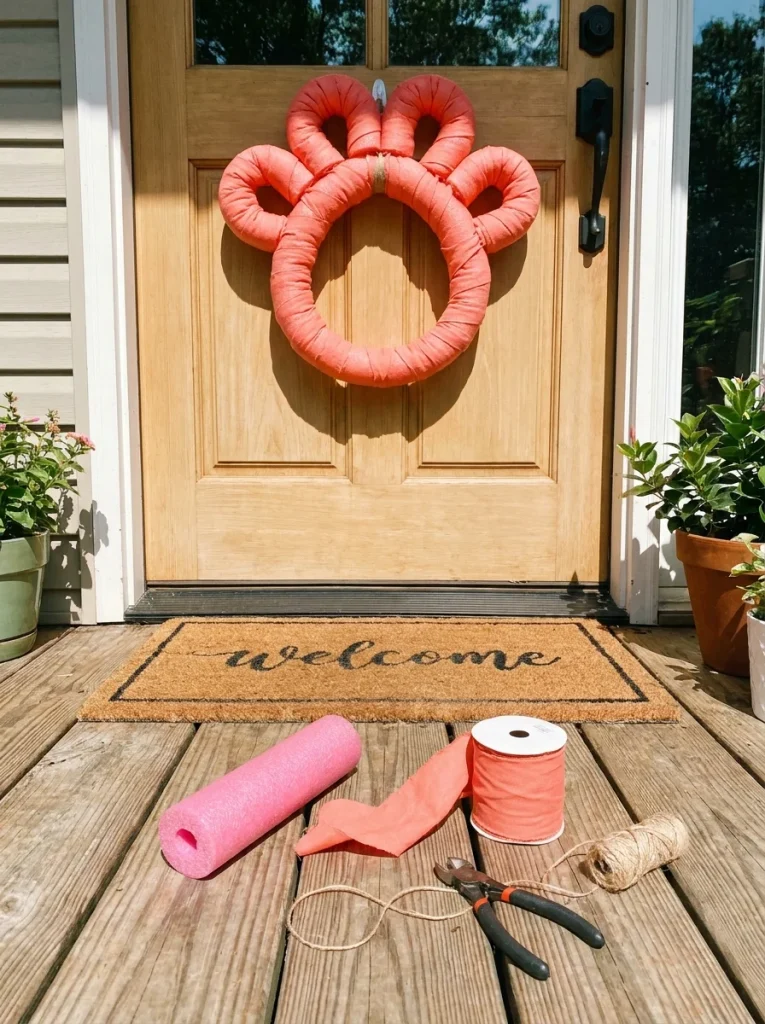
A clever dollar-store hack: pool noodles make surprisingly good wreath bases because they’re lightweight, cheap, and easy to bend into circles.
This is one of the most underrated tricks in the wreath-making world. Pool noodles are inexpensive, widely available even outside of summer at most dollar and discount stores, and their foam core holds a bent shape well once secured, which makes assembling a paw shape faster than working with wire.
What you’ll need:
- 1–2 dollar store pool noodles
- Ribbon or fabric to wrap
- Zip ties or wire
- Hot glue
How to make it: Cut the pool noodle into 5 sections and bend each into a circle, securing with zip ties. Wrap each circle in ribbon or fabric, then wire all five pieces together into a paw shape. This is one of the most affordable dog paw wreath diy methods out there, and it holds up surprisingly well both indoors and outdoors.
Since pool noodles are hollow, they’re also noticeably lighter than grapevine or foam, which makes them a smart choice if you’re hanging the wreath on a lightweight door or with a delicate hook.
Tips for Making Your Paw Wreath Last
A few small choices make a big difference in how long your wreath stays looking fresh.
Choose weatherproof materials for outdoor doors. If your wreath will hang outside, stick to faux (not dried) florals, outdoor-rated ribbon, and a UV-resistant sealant spray. Grapevine and jute hold up well in most climates, but yarn wreaths do best indoors or on covered porches. Direct afternoon sun is usually the biggest culprit behind faded ribbon and cracked foam, so a north- or east-facing door will keep colors looking newer for longer.
Use hot glue generously, but let it cool fully. Rushing this step is the most common reason pieces fall off. Hold each element in place for a few extra seconds before letting go, and for heavier items like wood signs or thick bows, add a small dab of glue at two or three points instead of just one for extra hold.
Store it properly in the off-season. Keep seasonal add-ons (like the fall pumpkin or Christmas versions) in a labeled box so you can swap decorations onto the same base year after year instead of rebuilding from scratch. A large zip-top bag or clear storage bin works well to keep dust and pests away between seasons.
Check for loose pieces every few weeks. Wind and daily door slamming can loosen even well-glued elements over time. A quick monthly check means you can re-glue anything before it falls off and gets lost.
Where to Hang Your Dog Paw Wreath
The front door is the obvious choice, but it’s far from the only option. A paw wreath also looks great on the wall above a dog bed, inside a mudroom, or near a leash and treat station. If you’re setting up a whole space for your pup, these dog grooming salon ideas can help you plan a spot where a wreath like this really ties the room together.
For something more functional, hang a smaller paw wreath near a treat jar or feeding station — it doubles as decor and a visual cue for guests that treats (or dog bones) live nearby. A paw wreath also makes a thoughtful addition to a garage or laundry room dog nook, tying the whole space together without needing extra wall art.
FAQs
Final Thoughts
Whichever style you pick, a dog paw wreath diy project is a simple, affordable way to add some personality to your front door. From romantic floral designs to a budget-friendly dollar tree dog paw wreath, there’s a version here for every skill level and every season. Pick your favorite base, gather your supplies, and let your dog’s personality lead the way to your next porch upgrade.

Izzy is an experienced ranch worker who has a passion for exploring nature and getting up close to wildlife. With her connections to various animal organizations, Izzy is well-versed in animal care and rehabilitation.