
14 DIY Dog Gates Indoor Ideas (With Real Photos & Materials Lists)
If you have a dog at home, you already know the struggle. You want to keep your pup safe, stop them from running upstairs, or keep them out of the kitchen — but most store-bought dog gates look like plastic eyesores that ruin your home’s style. The good news? Building your own diy dog gates indoor is easier than you think, costs less than premium store options, and — most importantly — can actually look beautiful in your home.
Whether you have a tiny Maltese or a large Golden Retriever, whether your home is modern Scandinavian or rustic farmhouse, there is a DIY gate idea on this list that fits your space perfectly. From beginner-friendly pine builds you can finish in an afternoon to advanced designer gates that look like they belong in an interior design magazine, we have covered every skill level and every budget.
In this article, you will find 14 unique easy DIY dog gate ideas, each inspired by real homes and real builds. We have broken down what each one looks like, what materials you need, how hard it is to build, and the key tips that make each one work. By the end, you will know exactly which gate is right for your home and your dog.
Let’s get into it.
Why Build Your Own DIY Dog Gate?
Before we jump into the ideas, let’s talk about why DIY is worth it in the first place.
Store-bought gates have real problems. Most are made from cheap plastic or thin metal. They come in fixed sizes that rarely fit your doorway perfectly. They look industrial and out of place in a stylish home. And the good-looking ones? They are surprisingly expensive.
When you build your own gate, you get to choose the exact size, the material, the color, and the finish. You can match your gate to your existing staircase, your kitchen cabinets, or your living room furniture. A DIY gate becomes a design feature — not an eyesore.
And it doesn’t have to be hard. Many of the ideas below require nothing more than basic woodworking skills, a few pieces of lumber, and a weekend afternoon.
If you are also thinking about creating a dedicated space for your dog at home, check out these smart dog room ideas — a great companion to building your own gate.
1. Chevron Pattern DIY Dog Gate Indoor
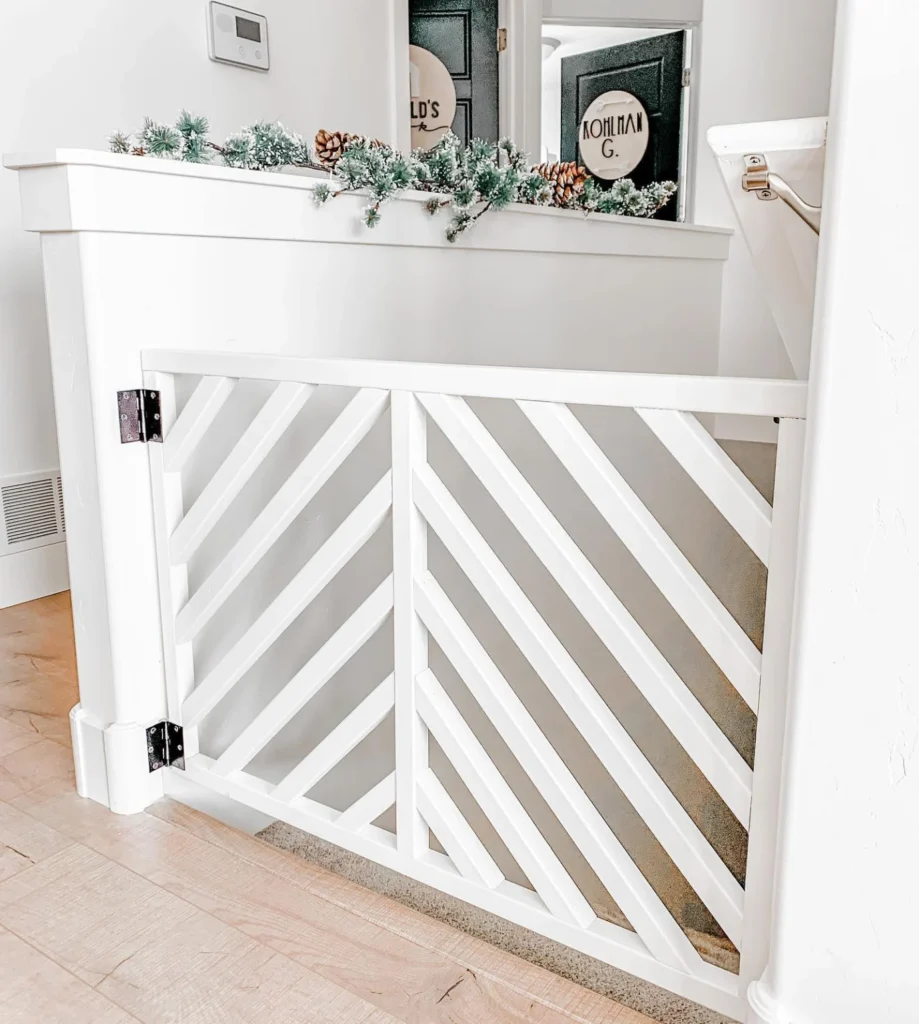
Best For: Decorative staircase openings, homeowners who want a statement piece Difficulty Level: ⭐⭐⭐ Intermediate to Advanced Estimated Cost: $60–$120
This is hands down the most visually striking idea on this entire list. Instead of boring straight vertical slats, this gate features diagonal slats arranged in a V-shaped chevron or herringbone pattern. The result looks less like a dog gate and more like a piece of architectural art installed in your home.
The build starts with a sturdy rectangular wood frame. Inside that frame, you cut and arrange individual wooden slats at 45-degree angles, meeting in the center to form the chevron shape. The whole thing gets painted bright white, which makes the diagonal pattern really pop against the wall.
What makes this design extra clever is the thick top rail. It is wide and flat enough to double as a small display shelf. In the inspiration photo, you can see seasonal greenery and pine cones sitting on top — but you could just as easily place a small plant, a candle, or a framed photo there. Your gate becomes decor.
This gate is mounted with hinges directly into a stair newel post and wall. The hardware is simple black metal, which creates a clean contrast against the white paint.
What You Need:
- 2×4 lumber for the outer frame
- 1×2 or 1×3 strips for the diagonal slats
- White paint or primer + paint
- Heavy-duty hinges (2–3)
- Bolt latch or barrel bolt
- Miter saw (for cutting 45-degree angles)
- Wood glue + screws
Pro Tip: Cut a cardboard template of the diagonal pattern before cutting your actual wood. This saves a lot of expensive mistakes. Also, use a brad nailer to hold slats in place while the glue dries before adding screws.
📸 Photo credit: Instagram @just_courtney_slight
2. Craftsman Mission-Style DIY Dog Gate
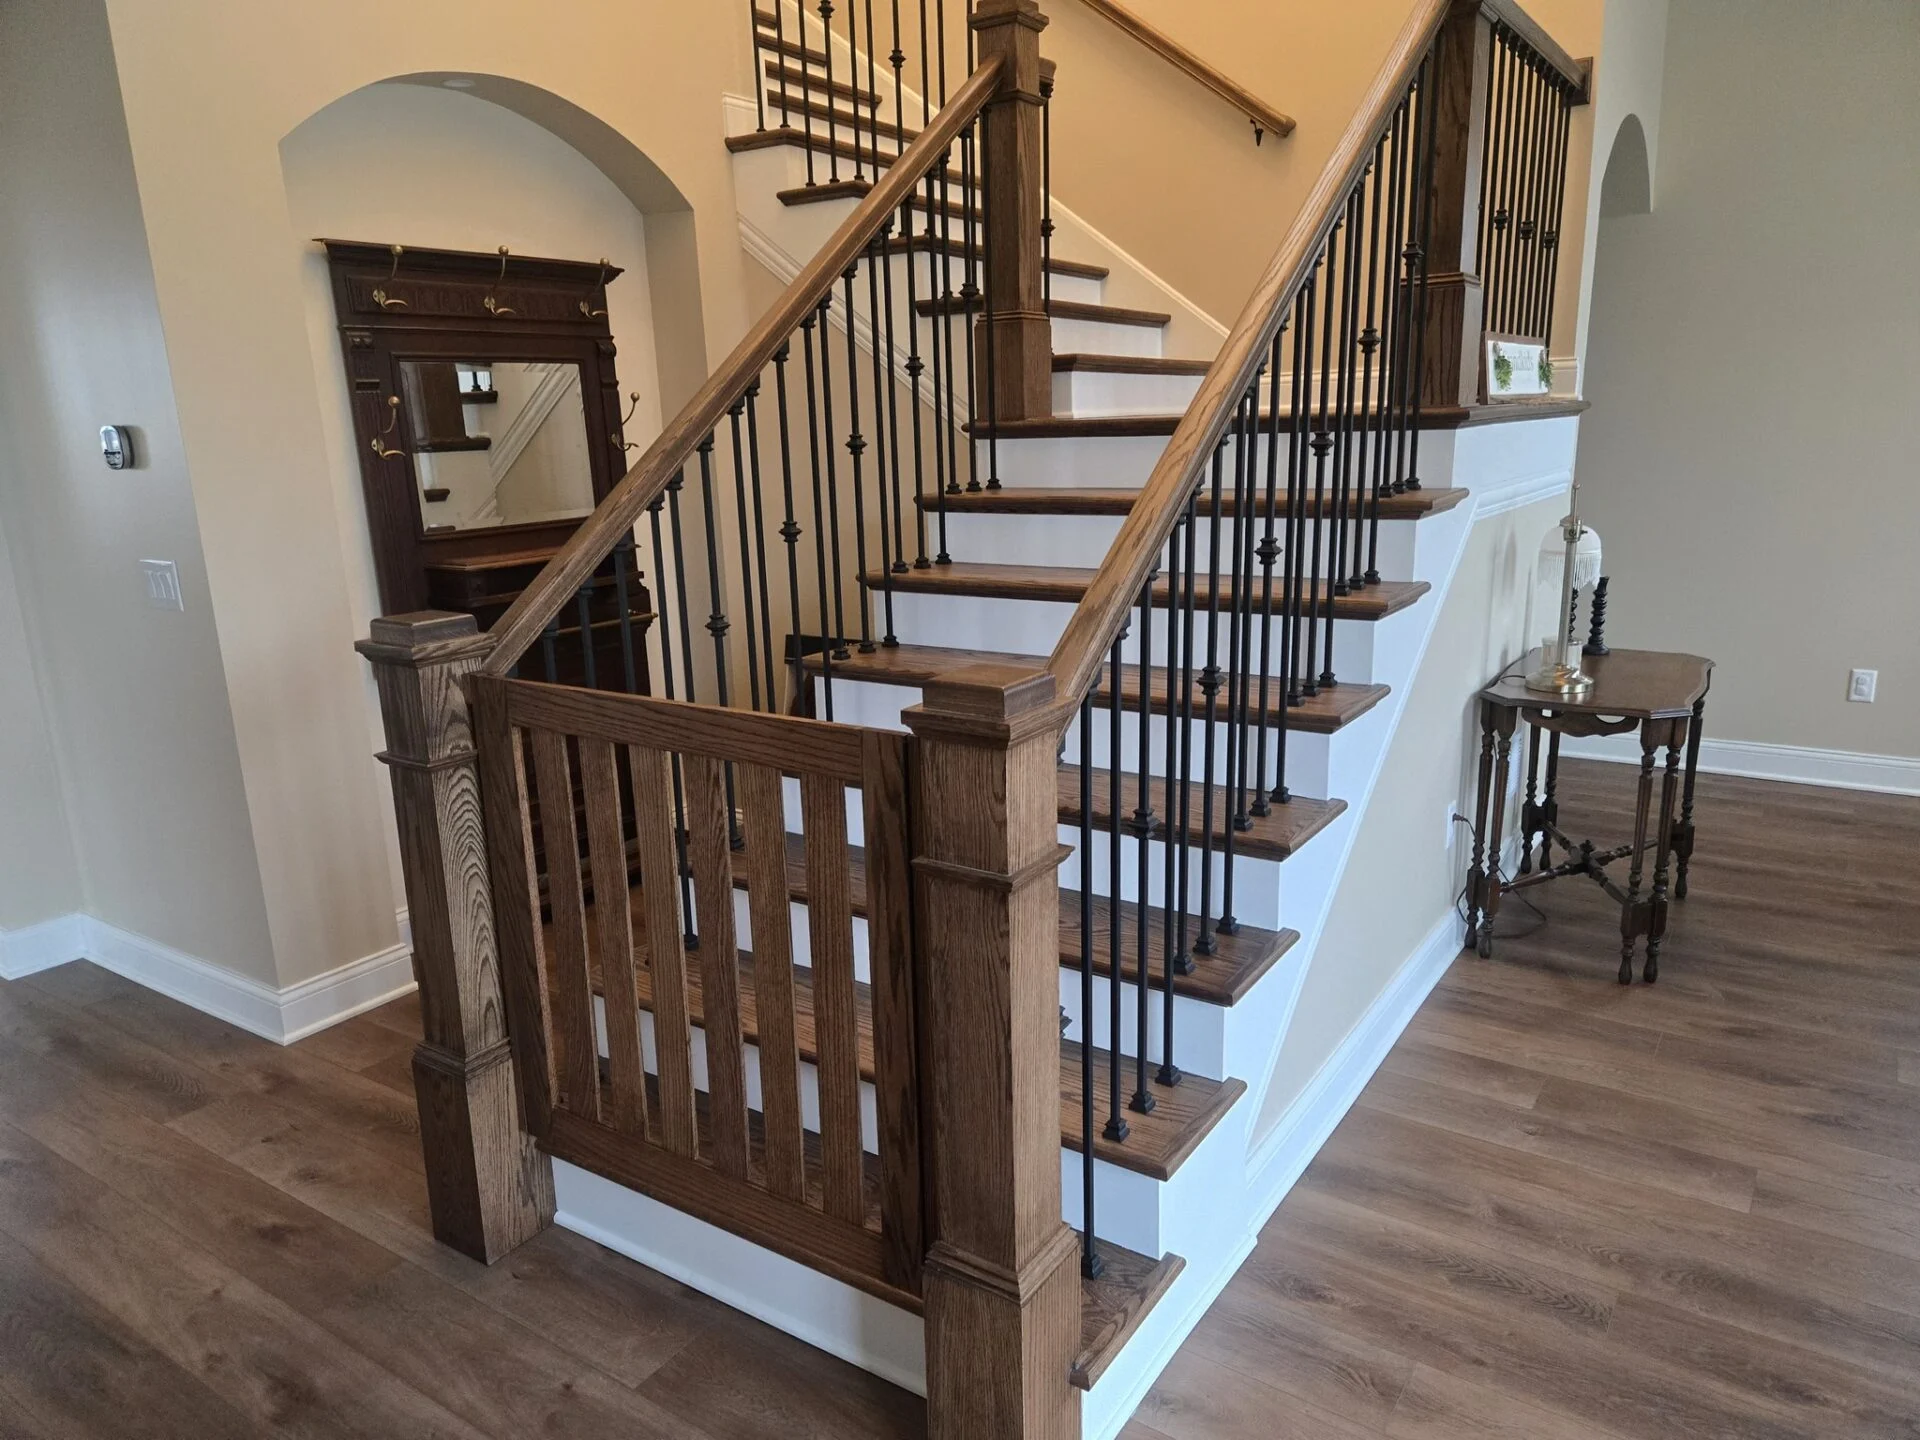
Best For: Traditional homes, dark wood staircases, colonial or craftsman-style interiors Difficulty Level: ⭐⭐⭐⭐ Advanced Estimated Cost: $100–$200
This gate looks like it was always part of the house. That is the highest compliment any DIY project can receive. The craftsman mission-style gate is built from solid oak or ash lumber, stained in a rich dark walnut or espresso tone that matches existing wood in the home.
What sets this design apart is the thick square newel posts on either side of the gate. These posts are not just decorative — they anchor the gate securely and integrate it visually with the stair banister. The gate panel itself features wide vertical slats with generous spacing, giving it that classic mission-style look.
In the inspiration photo, this gate is installed at the base of a grand staircase where it genuinely looks like an original architectural feature. The stair treads are the same dark wood tone. The banister balusters are black metal. And this oak gate ties all of it together perfectly.
The key to pulling this off is matching your wood species and stain to what already exists in the space. Spend time at the hardware store comparing stain samples against your actual stair tread before you commit.
What You Need:
- Solid oak or poplar lumber (for frame and posts)
- 1×3 or 1×4 vertical slats
- Dark walnut wood stain
- Polyurethane top coat (satin or semi-gloss)
- Heavy-duty pivot hinges
- Brass or black bolt latch
- Pocket hole jig for strong joints
- Sandpaper (80, 120, 220 grit)
Pro Tip: Use a pocket hole jig (like a Kreg Jig) for all frame joints. This gives you strong, hidden connections that make the finished gate look professionally made rather than homemade.
📸 Photo credit: Instagram @gatekeepersllc
3. Natural Oak Floating Gate
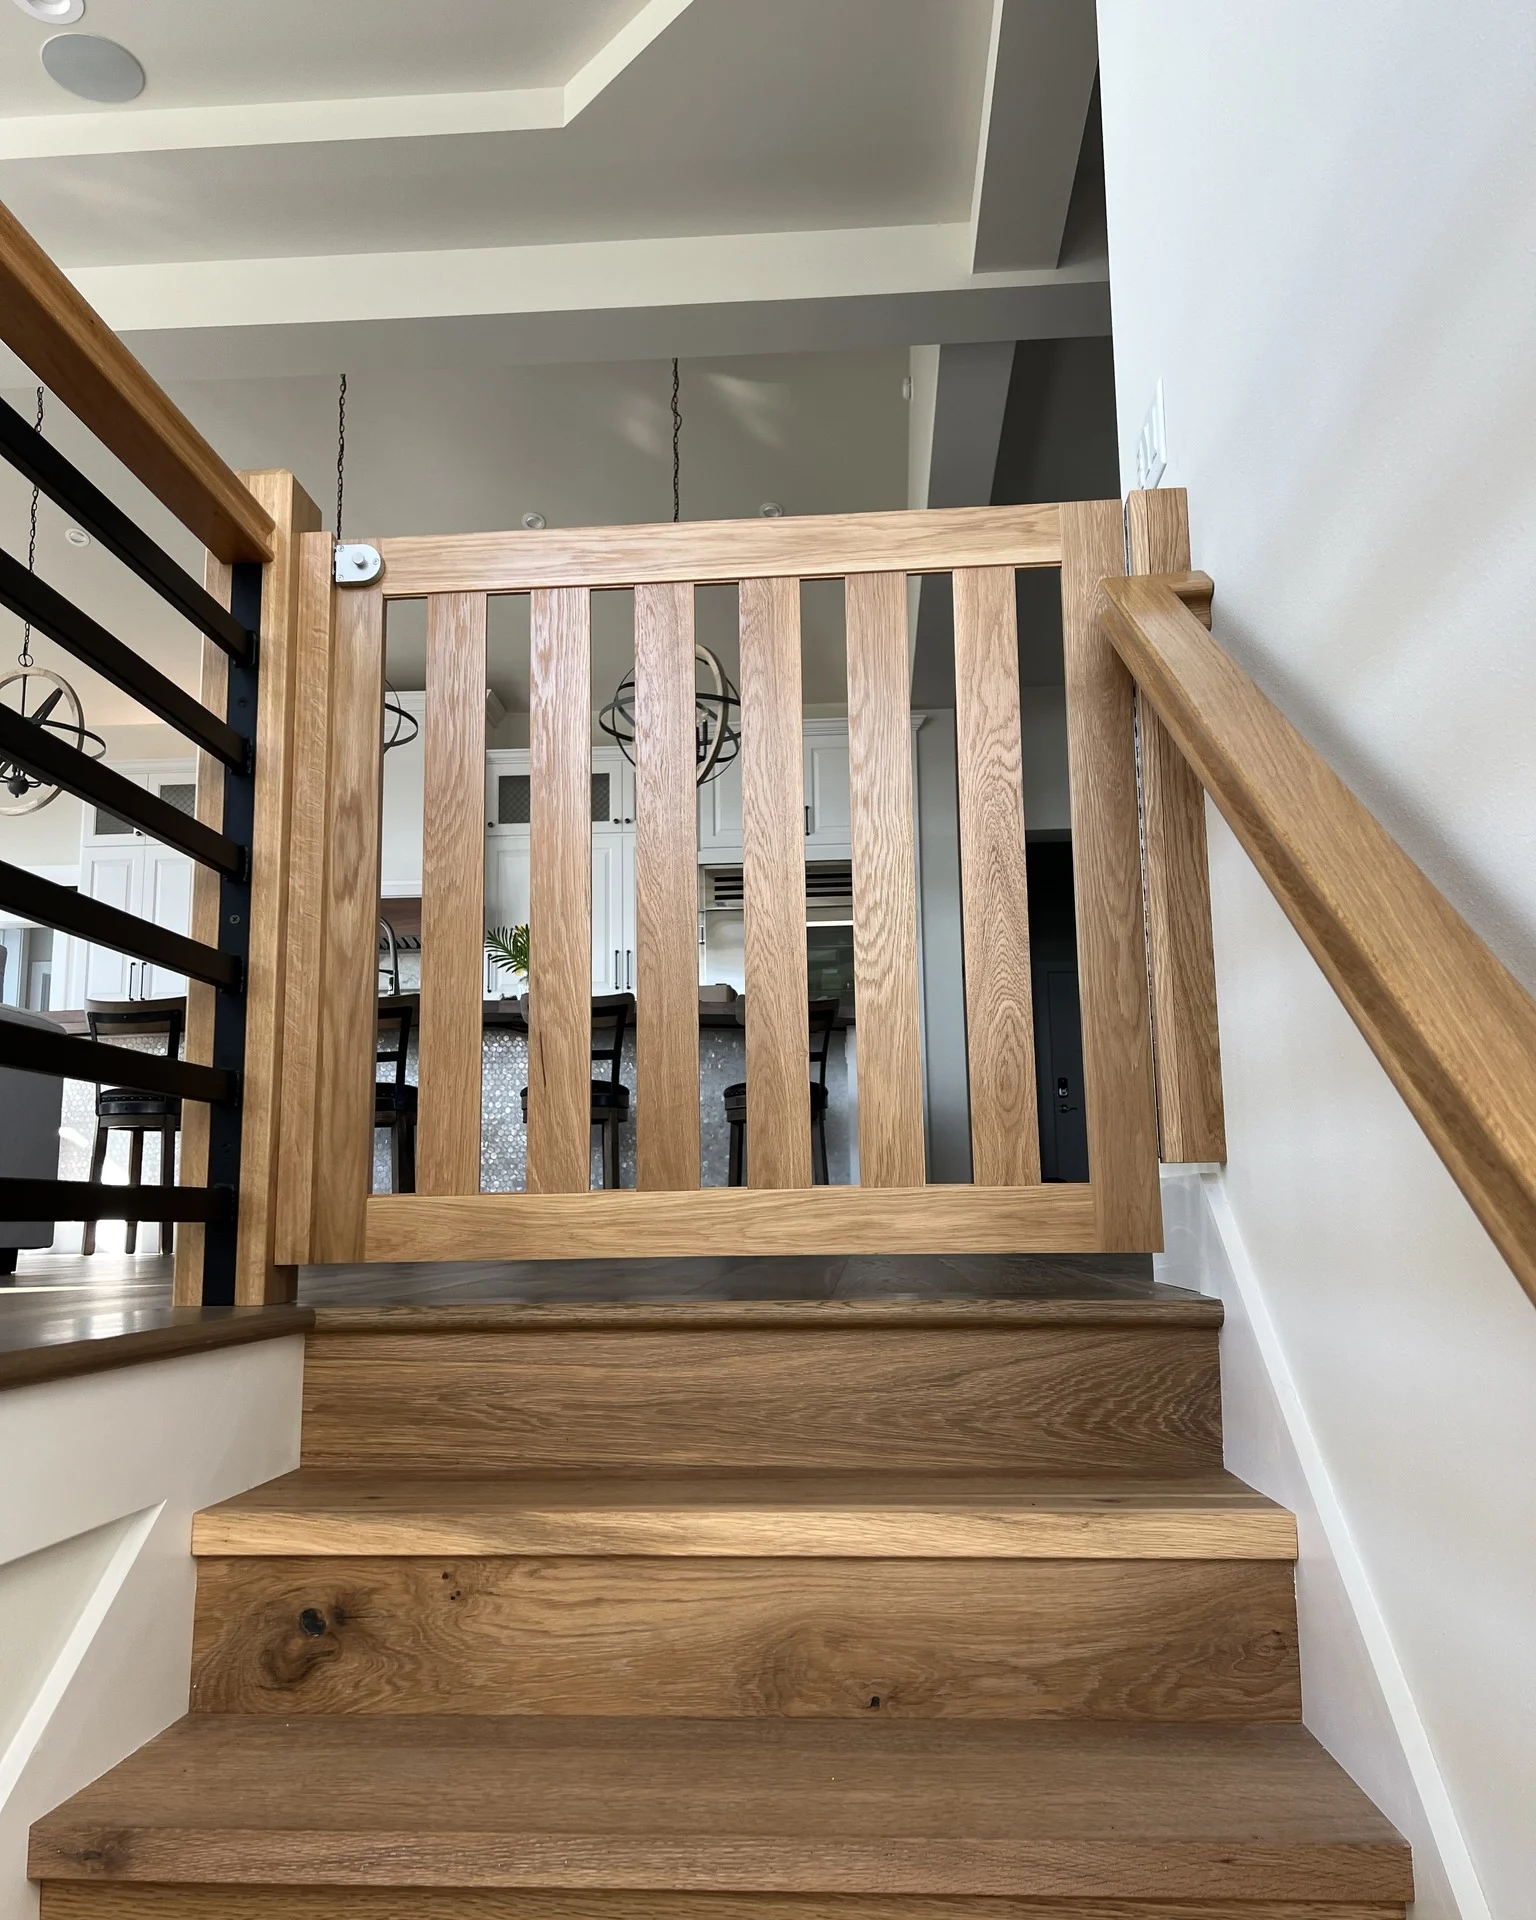
Best For: Modern, Scandinavian, or Japandi interiors with light wood tones Difficulty Level: ⭐⭐⭐ Intermediate Estimated Cost: $80–$160
This gate has a feature that none of the others on this list have: it appears to float. There is no contact with the floor. Instead, the gate is suspended between the wall and the stair banister using wall-mounted hinge hardware, with the bottom of the gate clearing the floor by several inches.
The material is natural white oak — the same pale, warm-toned wood you see in modern Scandinavian furniture. The slats are vertical, clean, and evenly spaced. No paint, no stain — just a clear matte finish that lets the natural wood grain show through beautifully.
The floating mount is achieved through a combination of a wall-mounted hinge bracket and a banister clamp on the opposite side. This means no drilling into your floor and no visible base hardware when the gate is closed.
This style works best in homes with light-colored wood floors, white or cream walls, and a minimalist aesthetic. It pairs beautifully with open-plan living spaces where visual lightness matters.
What You Need:
- White oak or birch lumber (1×3 or 1×4 slats)
- Clear matte polyurethane
- Wall-mounted hinge bracket (heavy-duty)
- Banister mounting clamp
- Magnetic catch or gate latch
- Level and measuring tape
- Wood screws and wall anchors
Pro Tip: The floating gap at the bottom is a design feature, but make sure it is no more than 2–3 inches if you have a small dog or puppy. Otherwise add a small threshold board painted to blend with the floor.
📸 Photo credit: Instagram @gatekeepersllc
4. Barn Door X-Brace DIY Dog Gate
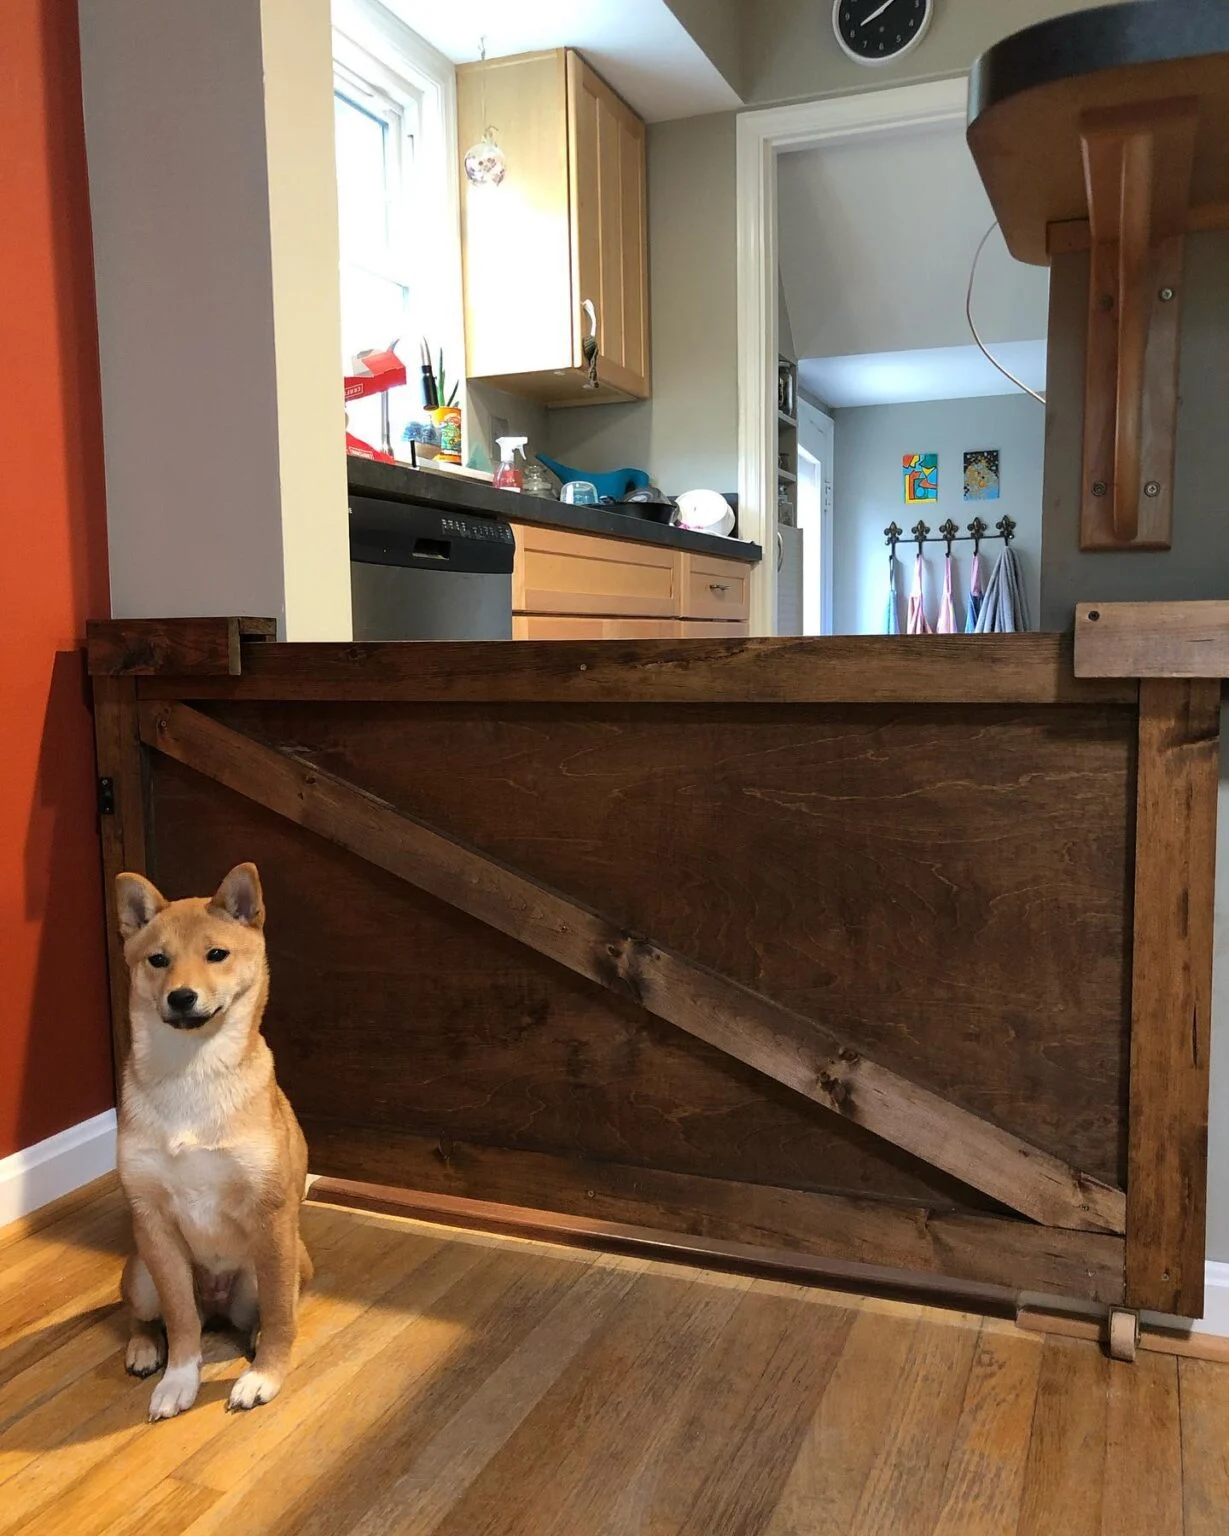
Best For: Farmhouse, rustic, or industrial-style homes Difficulty Level: ⭐⭐⭐ Intermediate Estimated Cost: $50–$100
If your home has a farmhouse or rustic feel, this is the gate for you. The barn door X-brace gate is inspired by classic barn door construction — solid plywood or MDF panel for the base, with diagonal wooden braces forming an X-shape on the face. The whole thing is stained in a deep dark walnut or ebony tone.
Unlike most gates on this list, this one is fully solid. There are no gaps, no slats, no open spaces. That makes it the best option for larger dogs who might be able to squeeze through or push through slatted designs. It is also great for containing multiple dogs, as shown in the inspiration photo which features a Shiba Inu puppy next to a very solid-looking gate.
The gate is mounted with heavy black iron hinges that match the industrial farmhouse aesthetic. A simple bolt latch keeps it closed. The whole build is forgiving for beginner woodworkers because working with flat plywood panels is much easier than cutting individual slats.
What You Need:
- 3/4-inch plywood or MDF sheet
- 1×3 lumber for the X-brace overlay
- Dark walnut stain or ebony paint
- Black iron or cast iron hinges (3)
- Black bolt latch
- Circular saw or jigsaw
- Sandpaper and wood conditioner
Pro Tip: Apply a wood conditioner before staining plywood. Plywood absorbs stain unevenly without it, and you will end up with blotchy dark patches. The conditioner ensures a smooth, even finish.
If you are building out a full dog zone in your home, these DIY dog kennel ideas pair perfectly with a barn-style gate like this one.
📸 Photo credit: Instagram @bethany_rescues
5. Black Painted Gate with Brass Hardware
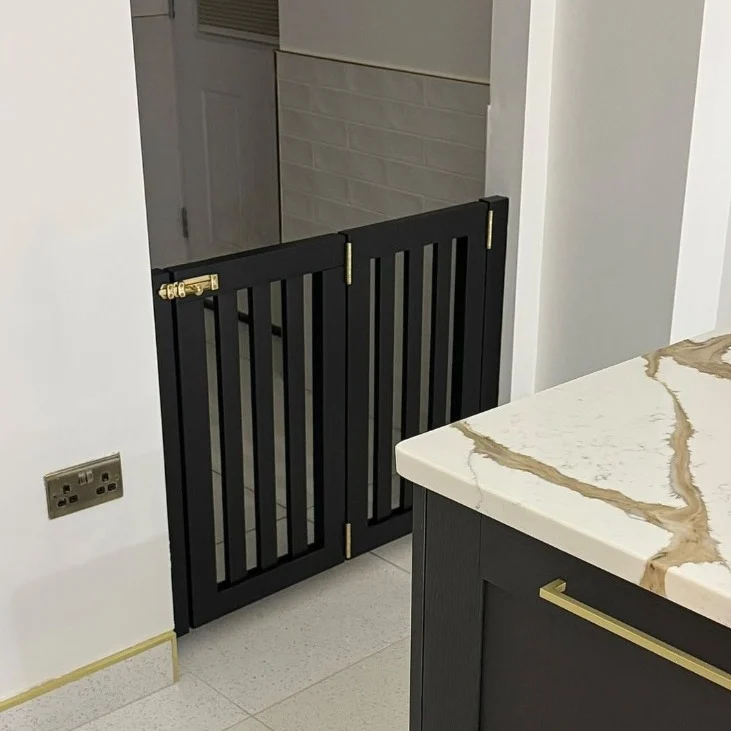
Best For: Contemporary, luxury, or kitchen-adjacent spaces Difficulty Level: ⭐⭐ Beginner to Intermediate Estimated Cost: $40–$90
Here is a secret that interior designers know: the hardware makes the piece. This gate proves that point perfectly. The gate itself is a simple rectangular wood frame with wide-spaced vertical slats — a design any beginner can build in a day. But painted matte black and fitted with antique brass or gold hardware, it looks like a thousand-dollar custom installation.
In the inspiration photo, this gate is installed in a kitchen doorway right next to a white marble island with brass drawer pulls. The black gate with gold hinges and a gold bolt latch ties directly into the kitchen’s existing hardware finishes. It looks completely intentional and completely designed.
This teaches a key lesson for DIY dog gates indoor projects: match your gate hardware to your room’s existing hardware. If your door handles are brushed nickel, use brushed nickel hinges. If your cabinet pulls are matte black, go matte black. If they are antique brass — as in this case — go brass. This one decision transforms a basic build into a designer piece.
What You Need:
- 2×2 lumber for frame
- 1×2 slats for vertical infill
- Matte black chalk paint or spray paint
- Antique brass hinges (2–3)
- Brass bolt latch or barrel bolt
- Brass corner brackets (optional, for decoration)
- Sandpaper and primer
Pro Tip: Use chalk paint for a matte black finish — it adheres to wood without primer in most cases and gives a beautiful, non-glossy result. Follow with a clear wax or matte sealer to protect the finish from dog scratches.
📸 Photo credit: Instagram @rusticriley
6. Bi-Fold Two-Panel DIY Dog Gate
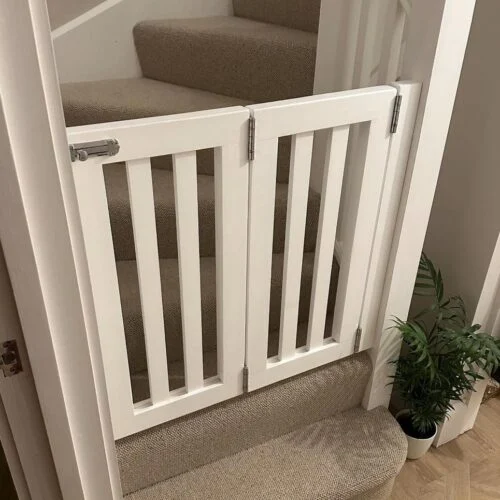
Best For: Narrow doorways, staircases with limited swing space Difficulty Level: ⭐⭐⭐ Intermediate Estimated Cost: $50–$110
Most gates swing open in one direction — which works fine until your doorway is narrow and a full-swing gate blocks the hallway every time you open it. The bi-fold two-panel gate solves this problem elegantly.
This design uses two equal panels connected by a center hinge. When you open the gate, both panels fold together toward one side like a butterfly’s wings, taking up half the wall space of a single-panel swing. It is the same principle as bi-fold closet doors, applied to a dog gate.
The inspiration photo shows this gate in crisp white with vertical slats and polished silver hinges — clean, minimal, and installed perfectly into a carpeted staircase doorway. The design is subtle enough that guests might not even realize it is a dog gate at first glance.
This design does require a bit more precise measuring and planning than a single-panel gate, since both panels must be exactly the same width and the center hinge must be perfectly aligned. But the result is worth the extra care.
What You Need:
- 1×3 or 1×4 lumber for both panel frames
- Vertical slats or dowels for infill
- White paint + primer
- 3 hinges minimum (1 center, 2 wall-mount side)
- Magnetic gate latch
- Measuring tape and level
- Pocket hole jig recommended
Pro Tip: Build both panels at the same time using the same measurements and the same jig setup. If you build one, then build the second separately, small measurement errors between them become very visible once installed.
📸 Photo credit: Instagram @rusticriley
7. Half-Door Style DIY Dog Gate
Best For: Standard interior doorways, kitchens, laundry rooms Difficulty Level: ⭐ Beginner Estimated Cost: $25–$60
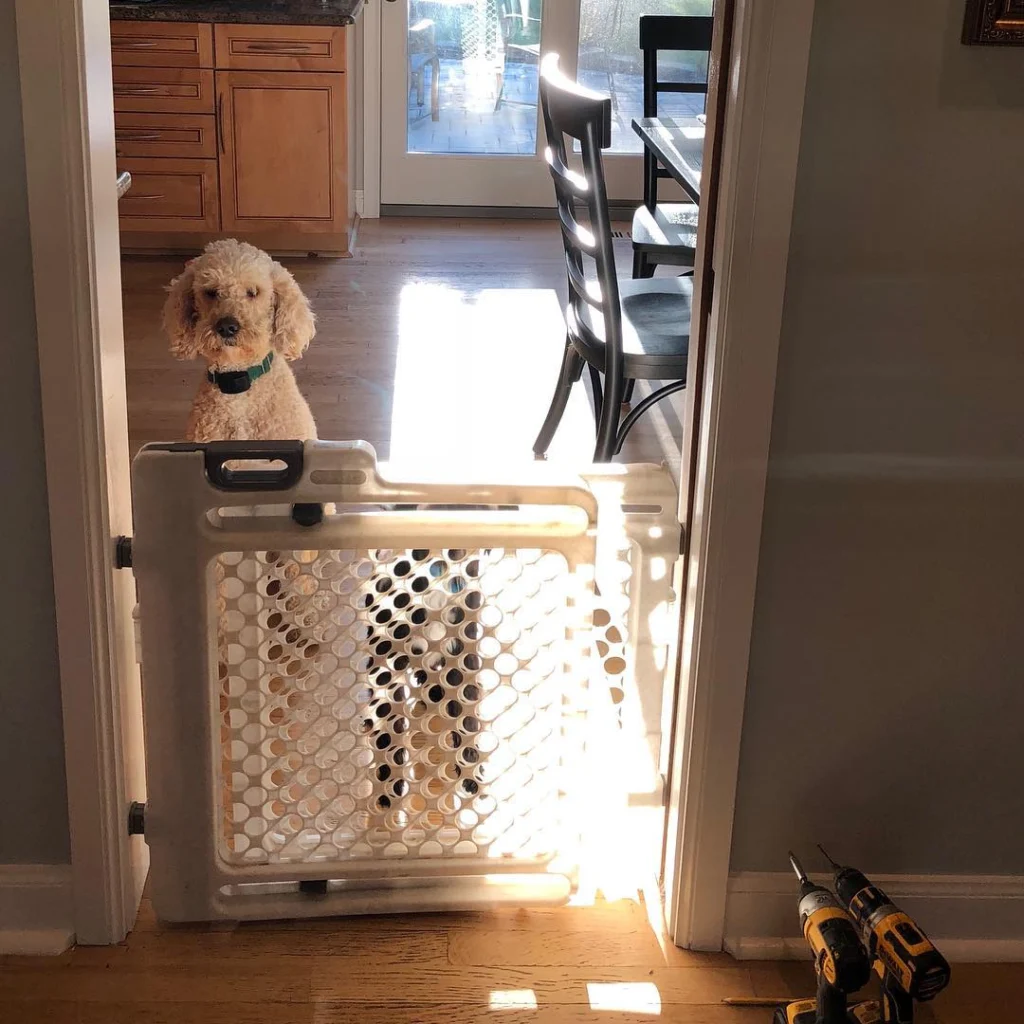
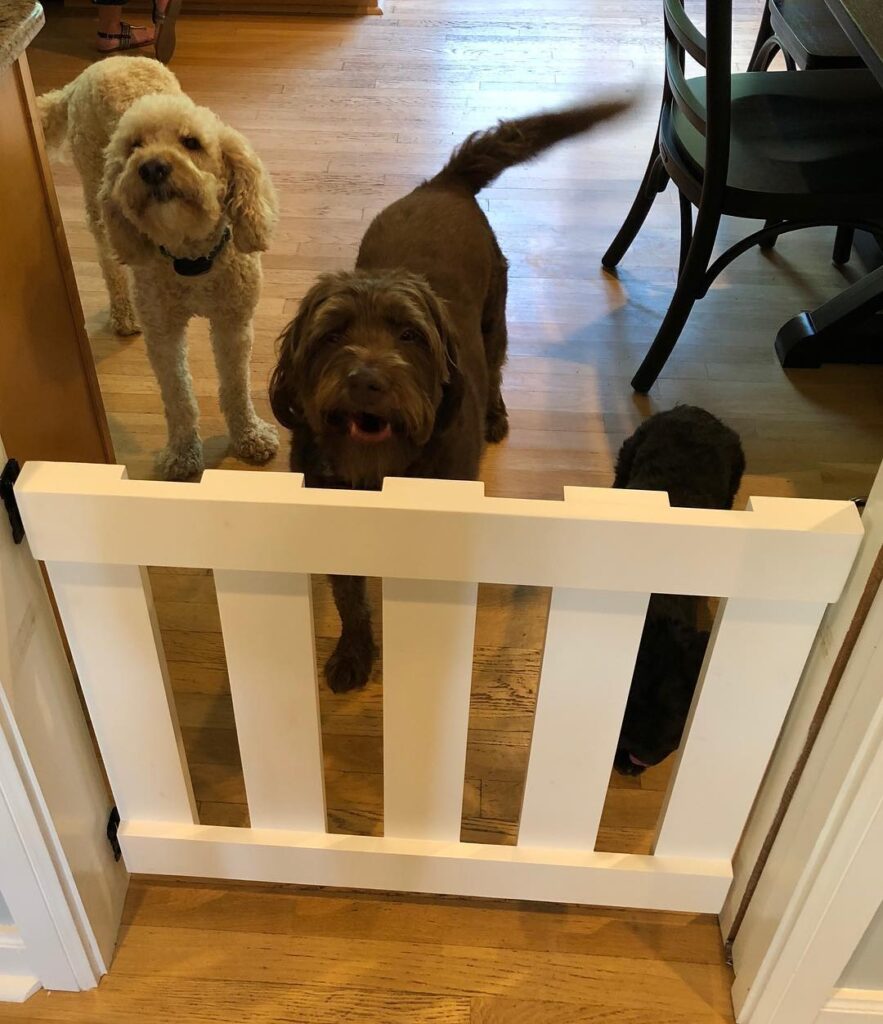
This is the easiest build on this entire list. If you have never built anything with wood before, start here. The half-door gate is essentially just the bottom half of a regular door — a rectangular frame with vertical slats — installed in a standard doorframe using two hinges.
The inspiration photo shows three dogs of different sizes (a Goldendoodle, a Labradoodle, and a smaller dark dog) looking over and through a simple white half-door gate. The gate has a thick flat top rail that the larger dogs can rest their paws and chins on, which — let’s be honest — is adorable.
The beauty of this design is its simplicity. You are working with straight cuts on square lumber. No angles, no fancy joints, no special tools required beyond a basic circular saw and a drill. You can build this in a Saturday morning and have it installed before lunch.
For the slats, you can use simple 1×2 pine strips or even wooden dowels purchased from any hardware store. Space them about 3–4 inches apart for visual openness while still keeping smaller dogs contained.
What You Need:
- 2×4 lumber for the outer frame
- 1×2 pine strips or 3/4-inch dowels for slats
- White paint (semi-gloss works best for durability)
- 2 heavy-duty door hinges
- Simple door latch or hook-and-eye closure
- Drill, screwdriver, and circular saw
- Wood filler for any gaps
Pro Tip: Cut your slats all at once using a stop block on your miter saw so every single slat is exactly the same length. Even spacing is what makes a simple gate look professional rather than rushed.
For more ways to set up your home for your dog, these puppy training tips are a great read alongside your gate build.
📸 Photo credit: Instagram @metrodetroitcraftsman
8. Thick-Slat Minimalist DIY Dog Gate
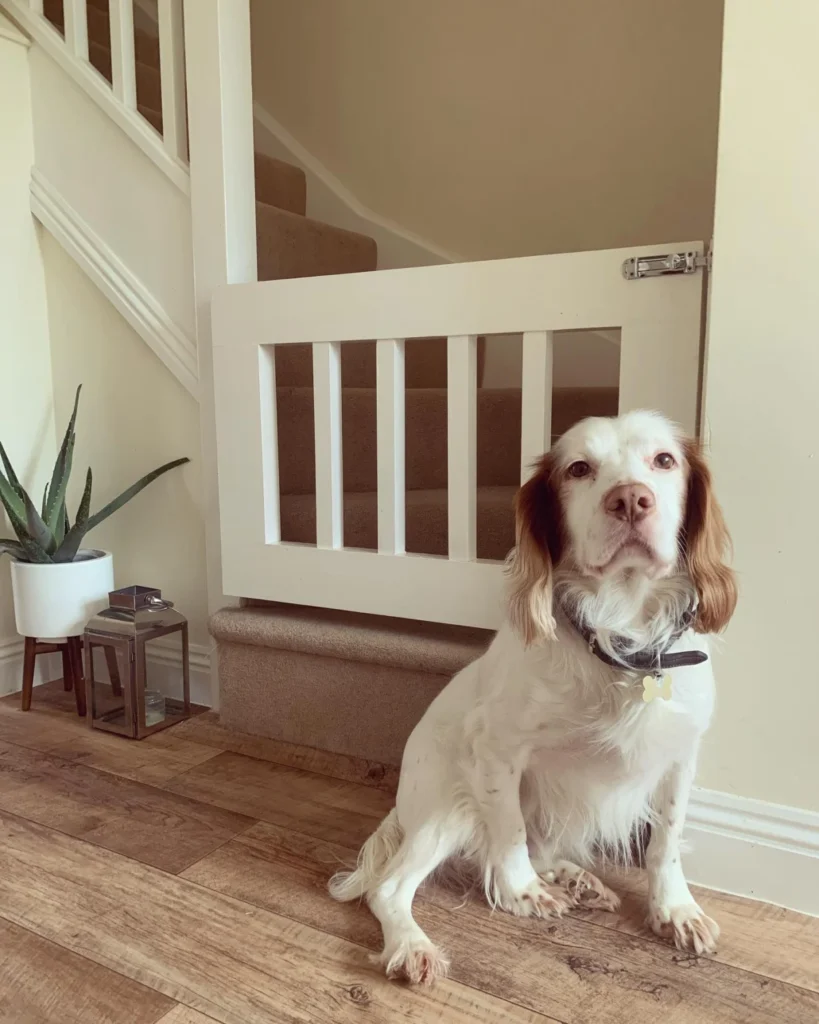
Best For: Minimalist, contemporary, or transitional interiors Difficulty Level: ⭐⭐ Beginner to Intermediate Estimated Cost: $35–$75
Sometimes less is more. The thick-slat minimalist gate takes the standard slatted gate design and makes one key change: it uses wider, thicker slats with more space between them. Instead of many thin slats packed closely together, you get fewer but chunkier slats that give the gate a substantial, architectural feel.
In the inspiration photo, this gate is installed flush into the stair opening — recessed rather than surface-mounted — which makes it look built-in and permanent. A beautiful white and brown Cocker Spaniel sits in front of it looking almost philosophical. The gate matches the white wall trim perfectly.
The wide spacing between slats is important to note: this works best for medium to large dogs. If you have a small puppy or a tiny breed, you may want to reduce the spacing or add a few extra slats. For bigger dogs, the bold, open look of widely-spaced thick slats is both beautiful and perfectly functional.
The inset/recessed mounting style shown in this inspiration requires a little more planning — you need to build the gate to fit the exact dimensions of your opening — but the result is far more polished than a surface-mounted gate.
What You Need:
- 2×4 lumber for frame
- 2×2 or 1×3 lumber for thick slats
- White exterior or interior paint (semi-gloss)
- Concealed or flush-mount hinges
- Magnetic gate catch
- Router (optional, for a clean rebated edge if doing inset mount)
- Level and clamps
Pro Tip: Sand the slats to 220-grit before painting to get a glass-smooth finish. With thick slats, any surface roughness is very noticeable. Two thin coats of paint always look better than one thick coat.
📸 Photo credit: Instagram @hunter_home
9. Freestanding Multi-Panel Playpen DIY Dog Gate
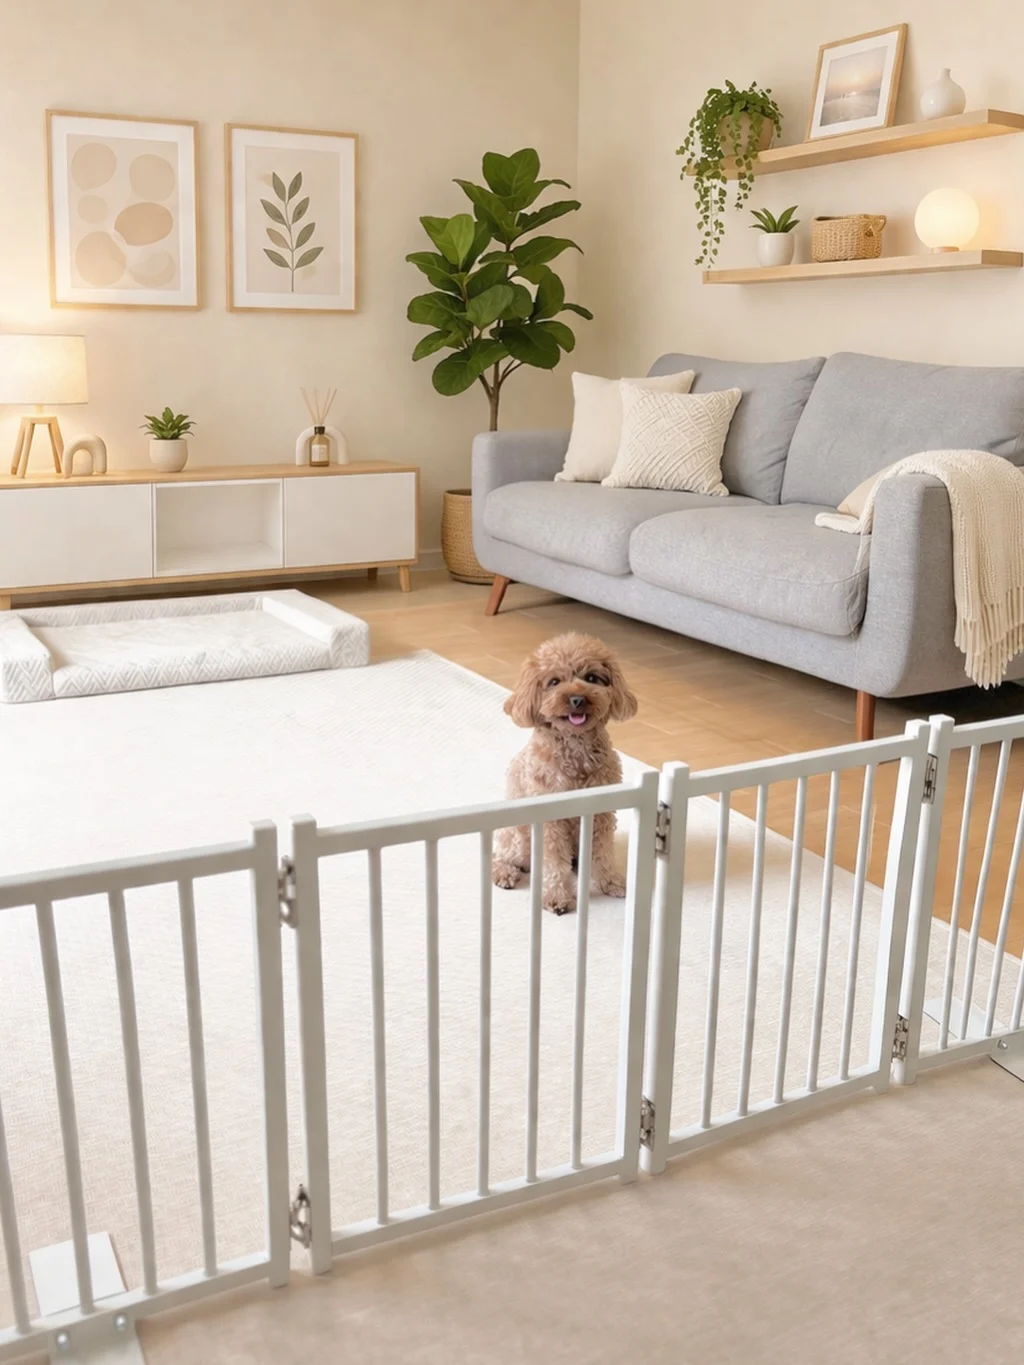
Best For: Renters, open-plan spaces, puppy containment zones Difficulty Level: ⭐⭐ Beginner Estimated Cost: $60–$130 (for full multi-panel set)
Here is the perfect solution for anyone who rents and cannot drill into walls, or anyone who wants a gate that can be moved around the house. The freestanding multi-panel playpen gate uses three or more hinged panels that fold together in a Z-shape or accordion configuration to stand on their own without any wall attachment.
In the inspiration photos, this design is shown in a Scandinavian-style living room — white panels with vertical slats, arranged to create an enclosed play zone for a fluffy toy poodle. In one photo the panels are configured as a barrier. In another, they are opened wider to create a larger playpen area. The flexibility is the whole point.
You can add as many panels as you need to cover a wider opening or create a larger playpen. More panels can be hinged together at any time. And when you need to store the gate, the whole thing folds flat and slides behind a sofa or into a closet.
Because this gate is freestanding, it relies on its own weight and the Z-shape configuration for stability. Use heavier lumber for the frames (at least 2×3) and make sure the hinges allow each panel to angle slightly rather than lying completely flat — this is what creates the self-supporting tension.
What You Need:
- 2×3 lumber for panel frames (per panel)
- 1×2 slats for infill
- White paint
- 3–4 panel hinges per connection point (that open both ways)
- Rubber feet pads for floor protection
- At least 3 panels minimum for stability
Pro Tip: Add a gate latch between the first and last panel so you can close the playpen into a complete enclosed circle. This is especially useful for puppies who need a fully enclosed safe zone.
📸 Photo credit: Instagram @chura_toypoo
10. Tri-Panel Freestanding Wire Mesh Gate
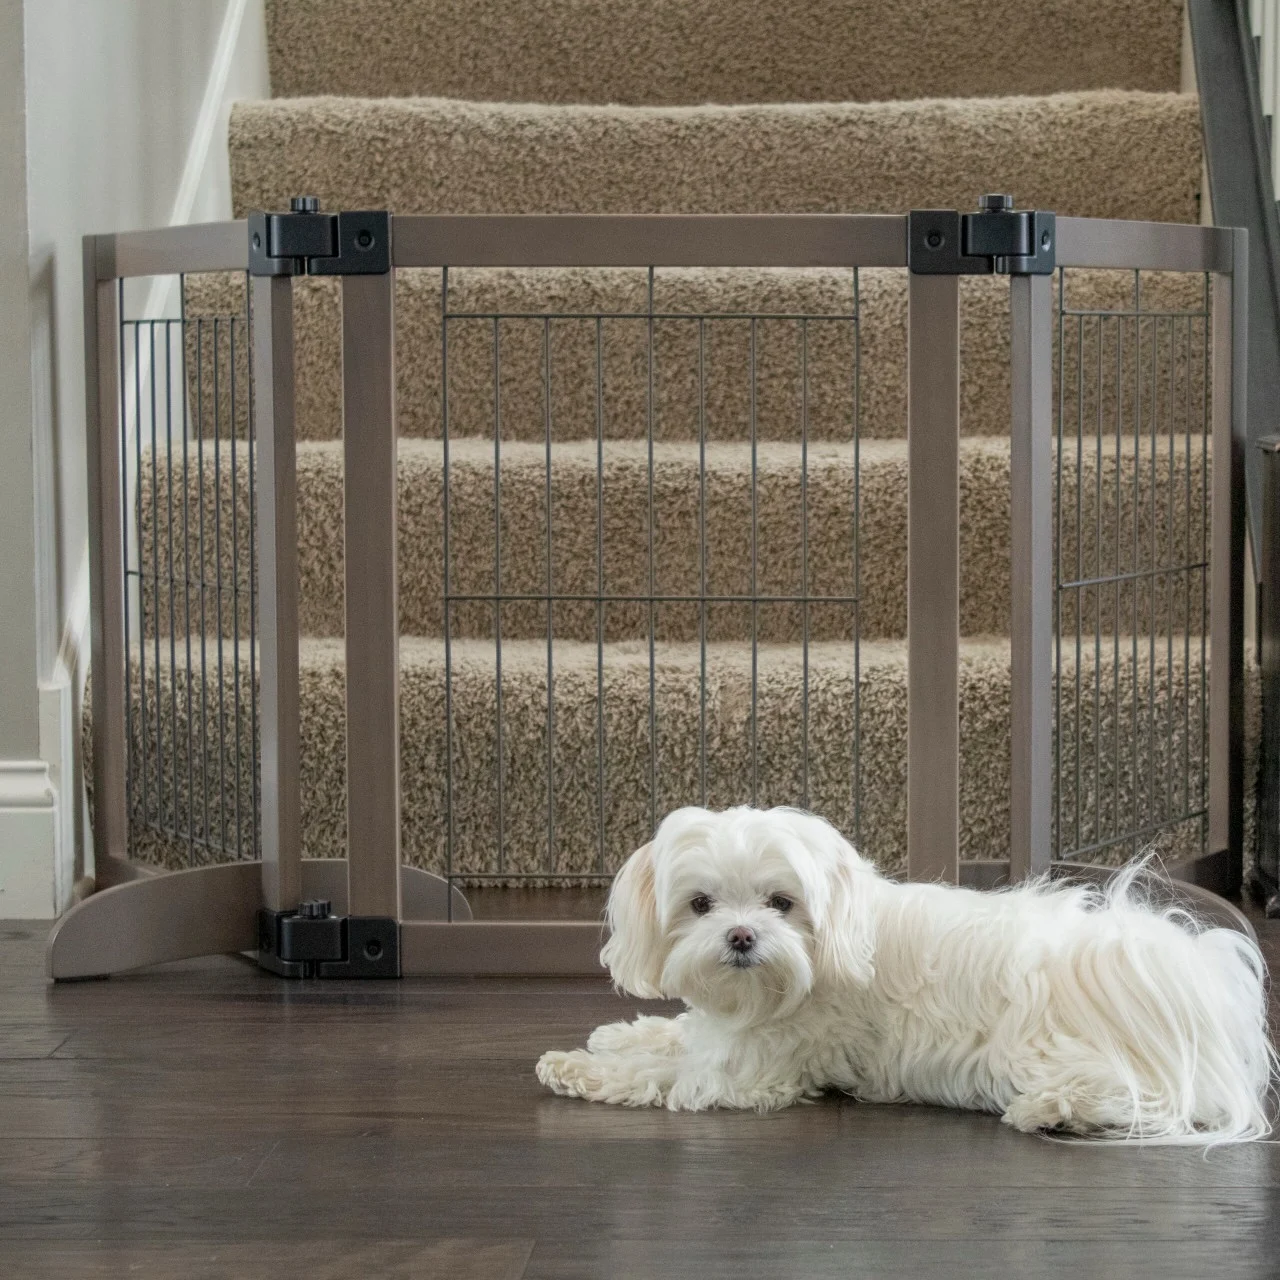
Best For: Pet owners who want visibility through the gate, bottom-of-stairs use Difficulty Level: ⭐⭐ Beginner Estimated Cost: $45–$90
This design takes the freestanding concept from the previous idea and adds a different material: wire mesh or steel hardware cloth instead of wooden slats. The result is a gate that is incredibly lightweight, very see-through, and extremely functional.
In the inspiration photo, a beautiful fluffy white Maltese lounges in front of a three-panel gate installed at the bottom of a carpeted staircase. The gate has a warm brown wood frame with grey wire mesh panels, and small rubber support feet to keep it stable on the hardwood floor. It looks understated but very purposeful.
Wire mesh infill has several advantages over wooden slats. It is cheaper (hardware cloth is sold by the roll at any hardware store). It is lighter weight. Dogs can see through it clearly, which reduces anxiety for some dogs who feel trapped when they can’t see you. And for chewers, wire mesh is much more difficult to damage than wooden slats.
The three-panel Z-shape design keeps the gate stable without any wall mounting. The key is making sure the outer two panels angle backward slightly from the center panel, creating a tripod-like base tension.
What You Need:
- 2×3 lumber for three panel frames
- Hardware cloth or welded wire mesh (1/2-inch or 1-inch openings)
- Staple gun and galvanized staples (to attach mesh to frame)
- Brown or black stain for the frame
- Heavy-duty panel hinges (bi-directional)
- Rubber feet pads
- Wire cutters and work gloves
Pro Tip: Fold the cut edges of the wire mesh over themselves before stapling to the frame. Raw wire mesh edges are sharp and could scratch your dog or catch on things. Folding the edge makes it smooth and safe.
📸 Photo credit: Instagram @northstatespet
11. Clear Acrylic Panel DIY Dog Gate
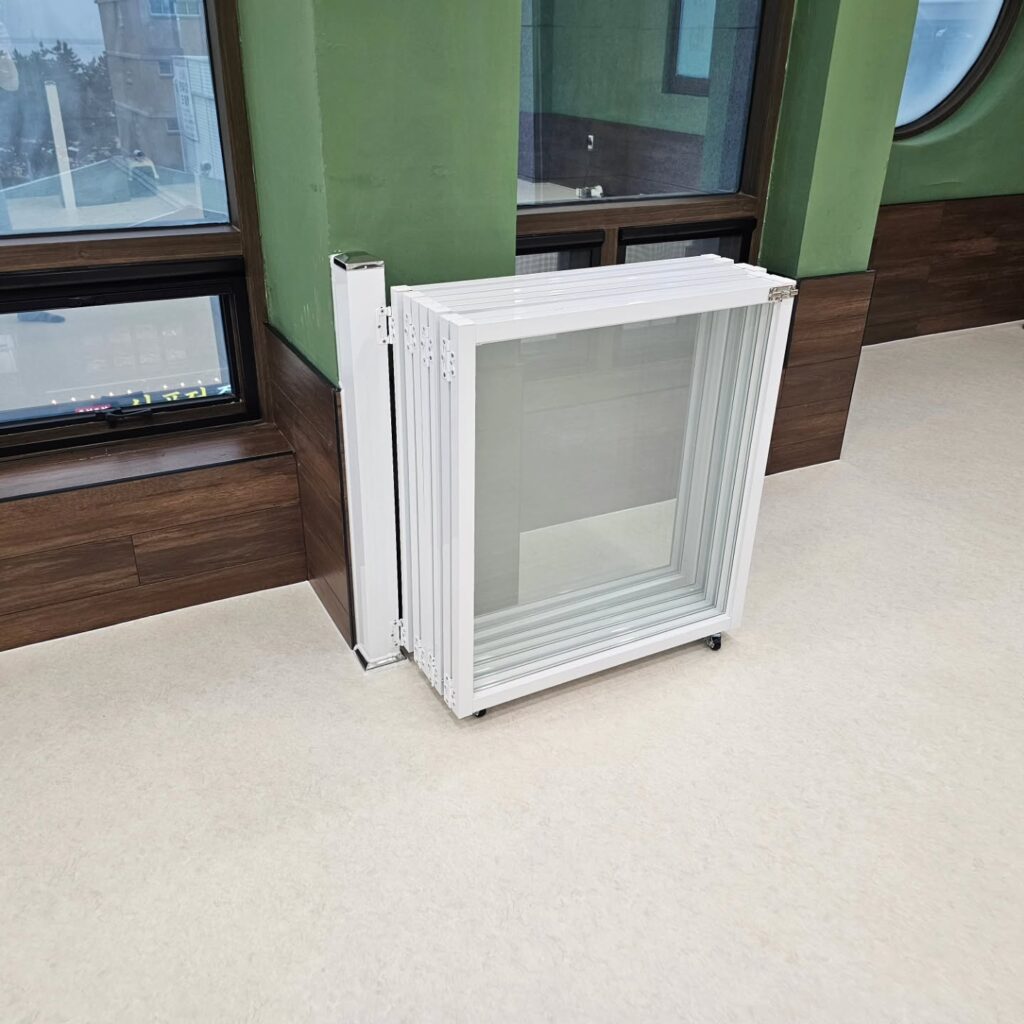
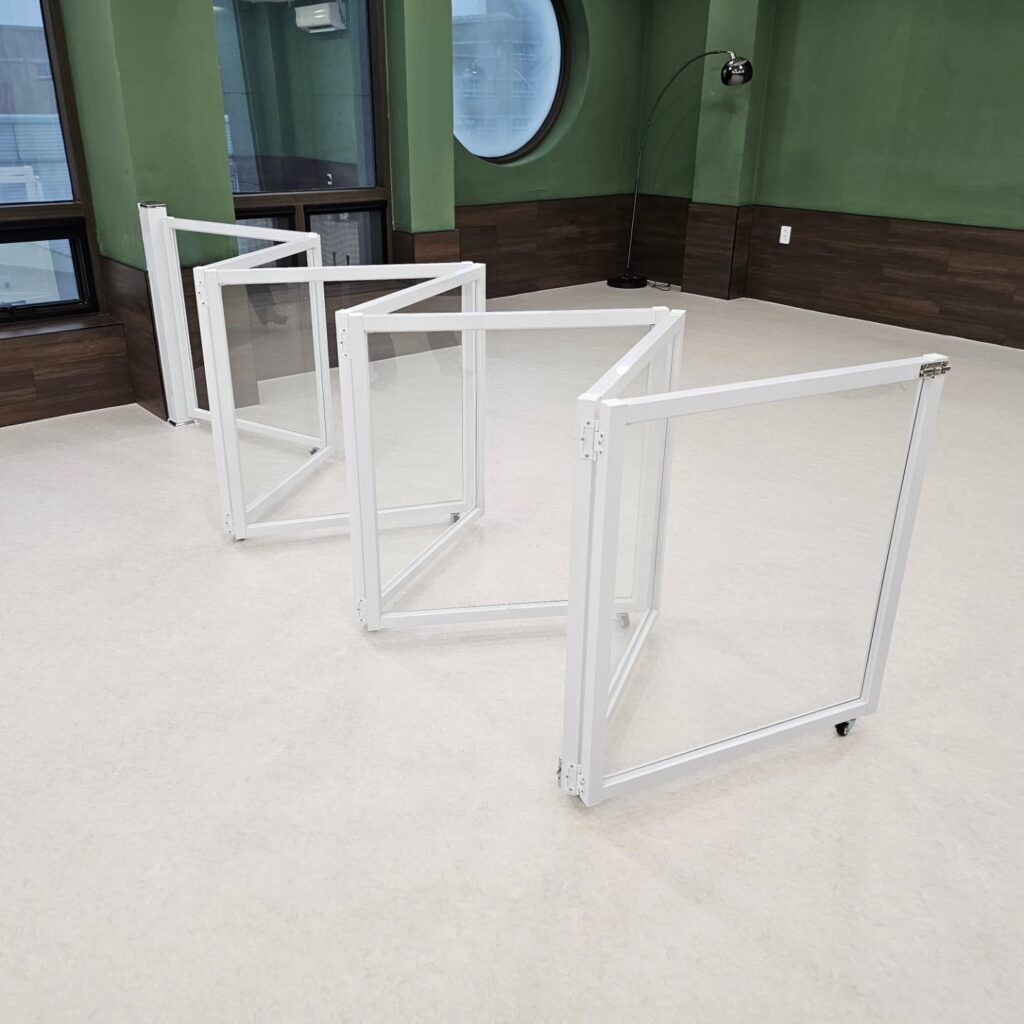
Best For: Ultra-modern homes, commercial pet spaces, maximalist visibility Difficulty Level: ⭐⭐⭐⭐ Advanced Estimated Cost: $120–$250
This is the most modern and futuristic design on the entire list. Instead of wood slats or wire mesh, the panel infill is clear acrylic or polycarbonate sheet — essentially a transparent wall. You can see completely through the gate as if it isn’t there, while still physically blocking your dog from passing.
The inspiration photos show this gate design in what appears to be a commercial pet facility — white aluminum frames with large clear acrylic panels, mounted on small caster wheels at the base so individual panels can slide and be repositioned. When the panels are extended into a line, they form a long transparent barrier across an entire room.
For a home DIY version, you would simplify this significantly. Build a basic rectangular wood frame (painted white), cut a sheet of 1/4-inch clear acrylic to fit inside the frame, and secure it with wood trim strips on both sides. Mount with standard door hinges and a latch.
The see-through design is particularly good for dogs with separation anxiety who need to see their owners to feel calm. It is also great for rooms where you want to maintain visual openness and light flow.
What You Need:
- 2×3 white-painted lumber frame
- 1/4-inch clear acrylic sheet (cut to size at hardware store)
- 1/2-inch wood trim strips (to sandwich the acrylic)
- White paint
- Standard door hinges
- Magnetic latch
- Circular saw with fine-tooth blade (for clean acrylic cuts)
- Clamps
Pro Tip: When cutting acrylic, keep the protective film on both sides until after all cuts are made. This prevents scratching. Use a fine-tooth blade and cut slowly. Score and snap method also works for straight cuts on thinner sheets.
📸 Photo credit: Instagram @petlife_best
12. Retractable Mesh DIY Dog Gate
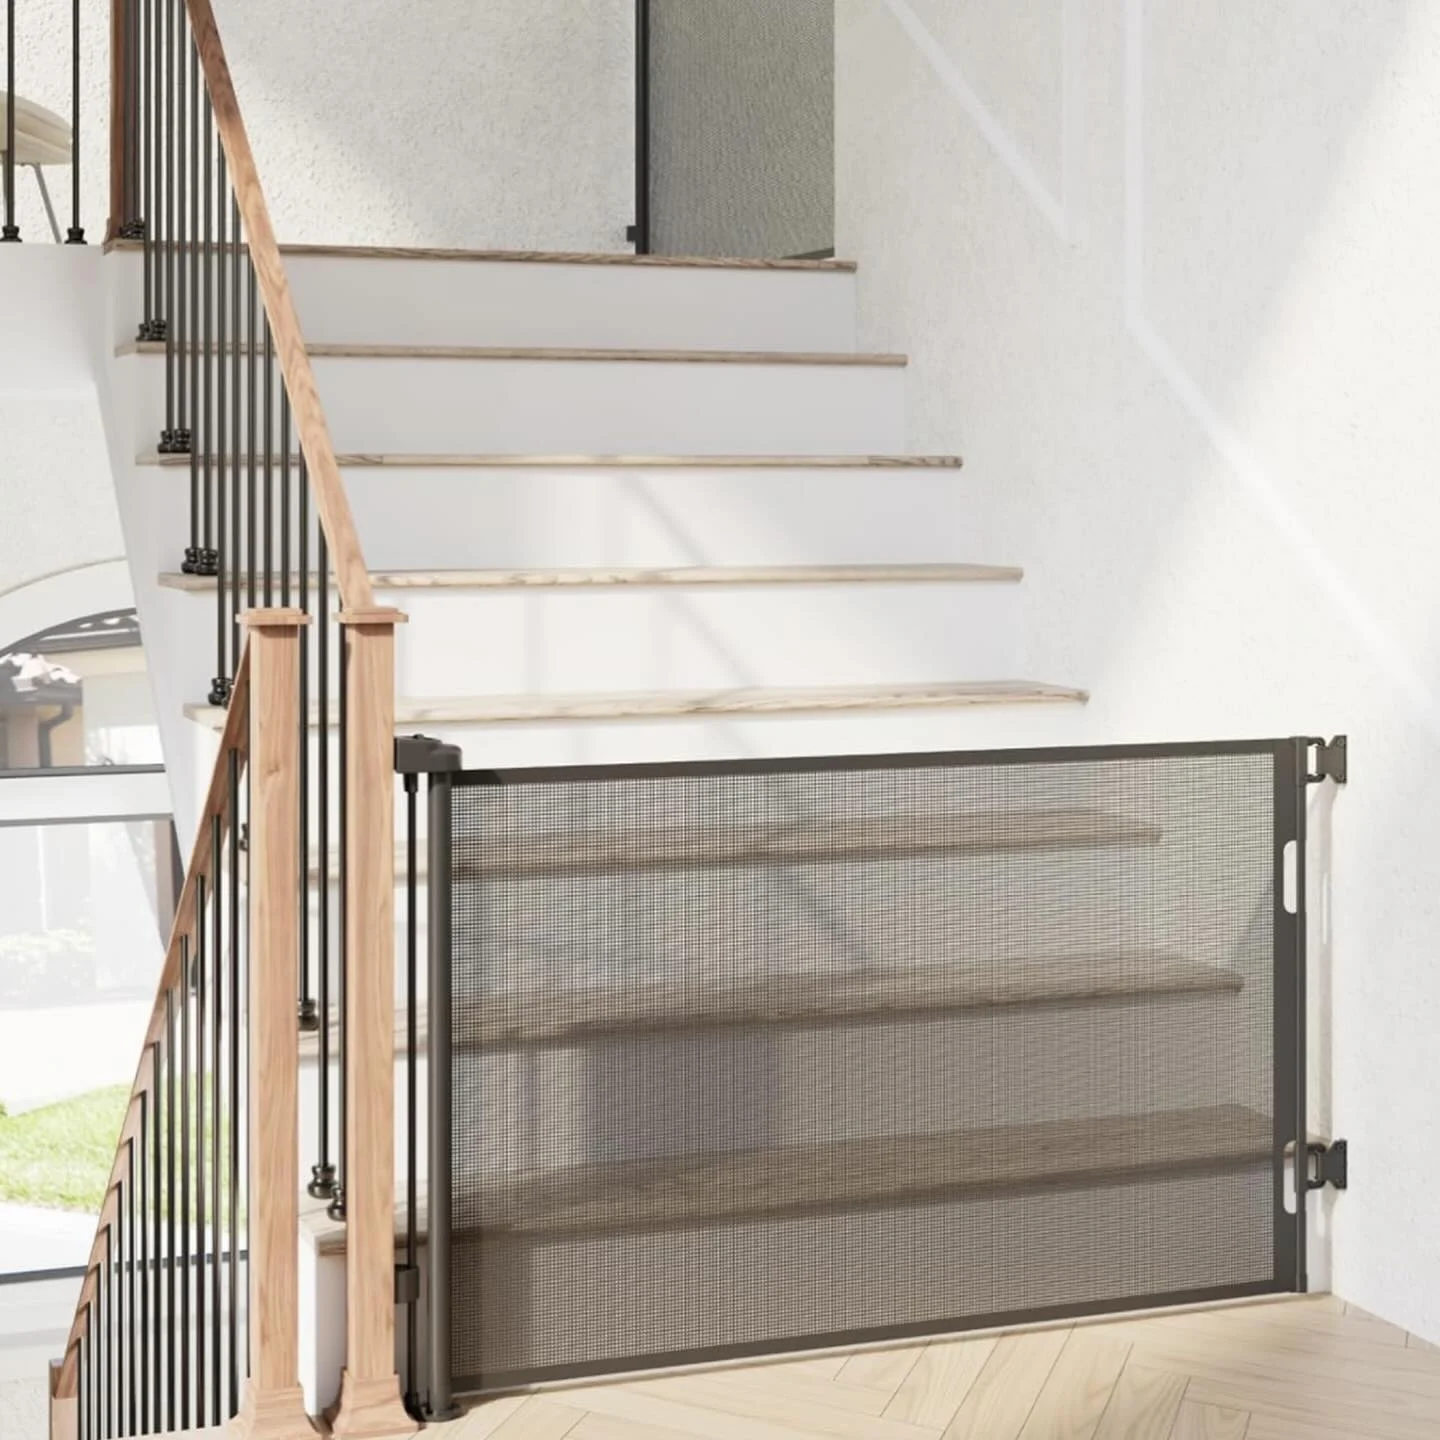
Best For: Stair tops, minimalist spaces where a permanent gate would feel bulky Difficulty Level: ⭐⭐⭐⭐ Advanced Estimated Cost: $80–$180
Imagine a dog gate that almost completely disappears when you don’t need it. That is exactly what the retractable mesh gate does. When open, the gate pulls out from a wall-mounted housing unit and locks into place on the opposite wall. When you no longer need it, it retracts back into the housing and essentially vanishes from view.
The inspiration photo shows a black mesh fabric gate at the top of a beautiful modern staircase — natural wood treads, black metal balusters, clean white walls. The gate stretches across the full opening between the banister and the wall, held in place by a latch on one side. You can barely see it. It keeps the staircase looking completely open and architectural.
For a DIY version, the key component is a retractable roll mechanism — similar to what is inside a retractable outdoor shade or roller blind. You mount the housing unit to one side of the doorway, attach your mesh fabric to the rolling mechanism, and install a receiver latch on the opposite wall.
This is the most mechanically complex build on this list, but the result — a gate that is invisible when not in use — is worth the extra effort for the right space.
What You Need:
- Retractable reel mechanism (hardware store or online)
- Heavy-duty mesh fabric or PVC-coated mesh
- Black or white aluminum channel housing
- Wall mounting screws and anchors
- Receiver latch with carabiner-style lock
- Drill and level
- Sewing machine or grommets (to finish mesh edges)
Pro Tip: Use PVC-coated polyester mesh rather than plain nylon mesh. It is much more resistant to dog scratching and clawing. And always mount the housing on the less-used side of the opening so the latch side is the one you interact with most.
📸 Photo credit: Instagram @bulldogwest38th
13. Outdoor Black Aluminum Patio Dog Gate
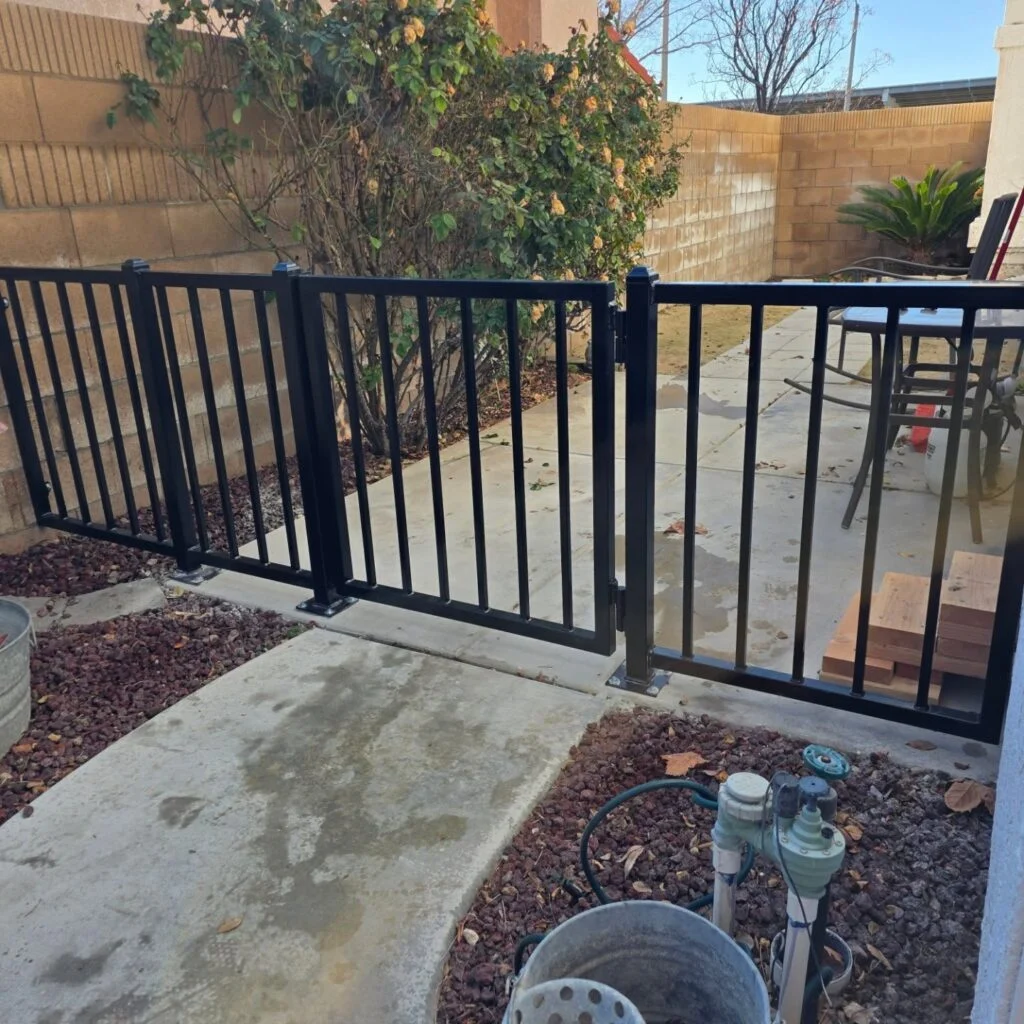
Best For: Backyard patios, pool areas, garden zones, outdoor dog containment Difficulty Level: ⭐⭐⭐ Intermediate Estimated Cost: $100–$250
Not all diy dog gates indoor ideas stay indoors. If you have an outdoor patio, garden, or pool area, a dedicated outdoor dog gate can define safe zones for your dog while keeping your outdoor space looking sharp. This idea steps outside the house — and it looks great doing it.
The inspiration photo shows a black powder-coated aluminum fence with a matching swing gate, floor-mounted with heavy base plates directly into a concrete patio surface. The fence separates a planted garden bed zone from the main patio area, and the gate allows easy human access while keeping the dogs contained.
For a DIY outdoor gate, aluminum is the best material choice. It doesn’t rust, it is lightweight, and a satin black powder coat finish looks excellent and lasts for years outdoors. You can purchase pre-cut aluminum square tubing from most metal supply stores and cut it with a metal chop saw or angle grinder.
Alternatively, you can achieve a similar look using standard square steel fence posts and pre-made aluminum fence panels, assembled and painted black — a much simpler approach that still delivers a professional result.
What You Need:
- Aluminum square tubing (1-inch or 1.5-inch)
- Aluminum flat bar for horizontal rails
- Black spray paint or powder coat (outdoor rated)
- Concrete anchor base plates (for freestanding posts)
- Heavy-duty outdoor gate hinges
- Self-closing gate latch
- Metal drill bits and metal chop saw or angle grinder
- Concrete anchors and epoxy
Pro Tip: Use a self-closing gate hinge rather than a standard hinge for your outdoor gate. Dogs are fast. A gate that automatically swings closed behind you prevents escapes when your hands are full of garden tools or groceries.
For more ways to set up outdoor spaces for your dog, these outdoor dog kennel ideas have excellent companion inspiration.
📸 Photo credit: Instagram @mendez_made_metalworks
14. Basic Pine Beginner DIY Dog Gate
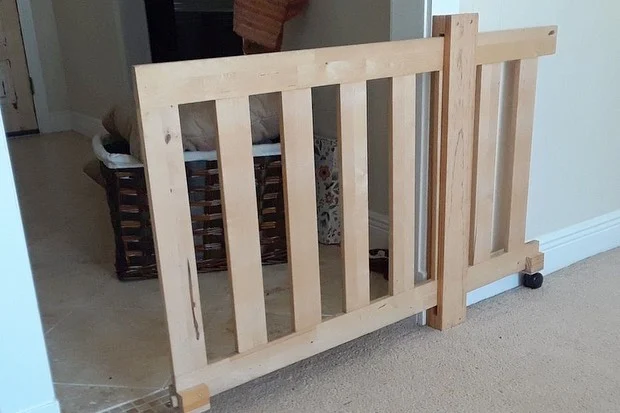
Best For: First-time builders, small budgets, any doorway Difficulty Level: ⭐ Beginner Estimated Cost: $15–$35
Every experienced woodworker started somewhere. This is where you start. The basic pine beginner gate is the most stripped-down, simple version of a DIY dog gate possible — and there is absolutely nothing wrong with that.
The inspiration photo shows a natural pine gate with a simple rectangular frame and a few vertical slats, leaning in a doorway. It is unfinished and unpainted — just raw wood showing its natural grain. It might look humble, but it is 100% functional and costs almost nothing to build.
The build couldn’t be simpler. Four pieces of lumber form the frame (two vertical sides, one top rail, one bottom rail). Several slats or dowels are secured vertically inside the frame using wood glue and screws. Two hinges attach it to the doorframe. A basic hook-and-eye closure keeps it shut. Done.
You can leave it natural as shown, apply a clear finish to bring out the pine grain, or paint it any color you choose. This is also a great gate to build first if you eventually want to upgrade to one of the more complex designs on this list — it teaches you the basics of measuring, cutting, and assembling a wood frame that apply to every other project here.
What You Need:
- Standard pine 2×3 or 2×4 lumber (for frame)
- 1×2 pine strips or 3/4-inch dowels for slats
- Wood glue
- 1.5-inch wood screws
- 2 standard door hinges
- Hook-and-eye latch
- Sandpaper (120-grit is enough)
- Basic drill
Pro Tip: Measure your doorway width three times before cutting your lumber. A gate that is even half an inch too wide won’t fit without forcing it, and half an inch too narrow will feel sloppy. Measure, write it down, measure again.
If you want to turn your basic gate build into a bigger project, explore these dog room in garage ideas to create a full dedicated dog zone in your home.
📸 Photo credit: Instagram @jennifervickco
How to Choose the Right DIY Dog Gate for Your Home
With 14 ideas in front of you, how do you pick the right one? Ask yourself these four questions:
1. What size is your dog? Small dogs need gates with narrow slat spacing (under 3 inches). Large dogs need taller gates and stronger materials. Puppies need fully enclosed configurations.
2. What is your skill level? Be honest with yourself. Start with ideas rated beginner (7, 8, 9, 10, 14) before attempting advanced builds. A well-built simple gate always beats a poorly-built complex one.
3. Where is the gate going? Staircase tops need wall-or-banister mounted gates with secure latches. Open-plan rooms suit freestanding multi-panel designs. Doorways work with almost any style. Outdoors needs weather-resistant materials.
4. What is your home’s style? Match the gate to your existing interior. Dark wood homes → craftsman or barn style. Light Scandinavian homes → natural oak or white freestanding. Modern contemporary → acrylic or retractable. Farmhouse → X-brace or black & brass.
Quick Material & Hardware Guide
Before you head to the hardware store, here is a quick reference:
Best wood for beginners: Pine — cheap, easy to cut, paints well Best wood for staining: Oak, ash, or poplar — takes stain evenly and beautifully Best paint finish: Semi-gloss or satin — easier to wipe clean from dog nose prints Best hinges for gates: Heavy-duty door hinges (not cabinet hinges — gates get more stress) Best latch for dogs: Bolt latch or barrel bolt — dogs cannot nudge these open like a simple hook-and-eye
If you want your gate to last years without needing repairs, do not skip the hardware quality. One set of good hinges costs $10–$15 and lasts indefinitely. Cheap hinges fail within months under daily gate use.
Conclusion
Building your own diy dog gates indoor is one of the most rewarding weekend projects a dog owner can take on. You get a gate that fits your exact space, matches your home’s style, and costs far less than buying a premium store-bought version. Most importantly, you get something to be genuinely proud of every single time you walk through it.
Whether you are a complete beginner starting with a basic pine gate this weekend, or an experienced woodworker ready to tackle the chevron pattern showstopper from idea number one — there is a project on this list that is exactly right for you and your home.
Pick your favorite idea, gather your materials, and go build something great. Your dog will appreciate the boundaries. Your home will appreciate the style.
Looking for more ways to set up the perfect home for your dog? Check out these dog feeding station ideas to keep mealtime organized and stylish.

Izzy is an experienced ranch worker who has a passion for exploring nature and getting up close to wildlife. With her connections to various animal organizations, Izzy is well-versed in animal care and rehabilitation.


